Follow, Share
At X - @zeootrAt YouTube(Google) - @gamedev_libgdx
At TikTok - @gamedev.zeootr.com
If you have completed our Android App tutorials, then you are most likely on your way to making some nice looking apps. Android for mobile app development is a continuous journey, with additional features, functions, and improvements being added with each new platform release. Whether you code apps for business and profit, or just a hobby, you'll never lack for new things to code and learn.
Mobile Game Development will be our next category for tutorials, Game Dev with the LibGDX engine framework for Android. And, just like our Mobile App Android Tutorials(non game), we shall first learn small bits of coding; all the intricate pieces of the gaming app, and then from those tutorials, we will piece together our first Android Mobile Game App using the LibGDX framework(engine).
In this, our first Game Dev article, we discuss the general aspects of Game Dev, including its popularity, gaming engines, and the features and game types that can be developed from those engines.
Libgdx with Android For Game Dev
Browse all Game Dev Tutorials from our Blog
What is Libgdx?
For our GameDev tutorials, we are using the LibGDX framework (engine), which uses the OpenGL that works on Android, Windows, Linux, macOS, iOS, and a browser. So it is a cross platform java game dev framework. With Libgdx, you have the freedom to create your game your way, as LibGDX does not make you adhere to a specific coding style or design. LibGDX has unrestricted usage for commercial and non commercial projects. So, you won't need to pay any licensing fees or royalties once your game makes it to the big time. The LibGDX developers would appreciate a credit(non monetary) given to them upon release of your game, but it's not something you must do.
With LibGDX, all rendering in your game is done with the Open GL ES 2.0/3.0. LibGDX also includes a sleuth of libraries and frameworks that are tried and true. There is documentation available at the LibGDX website, the Discord community, at LibGDX wiki, and many good tutorials online for basic components of game development with libGDX. There are several IDE's you can use to develop your Game Apps, some for mobile, and some for Desktop, and with LibGDX, you can use Desktop(Windows) and also target Android, iOS, and others.
LibGDX works with intelliJ IDEA, Eclipse, NetBeans, Jenkins, Gradle.
And, to deploy your game, you can use any of these platforms; Windows, Linux, Android, iOS, Mac OS X.
Libgdx With AIDE and Android Studio For Making Game Apps
Android Studio is a Google created IDE for making non game mobile Android apps. However, by using Libgdx and Android Studio together, you can also create Android mobile game apps with Android Studio. Bascially, you have to add the Libgdx interface to Android Studio, and then you can begin to develop your mobile game apps. Libgdx has a setup guide you can follow to integrate the Libgdx into Android Studio, and they have a game tutorial you can practice coding. However, if you have never coded before our game dev tutorials would be a good place to start learning the basics.
To integrate Libgdx with Android Studio, you can follow this link. Just click to continue at the bottom of each page to complete the setup and then practice coding with the game tutorial. Do install Android Studio before installing Libgdx and completing the Libgdx setup.
Libgdx Project Info- Setup Guide
Android Studio follows the same logic as AIDE, in that you will first create a 'template' single activity app, and then you only need to add/update your game code as you want.
AIDE is a mobile application you can install on your smartphone or tablet. You use it to code apps; mobile apps, and mobile game apps. It is compatible with Android. For our Android Game App development tutorials with Libgdx, we are using AIDE as our IDE, (integrated development environment). AIDE uses Gradle. Gradle is a dependency management system, and Gradle is also a build system helping with building and packaging your application, without being tied to a specific IDE.
So, we are using AIDE, as our integrated development environment, with Gradle and LibGDX, to make our game apps on the Android platform. This is how we are going to create our mobile games for smartphones and tablets.
With AIDE, we can use a mobile game Template, to create each mobile game screen. The process is similar with Android Studio. With AIDE, Libgdx is already included, so we don't have to integrate Libgdx into our app code setup. Android Studio does not have Libgdx integrated, so we have to integrate them together, and then we can create our Template game screen. AIDE and Android Studio, both use Gradle, a build system used to manage and automate the build process for Android mobile apps. This includes dependencies, and creating the apk file for the final app build.
Creating Mobile Game with AIDE
For these game dev tutorials, we are again using AIDE, as AIDE has a 'New Mobile Game'(libGDX/java) template available that follows the same logic as the one we used for our basic non game Android tutorials - 'New Android App' (Java/XML). This is ideal for coding with a mobile smartphone or tablet as AIDE can be installed on either. If you have AIDE installed on your smartphone or tablet, then you can follow along with these tutorials. The code is Java/xml, so you can also use any other mobile IDE or Desktop IDE that supports Libgdx. To download and use the Free version of AIDE, gohere, and, for info on coding with AIDE, free version.
Once you have AIDE installed you can create your first 'Mobile Game Template' app. From that, we will tweak it and learn the different classes, methods, and elements of Mobile Game Dev for Android.
These game dev tutorials assume you have at least some basic knowledge of using an Integrated Development Environment for Java/xml programming language, and or have completed some or all of our non game Android Tutorials, although you can learn without knowing either.
This Tutorial
For our first tutorial, we will learn about some of the android screens necessary in creating a mobile game app, and create a new simple game example from a game template using AIDE. This is not a fully functional game but a game screen introduction with an image being displayed. To note: screens and code would be the same if coding with Android Studio; so you can copy and paste these codes into Android Studio to create a mobile game app, once you have integrated Libgdx with Android Studio. The 'folder hierachy' in Android Studio, is on the left menu pane, where you can easily click to view the various folders and files.
And, we will also learn about the folder hierachy used in game dev; and where to store your images for a simple android game app. And, we conclude by mentioning the role of 'import statements' in your game dev code.
These game dev tutorials will follow a rather slow learning curve, with lots of images to showcase the coding experience.
Working With AIDE for Mobile Game Coding If you have AIDE installed on your smartphone or tablet, you can follow along with these instructions:
You must get to the coding section in AIDE. To Open AIDE, simply click on the APP'S icon once you have it installed on your android device. Usually when you first open AIDE, it goes to a blank screen as shown here, or the last screen you were working on.
It may seem a tad daunting at first glance to navigate around AIDE, because there are many sections and categories in AIDE, including built in tutorials(paid and some free). Your screen should look like this next image, where you see the dots in the top right corner, and the half screen with files hierachy on the bottom half, and the 'Create New Project' selection.
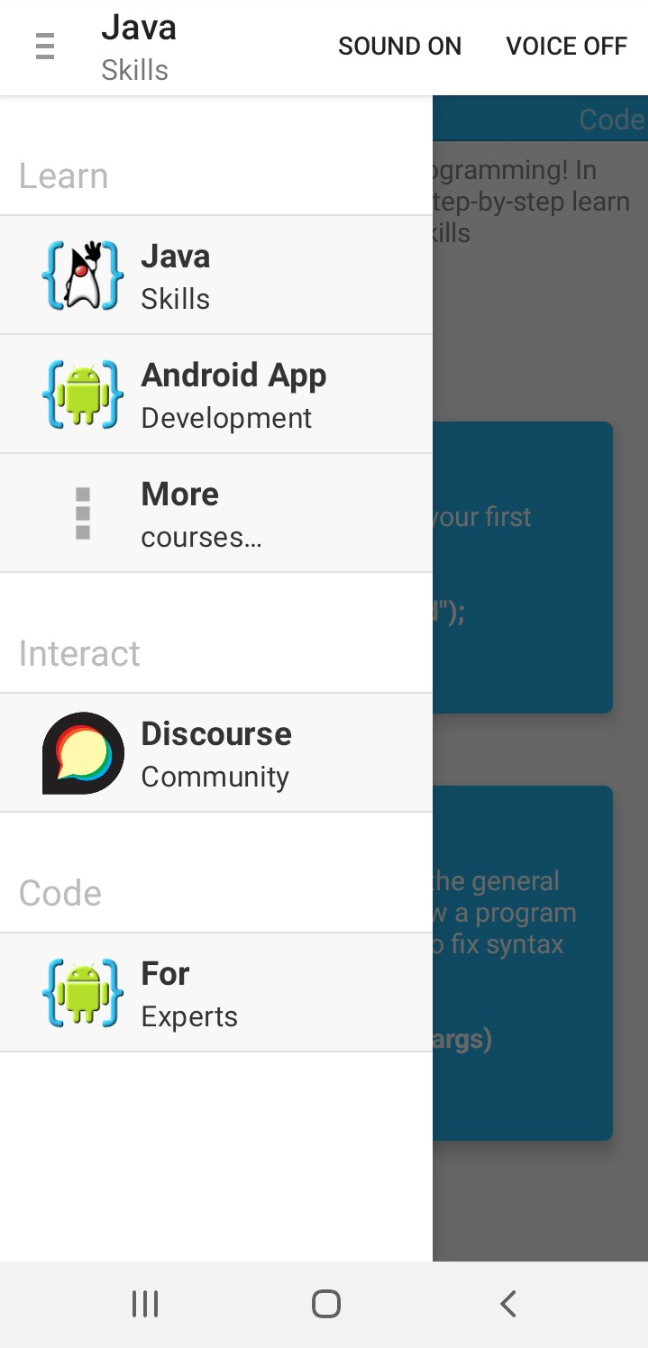
If you don't see this when you open AIDE, just do the following to get to this screen. From top right in AIDE, select the dots as shown in this image;

Next, select 'Learn', as shown in this image

Now, just select the 'For Experts' at the CODE section, bottom of menu(menu populates from the left(usually). Clicking on 'For Experts', takes you to the coding editor in AIDE.
Lastly, select the top dots again, then 'View', then, 'File', and then select 'Create New Project', making sure you see /storage/emulated/0/AppProjects across the top of the file Hierachy; like shown in these images; this means your at the proper directory for creating the new app folder name. Alternatively, you can select the round blue floating button, at bottom right of your screen; this populates the bottom half of your screen with the app project hierachy folders, then you can select the 'Create New Project', selection.
Now that we are at the AIDE coding editor, we create our game app with the template provided in AIDE. To do this, click the Mobile Game, then New Mobile Game from the selections.


Next, add a Name and Package name for your game app.
For this tutorial, we named our game app, MyGame. For the package name we used com.aac.game_app_example; usually you use com. then your domain name if you have one, and then whatever name you like for the app itself. I just use aac, for androidappcoding(FYI: Our androidappcoding.com website is now at gamedev.zeootr.com).
To Note; You cannot change the app package name once created, but you can change the app name from the app name folder in your AppProjects in AIDE. Also, for the app name, there can be no spaces in the name when creating it, however, once created, you can goto the app project name at the file hierachy and select it and then rename it to add spaces. For example, this tutorial app name - 'MyGame', i could change it to 'My Game'.
Next, click the 'Create' button to create your new game app from the template. This next image shows the app, (the app screen), a white screen with the android icon added at the bottom of the screen.

Our new app name, MyGame is added to the AppProjects folder which you can see in the file hierachy in AIDE as shown in these next images, and it is also viewable from your devices File Manager.

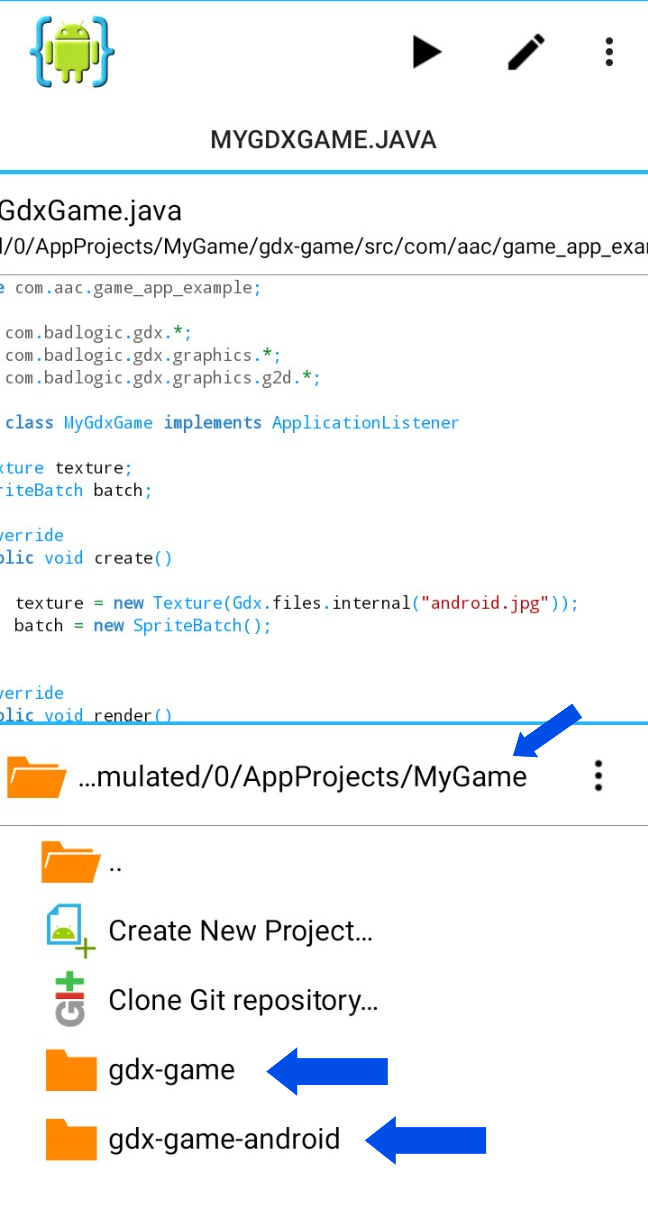
When we click on 'My Game', we see another set of folders and what folders are important here are: gdx-game, and gdx-game-android. These are the folders that have the games's java class (gdx-game) with MyGdxGame.java, and the folder (gdx-game-android) for android files like main.xml, MainActivity.java, strings.xml, and the game assets folder also. More on this later.
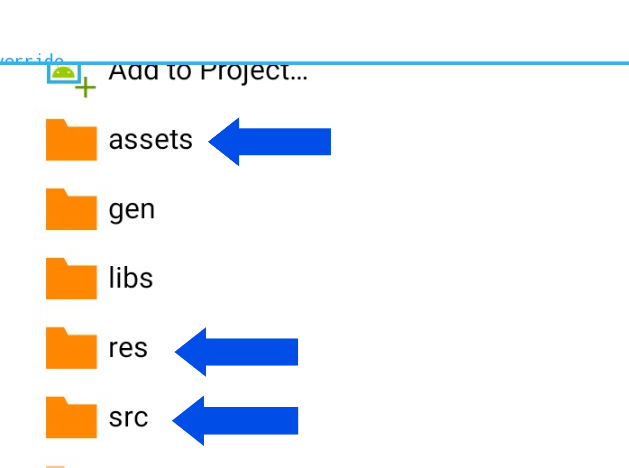
In this next image, we see the folders within the gdx-game-android folder.
The folder most important here is the assets folder, because that is where we put our game images. Seems odd that they don't go in the gdx-game folder but instead here. The other folders res, and src contain the xml and android java class file like MainActivity.java, which as we explained, we don't really use in a game app, except to launch our game app first screen. And, outside of these mentioned folders is the 'androidmanifest.xml' file. This is also important as you can make changes to your app in this code.
At 'androidmanifest.xml', you can add a customized app icon, add app permissions, tweak app controls for keyboards and the like, and of course, for a non game app, this is where you would add code for any additional classes your adding to your app(new screens). SDK targets are also set in this file for both game and non game apps. Because we're using a template for our game app screens, these have already been set for us, so for now, we just need to know where the file is in the AppProject hierachy.

The 'gdx-game-android' folder has:
Assets
res
src
folders,
Mobile Game App Screens

From our image we see the src folder also. As mentioned, the MainActivity class (MainActivity.java), is the first executable code page in the app. For regular Android apps it is the page where all code is executed from and its' job is to activate the first screen in your app usually an xml screen(a layout screen), basically to open the first screen of an app.
For a Game App its' role is the same but yet not the same. Although it does make sure the first screen in the game app is opened, it does not do anything else because the screen it populates the MyGdxGame.java, then becomes the most important screen in your game app. For a game app, most all coding can be done on only one particular screen, that is the MyGdxGame.java class.
MainActivity.java screen

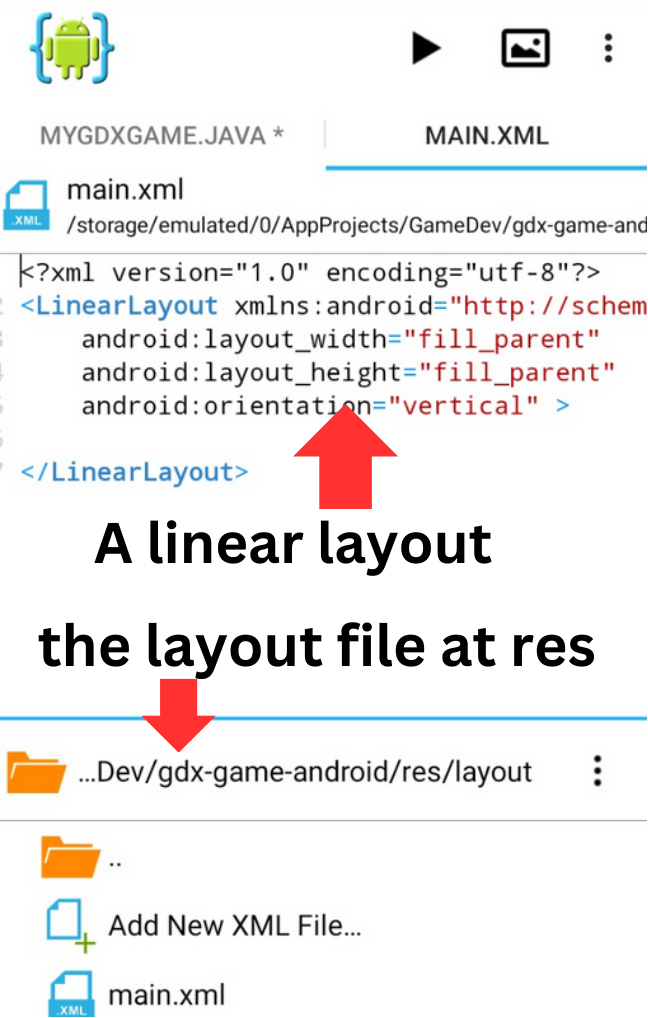
Next, we see the 'res' folder. This is where we keep our layout files in a regular Android app, but with game app we do not use it for that. But like the MainActivity.java, it is required only to get the game populated.

Main.xml screen

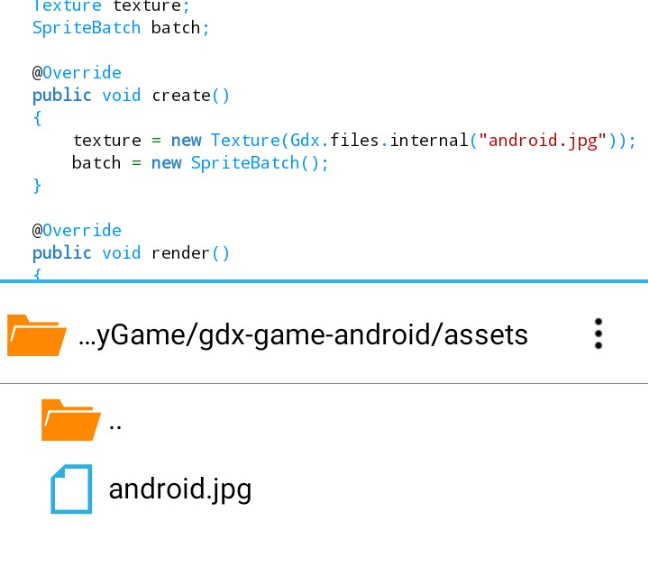
Next folder in the 'gdx-game-android' folder is the Assets folder. This folder is very important for our game dev. This is where we put our images, and our fonts for the game. From programming Android apps in AIDE you are familiar with images in the drawable-hdpi folder, but with Android game dev they don't go in the drawable-hdpi type folders, now they go in the assets folder. And, fonts for our game as well. Fonts in game dev is a big topic unto itself. We shall discuss that in a later tutorial. So images to the assets folder only at gdx-game-android. For our template game app, the assets folder contains the image: android.jpg. This is the default image used in AIDE for the template game app, as shown in this next image.
at folder
gdx-game
MyGdxGame.java screen
The gdx-game folder has the java class for the game, the first and most important game screen - which is named; MyGdxGame.java. For small games you will probably code everything on this one java class page. This page was created for us by the MainActivity.java, when the app starts. Basically, the MainActivity class passes along the configurations(extends Android Application) that create this game class: MyGdxGame.java.
FYI: java class, class, java screen, java page, all refer to the same thing that being a .java created page or screen in your app code, in this case the; MyGdxGame.java

In this next image, we see some basic coding for the MyGdxGame.java, with an image added. Images can be added in several ways with libGDX game dev, but the simplest is with the basic texture method code, and a Spritebatch to draw it, as shown here.
To add an image we first declare them as a variable like: Texture texture, and then at create we add:
'texture = new Texture(Gdx.files.internal("android.png")', Gdx.files.internal; this tells where to find the image, which means to look in the Assets folder in the gdx-game-android folder.
The image itself is added to the assets folder at the 'gdx-game-android' folder as seen in the image. To actually add the image you must use your device File Manager to copy/paste or move it from wherever to the AppProjects/MyGame/gdx-game-android/assets folder. You cannot use AIDE to add images or videos to the 'asset' folder. However, in the AIDE coding editor, you can create, delete, and rename files or folders, and of course, create new projects which is a new app.
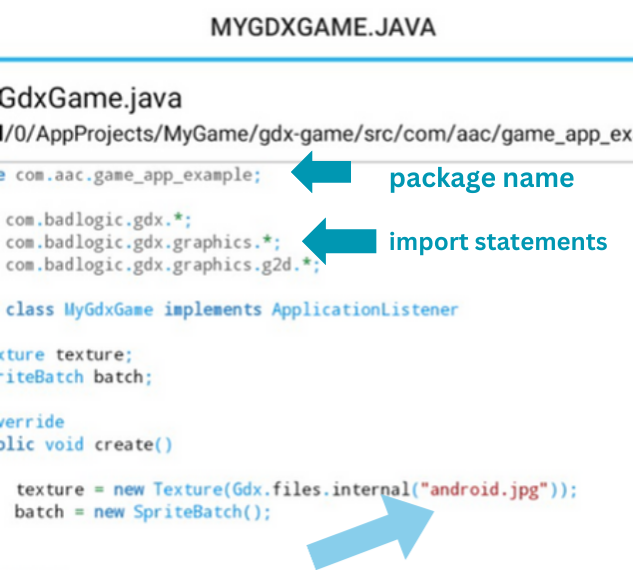
Imports
In this same image, you can see the game app 'package name' at the top of the screen, and then the import statements are shown, Badlogic is the commonly used import statement library for gamedev.
There are a lot of import statements for game dev, almost everything you add to code has an import statement you must add for it. And, they all get added to the top of the page like this, just after the package name. It doesn't matter what order you place them, just as long as you add them. Without adding them, you will get a runtime error, and your app code will not build.
Compile App Code, Build Game App
Each time we create a mobile game app with the AIDE template game app, we must then RUN the app to have it install the APP ICON on our smart phone or tablet. Then we just click the icon to open the app, similar to other apps on your phone. All mobile IDEs work in this manner.So, when we do updates to our code or create a new template game app, as we are doing in our game dev tutorials, we must RUN the app after each update so the new information is processed into the app build, and then it displays once we open our game app by clicking on the app icon. Since we have not yet added a customized app icon, the default little green android icon will be shown, with the app name in text under the icon. 'MyGame' is the text that shows for the app we are now working with.
Once you've completed adding your app code in AIDE, or your preferred mobile IDE for Java, you can then compile the code to build your game app. To RUN the app code, you click the little arrow atop the coding editor as shown in this next image. A display message will appear if you're using the free version of AIDE, as shown here also. To continue using AIDE for free, just click the 'continue for free' selection. Otherwise, click the selection to purchase AIDE.
To Note: If you had purchased AIDE, you can install it on subsequent smart phones you upgrade to; you just need the original email you purchased it with from Google Play. Then you can log in to Google Play, and in your account, you just select the AIDE app, from the 'not installed' list, to install it on your new phone.

FYI:
Build Error
When we have a file open in our AIDE coding editor, the file name appears at the top of the coding editor, similar to having tabs open in Windows.
When running your app code (clicking the little black arrow atop the editor page, shown in this next image) you might encounter an error that reads as shown in this next image: 'There is no main method to run in this project'.
If so, just click 'OK' to close the error message, then, you must open the MainActivity.java file, from your 'gdx-game-android' file hierachy. To do so, click on your app Project name, then 'gdx-game-android', 'src', 'MainActivity.java", to open the file.

Once,you open the MainActivity.java, just click to RUN your code again, and it should build without isssue. This next image shows both the 'mygdxgame.java', and 'MainActivity.java' tabs.
To learn more about handling common errors in AIDE, Read our article.

Settings in AIDE
To get to the settings in AIDE, simply select the dots at the top right of the coding editor then select, MORE, then, SETTINGS, as shown in this next image.
The settings in AIDE allow you to adjust a variety of things, including AUTO SAVE; saving your work at certain increments as you code. Just select the AUTOSAVE, then, just select your time interval. And, at the BUILD RUN setting, you can make sure it is selected which it usually is by default. This feature allows your app code to RUN/compile by simply clicking the little black arrow atop the coding editor.
AIDE can also connect with DROPBOX, and GITHUB, for your coding projects. However, these settings aren't necessary, and are settings you can incorporate as you learn more about Android app coding.

In Summary
The Android game app can easily be created in AIDE or your preferred mobile IDE for Java coding language, and, can also be coded in Android Studio(must add the Libgdx interface to create the game app). This template game app gives a very basic game screen layout with one image added. By adding a variety of coding methods to our template game screen, we can learn the basics of coding a game app with libgdx. Then, once we know the basics, we can implement additional game screen types and game components to enhance our game play.
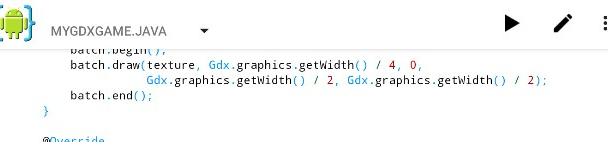
In this first game dev tutorial, we implemented the basic method to add an image to code in the MyGdxGame.java class. All images you add must be first declared (create variables), then added to the 'create method'(create an instance of), and then 'rendered'(draw to the game screen) with the render method.
Each Android game app has two important folders from the AppProject-game name folder; those being - gdx-game, and gdx-game-android. Gdx-game is where your main game screen code is coded; at MyGdxGame.java; and the gdx-game-android folder has several sub folders but the most important one is the 'assets' folder. This is where we add our game images, fonts, and videos.
A game app is built(run/compiled) the same as a regular Android app in AIDE. You just select the little arrow at the top of AIDE to run the code. Once the game builds, you can see the changes/updates by selecting the game icon. Make sure to save your screen code before running your app. Goto settings in AIDE to select AUTOSAVE, it is usually selected On by default. This makes all changes you make save automatically.
Read Also: About Game Dev
EXAMPLE CODE - From This Tutorial, This is a Component Tutorial