
Libgdx with Android For Game Dev
Game Dev Tutorial : ImageButton Stage
Game Dev -All Game Dev Tutorials
An ImageButton can be created with the Scene2d of Libgdx. First we add the texture that will be our imageButton in this case, our .png: gamePlay.png Then we add our imageButton variable, and instance of it, and then we add the texture 'gameplay.png' to the imageButton, and then we set that as our Actor. Then we add the actor to the stage. And lastly, we draw the stage, which in turn, draws our imageButton to the screen. Code and image for this tutorial is at the Example Code section on this page.
Because we want our ImageButton to scale properly across our Portrait and Landscape orientation, we are going to use an 'ExtendViewport' and add the 'Orthographiccamera' to code also.
We are creating a new app for this tutorial.
First, we must create our new mobile game app, so in AIDE, at the AppProject file hierachy, Choose Create New Project, select Mobile Game, and New Mobile Game; then add the App name, ImageButtonStage(Note: no spaces in the app name(can use _ ), you can add spaces after you create it; Just Goto: the 'AppProject' folder; just select the App Name, and then select rename). Next, add the package name, 'com.aac.imagebutton_example'.
Click CREATE. Now ImageButtonStage app is created, and the MyGdxGame.java page opens in your AIDE coding editor.
App Shot - ImageButton Stage
Screen Size 5.8"

Landscape orientation

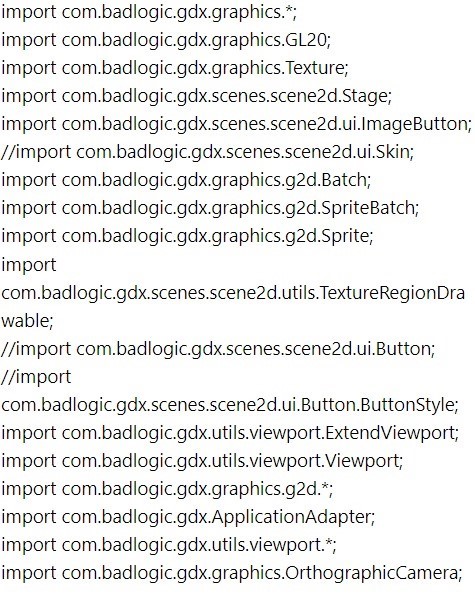
First we add the imports required for the variables we are going to add and our methods. So we add 'texture, imagebutton, stage, spritebatch, textureRegionDrawable, viewport, ExtendViewport, ApplicationAdapter, OrthographicCamera, as shown in this image.
Variables Code - we must declare variables for the calls: stage, imageButton, texture, extendViewport, orthographic camera, and, spritebatch. First we declare our code calls, then we create a variable for each of them. You can name them as you like.

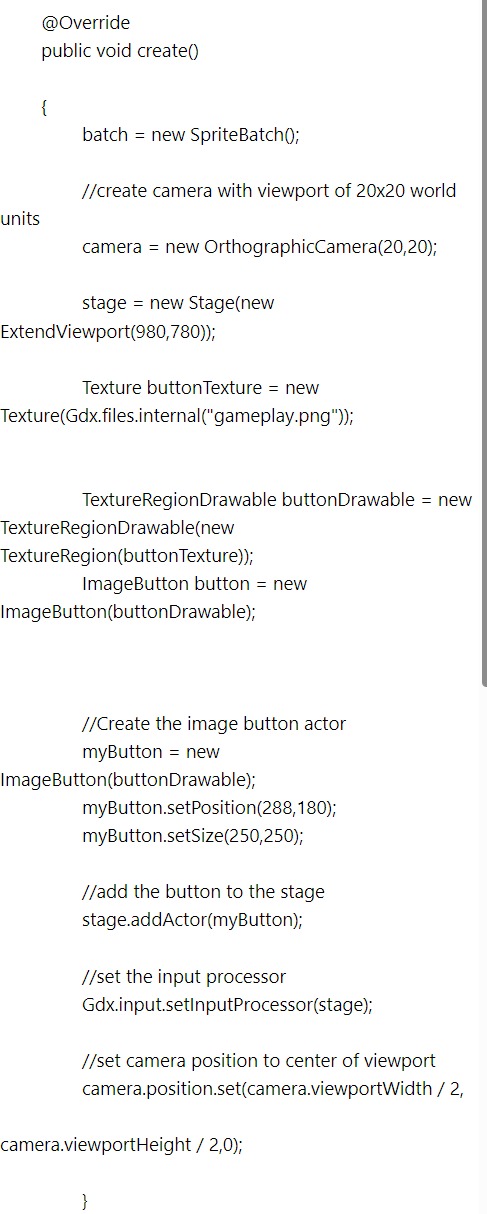
At the Create method code, we create new instances of the variables. We add our game's image, using the Texture method, and then set it as the ImageButton. Then we set the actor from our imagebutton, and then add actor to the stage. Also in create method, we can set the position and size of our image button as shown in this next image.
Render method code - at our 'render' code we include the 'stage.act' and 'stage.draw' methods to draw our ImageButton to the game screen. We also update our viewport and camera with the 'camera.update', and 'setProjectionMatrix', and 'resize' calls. By adding these calls, our game screen will display properly in both portrait and landscape modes, and across other device screen sizes. Do note; this may require additional code tweaking depending on the complexity of your game screen. And, we also include our screen color code in the 'render' method. For this tutorial, we added 'rgb' color codes.

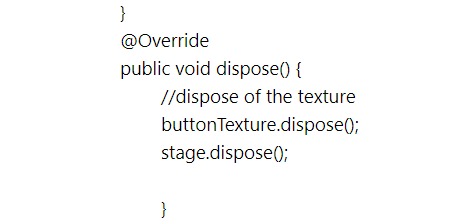
In the 'dispose' method, we dispose of the stage and texture.
Game Dev -All Game Dev Tutorials
An ImageButton can be created with the Scene2d of Libgdx. First we add the texture that will be our imageButton in this case, our .png: gamePlay.png Then we add our imageButton variable, and instance of it, and then we add the texture 'gameplay.png' to the imageButton, and then we set that as our Actor. Then we add the actor to the stage. And lastly, we draw the stage, which in turn, draws our imageButton to the screen. Code and image for this tutorial is at the Example Code section on this page.
Because we want our ImageButton to scale properly across our Portrait and Landscape orientation, we are going to use an 'ExtendViewport' and add the 'Orthographiccamera' to code also.
Create our Game App Screen
We are creating a new app for this tutorial.
First, we must create our new mobile game app, so in AIDE, at the AppProject file hierachy, Choose Create New Project, select Mobile Game, and New Mobile Game; then add the App name, ImageButtonStage(Note: no spaces in the app name(can use _ ), you can add spaces after you create it; Just Goto: the 'AppProject' folder; just select the App Name, and then select rename). Next, add the package name, 'com.aac.imagebutton_example'.
Click CREATE. Now ImageButtonStage app is created, and the MyGdxGame.java page opens in your AIDE coding editor.
App Shot - ImageButton Stage
Screen Size 5.8"
Landscape orientation
Code For This Tutorial
Imports CodeFirst we add the imports required for the variables we are going to add and our methods. So we add 'texture, imagebutton, stage, spritebatch, textureRegionDrawable, viewport, ExtendViewport, ApplicationAdapter, OrthographicCamera, as shown in this image.
Variables Code - we must declare variables for the calls: stage, imageButton, texture, extendViewport, orthographic camera, and, spritebatch. First we declare our code calls, then we create a variable for each of them. You can name them as you like.
At the Create method code, we create new instances of the variables. We add our game's image, using the Texture method, and then set it as the ImageButton. Then we set the actor from our imagebutton, and then add actor to the stage. Also in create method, we can set the position and size of our image button as shown in this next image.
Render method code - at our 'render' code we include the 'stage.act' and 'stage.draw' methods to draw our ImageButton to the game screen. We also update our viewport and camera with the 'camera.update', and 'setProjectionMatrix', and 'resize' calls. By adding these calls, our game screen will display properly in both portrait and landscape modes, and across other device screen sizes. Do note; this may require additional code tweaking depending on the complexity of your game screen. And, we also include our screen color code in the 'render' method. For this tutorial, we added 'rgb' color codes.
In the 'dispose' method, we dispose of the stage and texture.
Summary
In this tutorial, we implemented an 'ImageButton' with the stage and actor methods. We included an 'orthographic camera', and 'Extendviewport', so our game would scale properly across different device screen sizes.
EXAMPLE CODE - Code For This Tutorial.
JUST copy and paste to update your code.
JUST copy and paste to update your code.