
Libgdx with Android For Game Dev
Game Dev Tutorial : Simple Stage
Game Dev -All Game Dev Tutorials
With the Libgdx game framework(engine), you can implement methods for basic functions, as we have learned in our previous tutorials. Adding images, textures, texture regions, fonts, viewport, and the orthographic camera are all considered core aspects of coding in Libgdx. We can also add more sophisticated code methods allowing us to enchance our game play screen. Some of these methods can include rotating our game characters, adding movement and animations, collisions, and effects.
In order to incorporate additional methods into our game code, we can work with additional Libgdx classes. One such class is 'Scene2d', which includes many methods for improving our game play. An important one is Stage, which is a method that allows us to manipulate our game assets, allowing more functionality in our game. So, 'Stage' is one component of the Scene2d class.
With a stage, certain calls are automatically included, like Spritebatch, Viewport, and Camera. As you know from the tutorials we have completed, these code calls must be individually declared and created in our code.
And, Actor is a another component of Stage. Using 'Stage", any widget can be an Actor for you game screen, like a button, image, or a font. An Actor is useful because it can take on actions. So, for example, we can animate an image we add, or add a 'Click Event', to a button we created; so it then does something, like rotate or move along the screen. Actors can also take actions based on time by adding the 'deltaTime' call. So Actors are great for adding actions to your game characters, and you can also add actions to a group of actors, so they all act together. All this and more is achievable with the Libgdx Scene2d. Scene2d follows the same coding process as a non scene2d code. Just add your code, and the import statements that are required for that code, then RUN and build your app code.
In this tutorial, we will look at a basic 'stage' implementation, and add some color to the game screen. You can copy and paste the code from the Example Code section on this page.
First, we must create our new mobile game app, so in AIDE, at the AppProject file hierachy, Choose Create New Project, select Mobile Game, and New Mobile Game; then add the App name, Simple Stage(Note: no spaces in the app name(can use _ ), you can add spaces after you create it; Just Goto: the 'AppProject' folder; just select the App Name, and then select rename). Next, add the package name, 'com.aac.simple_stage_example'.
Click CREATE. Now SimpleStage app is created, and the MyGdxGame.java page opens in your AIDE coding editor.
App Shot - Simple Stage
Screen Size: 5.8"

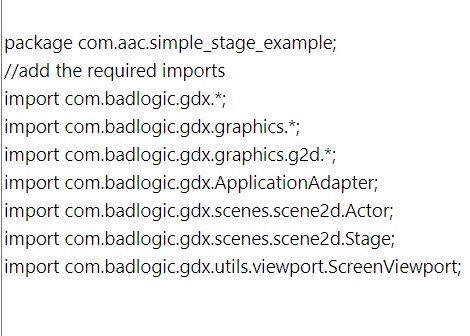
For this projects' code, we need to add our import statements as shown in this next image.
Besides adding the basic imports required(the first three lines of code), we also add imports for Stage, Viewport, Actor. Also included is the import for our class 'ApplicationAdapter'. If we omit any of these imports we would get a 'runtime' error message when building our app code.
Our next image shown here is the code for the 'variable', we must add. And the 'create' method is where we create our new instances of the variables we are adding. So, our variable is the 'Stage', and in our create method we created our 'new Stage' and added our ScreenViewport to it. Usually, we would declare our viewport as a variable also, but because Stage has its own built-in viewport it is not necessary to declare it as a variable. Also note we did not add any screen resolution for the ScreenViewport. A screenviewport does not require any additional arguments because it automatically adjusts to the device screen size. For this reason, it is better suited to small screens or a game that is targeted for a specific screen size.

Next, in the 'render' method, we draw our stage to the screen and change the background screen color as well. Note that we use stage.draw and not batch.draw. With stage, you use the stage.draw, because the 'spritebatch' is included in the stage method.
However, there could be a coding scenario where you might include both, a stage.draw and a batch.draw. This would depend on the assets you want to add, and how you want to add them. In gamedev, you can have more than one viewport, in fact, it is common to have at least two. Usually one is for your game screen actions, and one for your fixed assets. So, in this scenario, you may find you use both stage and nonstage methods to implement your game characters. We will learn more about this as we continue our tutorials.
Also we 'dispose' of our game assets, like we do with every game. When using a 'stage' you need only dispose of the stage, you don't have to dispose of the assets directly(by adding the assets name). However, there may be instances where you may have to dispose of them, which is essentially if you code them directly(without stage) then you must dispose of them directly, as we have done in our previous tutorials.

The Stage, and Actor methods, are commonly used in game dev, especially for character movement. Rotating, scaling, moving, and animating your game characters can add more fun to your game play. With Scene2d, you can add all sorts of manipulations.
LibGDX’s scene2d provides a powerful framework for handling collisions between game objects. With this, you can use circles, custom made shapes or bounding boxes, to define collision areas for the game characters. You can easily detect collisions, by checking whether the bounding rectangles of the characters meet.
And with scene2d , you can handle various game mechanics; like special effects with explosions. Actors and actions can work with images you use as your game textures, or with game sprites like pixel made characters.
We will learn additional code methods with Scene2d as we continue our tutorials.
Game Dev -All Game Dev Tutorials
With the Libgdx game framework(engine), you can implement methods for basic functions, as we have learned in our previous tutorials. Adding images, textures, texture regions, fonts, viewport, and the orthographic camera are all considered core aspects of coding in Libgdx. We can also add more sophisticated code methods allowing us to enchance our game play screen. Some of these methods can include rotating our game characters, adding movement and animations, collisions, and effects.
In order to incorporate additional methods into our game code, we can work with additional Libgdx classes. One such class is 'Scene2d', which includes many methods for improving our game play. An important one is Stage, which is a method that allows us to manipulate our game assets, allowing more functionality in our game. So, 'Stage' is one component of the Scene2d class.
With a stage, certain calls are automatically included, like Spritebatch, Viewport, and Camera. As you know from the tutorials we have completed, these code calls must be individually declared and created in our code.
And, Actor is a another component of Stage. Using 'Stage", any widget can be an Actor for you game screen, like a button, image, or a font. An Actor is useful because it can take on actions. So, for example, we can animate an image we add, or add a 'Click Event', to a button we created; so it then does something, like rotate or move along the screen. Actors can also take actions based on time by adding the 'deltaTime' call. So Actors are great for adding actions to your game characters, and you can also add actions to a group of actors, so they all act together. All this and more is achievable with the Libgdx Scene2d. Scene2d follows the same coding process as a non scene2d code. Just add your code, and the import statements that are required for that code, then RUN and build your app code.
In this tutorial, we will look at a basic 'stage' implementation, and add some color to the game screen. You can copy and paste the code from the Example Code section on this page.
Create our Game App Screen
We are creating a new app for this tutorial.First, we must create our new mobile game app, so in AIDE, at the AppProject file hierachy, Choose Create New Project, select Mobile Game, and New Mobile Game; then add the App name, Simple Stage(Note: no spaces in the app name(can use _ ), you can add spaces after you create it; Just Goto: the 'AppProject' folder; just select the App Name, and then select rename). Next, add the package name, 'com.aac.simple_stage_example'.
Click CREATE. Now SimpleStage app is created, and the MyGdxGame.java page opens in your AIDE coding editor.
App Shot - Simple Stage
Screen Size: 5.8"
Code For This Project
For our project we are adding just a STAGE, but not adding any assets. And, we are going to color our screen also. With this tutorial, you can see how a basic stage is coded.For this projects' code, we need to add our import statements as shown in this next image.
Besides adding the basic imports required(the first three lines of code), we also add imports for Stage, Viewport, Actor. Also included is the import for our class 'ApplicationAdapter'. If we omit any of these imports we would get a 'runtime' error message when building our app code.
Our next image shown here is the code for the 'variable', we must add. And the 'create' method is where we create our new instances of the variables we are adding. So, our variable is the 'Stage', and in our create method we created our 'new Stage' and added our ScreenViewport to it. Usually, we would declare our viewport as a variable also, but because Stage has its own built-in viewport it is not necessary to declare it as a variable. Also note we did not add any screen resolution for the ScreenViewport. A screenviewport does not require any additional arguments because it automatically adjusts to the device screen size. For this reason, it is better suited to small screens or a game that is targeted for a specific screen size.
Next, in the 'render' method, we draw our stage to the screen and change the background screen color as well. Note that we use stage.draw and not batch.draw. With stage, you use the stage.draw, because the 'spritebatch' is included in the stage method.
However, there could be a coding scenario where you might include both, a stage.draw and a batch.draw. This would depend on the assets you want to add, and how you want to add them. In gamedev, you can have more than one viewport, in fact, it is common to have at least two. Usually one is for your game screen actions, and one for your fixed assets. So, in this scenario, you may find you use both stage and nonstage methods to implement your game characters. We will learn more about this as we continue our tutorials.
Also we 'dispose' of our game assets, like we do with every game. When using a 'stage' you need only dispose of the stage, you don't have to dispose of the assets directly(by adding the assets name). However, there may be instances where you may have to dispose of them, which is essentially if you code them directly(without stage) then you must dispose of them directly, as we have done in our previous tutorials.
Summary
With this tutorial, we made an app with a simple stage. Stage, and Actor are two important components of Scene2d. Stage has its' own built-in Spritebatch, Viewport, and Camera. Actor can act on your game assets and make them interact with each other.The Stage, and Actor methods, are commonly used in game dev, especially for character movement. Rotating, scaling, moving, and animating your game characters can add more fun to your game play. With Scene2d, you can add all sorts of manipulations.
LibGDX’s scene2d provides a powerful framework for handling collisions between game objects. With this, you can use circles, custom made shapes or bounding boxes, to define collision areas for the game characters. You can easily detect collisions, by checking whether the bounding rectangles of the characters meet.
And with scene2d , you can handle various game mechanics; like special effects with explosions. Actors and actions can work with images you use as your game textures, or with game sprites like pixel made characters.
We will learn additional code methods with Scene2d as we continue our tutorials.
EXAMPLE CODE - Code For This Tutorial.
JUST copy and paste to update your code.
JUST copy and paste to update your code.