
Libgdx with Android For Game Dev
Game Dev Tutorial : How To Create A Spritesheet
Game Dev -All Game Dev Tutorials
Spritesheets are commonly used in Game Dev. A Spritesheet is essentially an image that holds a lot of individual images, of different sizes, and often made with pixelart(to keep file size small), but they don't have to be. The images you add to the spritesheet can vary in size, and, typically you make them with power of two(16x16,32x32,64x64,128x128,256x256,512x512). The spritesheet is usually no larger than 1024x1024, but it can be larger if you want. The idea with spritesheets is to pack a lot of game assets into one larger image, thus making it easier and more efficient to load them from the single large sheet, than loading them individually. Making them all the same size makes it easier to pack them efficiently, and for you to draw them to the screen, as the coordinates for each must be specified in the code.
There are a couple of code choices when loading a spritesheet. You can simply call the spritesheet itself to code, with 'Texture', and then load the images you want from it with TextureRegion or you can make it more involved by using 'TextureAtlas' to load the spritesheet. By implementing with 'TextureAtlas', you can include additional information about your 'spritesheet' images with the metadata file. TextureAtlas loads two files, the metadata file, and the image file - the spritesheet with the images. The advantage of this, is you can preset certain things about your images, like size, and position in the metadata file. Then, when they get added to the game screen they are already sized and positioned where you want them.
TextureAtlas code call is most useful and practical for a game app with lots of game characters and fixed assets.
Images are most often packed to a Spritesheet with a TexturePacker. When you use a Texture Packer to pack your images, this info or 'metadata file' as is is know, is generated also. You don't have to include the metadata file when loading your spritesheet, but if you want to make it available and utilize the features supported by TextureAtlas for it, then do load your spritesheet and metadata file by implementing with TextureAtlas code call.
For this tutorial, we are going to create a simple small spritesheet(spritesheetx.png) with two pixel made warriors, and pack them horizontally, with no spacing. Our spritesheet is small, only 7kb in size, thanks to making our spritesheet warriors with pixelart.
There are a couple of ways you can pack your game assets(images,sprites). I used an online web based Free Texture Packer to pack the 2 images; however, you can also buy a Texture Packer. At the CodeandWeb website, you can buy a Texture Packer. Their Texture Packer is compatible with a lot of game engines so if you decide to buy one, theirs is a good choice. They also have a free version however, it has limited features.
Most Texture Packers only work on a desktop or laptop computer, however, some mobile apps that make Pixelart can make a spritesheet(PixelStudio).
Additionally, you can also pack your game images manually by coding it in code. To do so, you load all the individual images into a folder of your app project. Then you add the specific code that names your TextureAtlas file(name it as you like), and specify where to find all the images(the folder) that you want to pack into a spritesheet. Then because you are using TextureAtlas, you can customize your spritesheet, with things like the image size you want to draw to screen. Coding your spritesheet using this method requires specific 'dependencies' to be added to your app project libraries, which might make it more suitable to Android Studio, where you can easily select libraries you want to add to your project. Performance wise, packing your images with a free online or paid texture packer would be just as efficient, which is probably why most developers use them.
And, you don't have to pack your game images and sprites, however, if your game has a lot of assets, packing them can improve game performance.
Click Create; Spritesheet app is created, and the MyGdxGame.java page opens in your AIDE coding editor.
App Shot - Spritesheet
Screen Size, 5.8"; White Screen

Landscape Mode


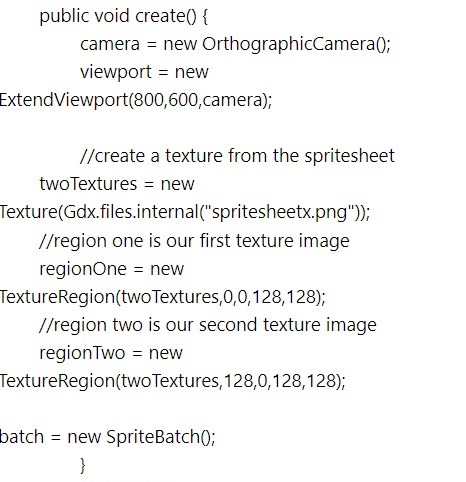
Add Variables - here we add all the variables we use in code for this tutorial. We include Spritebatch, Texture, TextureRegion; and also for ExtendViewport, and OrthographicCamera. You can name your variables for these code calls as you like; Texture we name it twoTextures; ExtendViewport we named it viewport; and OrthographicCamera - camera; and for our texture region variables we add two because we are going to get 2 regions(2 sprites - aka images) from our 'spritesheet.png;. Again, you can name them as you like, so I named them as regionOne, and regionTwo.

At Create method, we create instances of our camera and viewport, and set the screen viewport size to 800,600, for width and height. Next, we load our 'spritesheetx.png', by using the Texture call variable we named it- 'twoTextures'. Then we get each region(sprite warrior) from the spritesheet using the TextureRegion code call.
Since we are getting 2 separate sprites(the images) from our spritesheet, we must call the TextureRegion for each one. Hence, the variable names 'textureOne', and 'textureTwo'. And, for each texture we are loading, we must define their parameters. The first warrior; we want to being its draw at 0,0 on the spritesheet, so we add 0,0 for width and height, aka x and y, then 128,128 for its' actual size. The second warrior, is at 128 width, we know this because it is to the right of the first image, and we know that it is 128 wide. So, for the second image sprite, we code, 128,0,128,128. This means to start drawing it at 128 width, 0 for height, then draw its actual size as 128x128.
And, lastly in create method, add the instance of spritebatch with our named variable 'batch'.
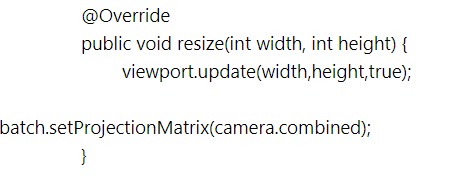
Add the Projection Matrix call and Resize method, so the viewport updates when the screen gets resized during the game.
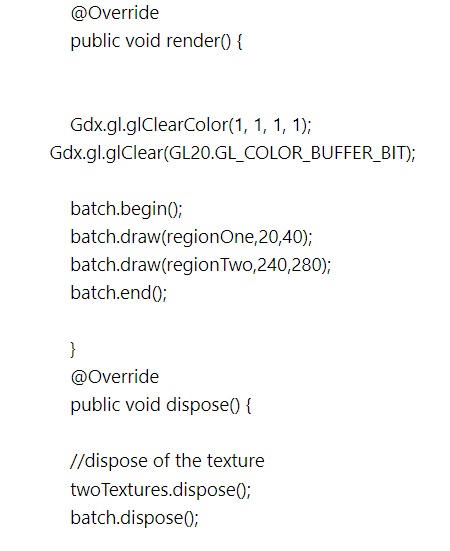
At the Render method, we add the color we want for our game screen. Then we begin our batch and draw the texture regions to the game screen using the batch.draw call. Because in this tutorial we are not using a Stage we must draw our assets to the screen with the 'batch.draw', and not 'stage.draw', which is used if we had included a Stage. And, we add the parameters to position our warriors on the screen. So, the first warrior(regionOne), is at 20,40; meaning 20 along the x, and 40 for height. The second warrior(regionTwo), we positioned at 240,280; meaning 240 along the x, and 280 for height from base of the game screen.
And, lastly we dispose of the game assets. All code, and the spritesheetx.png is at the 'Example Code' section on this page.
Online free Texture Packers can be found at these links: The Leshy Labs can pack your images, and also you can edit your spritesheets(remove and add new ones), and it supports several useful features. Do read the intro articles for best tips and how tos. Note: with this texture packer, once you've loaded all your images, you must select SAVE, at Filename, and at the Spritesheet select SAVE.
A free online texture packer(spritesheet maker):
Leshy Lab Spritesheet Maker
This next link also provides free online texture packer: FREE online Texture Packer
With this one, similar to Leshy, just add your images you want packed, then here you will select the size of your spritesheet, so if you want it to match your image exactly(which you would) then add the image sizes together and then use that number. Example- you have 2 images, each sized 256x256, then you want a 512x256, if it packs it horizontally, and 256x512, if it packs it vertically. So once you load them see how it packed them, horizontally or vertically, then just adjust the 'width', 'height', values.
Also, with this texture packer, you can see at 'format', there a lots of choices with many of the game engines listed. You can just select 'xml' or leave it at the default showing. This only affects the 'metadata' file as engines are specific to which type of format is used. However, we are not using the 'metadata' file in our game code, so we don't require the metadata file.
Once you've added your images, and added the 'metadata' file name, and 'spritesheet' name you want, and the spritesheet size(width,height), you can click the Export button to create the new spritesheet. Note: if you don't add a name for the spritesheet(png) or metadata file, it will generate based on the default settings, and you can just rename them as you like.
With each of these free texture packers, you must add the file name for the 'texture metadata'(plain text) file, and the spritesheet itself(recommended to use .png file type). Note: you don't have to use the metadata file, but it creates it by default. It's more useful like we mentioned, for larger spritesheets with lots of images and assets.
Game Dev -All Game Dev Tutorials
App Project Name: Spritesheet
Spritesheets are commonly used in Game Dev. A Spritesheet is essentially an image that holds a lot of individual images, of different sizes, and often made with pixelart(to keep file size small), but they don't have to be. The images you add to the spritesheet can vary in size, and, typically you make them with power of two(16x16,32x32,64x64,128x128,256x256,512x512). The spritesheet is usually no larger than 1024x1024, but it can be larger if you want. The idea with spritesheets is to pack a lot of game assets into one larger image, thus making it easier and more efficient to load them from the single large sheet, than loading them individually. Making them all the same size makes it easier to pack them efficiently, and for you to draw them to the screen, as the coordinates for each must be specified in the code.
There are a couple of code choices when loading a spritesheet. You can simply call the spritesheet itself to code, with 'Texture', and then load the images you want from it with TextureRegion or you can make it more involved by using 'TextureAtlas' to load the spritesheet. By implementing with 'TextureAtlas', you can include additional information about your 'spritesheet' images with the metadata file. TextureAtlas loads two files, the metadata file, and the image file - the spritesheet with the images. The advantage of this, is you can preset certain things about your images, like size, and position in the metadata file. Then, when they get added to the game screen they are already sized and positioned where you want them.
TextureAtlas code call is most useful and practical for a game app with lots of game characters and fixed assets.
Images are most often packed to a Spritesheet with a TexturePacker. When you use a Texture Packer to pack your images, this info or 'metadata file' as is is know, is generated also. You don't have to include the metadata file when loading your spritesheet, but if you want to make it available and utilize the features supported by TextureAtlas for it, then do load your spritesheet and metadata file by implementing with TextureAtlas code call.
For this tutorial, we are going to create a simple small spritesheet(spritesheetx.png) with two pixel made warriors, and pack them horizontally, with no spacing. Our spritesheet is small, only 7kb in size, thanks to making our spritesheet warriors with pixelart.
Making Pixelart Characters: Packing Warriors
To make the 2 warrior characters, I used PixelStudio app, which is a free app based pixelart maker. I selected 32x32, for my drawing canvas, and then saved each warrior as 256x256. This is good because now if I have to resize my warrior smaller each warrior will still look proper. After I made them, I just saved them to my cell phone, and then uploaded them to my laptop(by way of Cloud) and then loaded them into the free web based Texture Packer at Leshy Labs. Once I made the Spritesheet, I uploaded it to my Cloud, then back to my cell phone, and into the 'assets' folder of my AppProject - Spritesheet.There are a couple of ways you can pack your game assets(images,sprites). I used an online web based Free Texture Packer to pack the 2 images; however, you can also buy a Texture Packer. At the CodeandWeb website, you can buy a Texture Packer. Their Texture Packer is compatible with a lot of game engines so if you decide to buy one, theirs is a good choice. They also have a free version however, it has limited features.
Most Texture Packers only work on a desktop or laptop computer, however, some mobile apps that make Pixelart can make a spritesheet(PixelStudio).
Additionally, you can also pack your game images manually by coding it in code. To do so, you load all the individual images into a folder of your app project. Then you add the specific code that names your TextureAtlas file(name it as you like), and specify where to find all the images(the folder) that you want to pack into a spritesheet. Then because you are using TextureAtlas, you can customize your spritesheet, with things like the image size you want to draw to screen. Coding your spritesheet using this method requires specific 'dependencies' to be added to your app project libraries, which might make it more suitable to Android Studio, where you can easily select libraries you want to add to your project. Performance wise, packing your images with a free online or paid texture packer would be just as efficient, which is probably why most developers use them.
And, you don't have to pack your game images and sprites, however, if your game has a lot of assets, packing them can improve game performance.
Create our Game App Screen
We are creating a new app for this tutorial. First, we must create our new mobile game app, so in AIDE, at the AppProject file hierachy, Choose Create New Project, select Mobile Game, and New Mobile Game; then add the App name, Spritesheet(Note: In AIDE,no spaces in the app name(can use _ ), or you can add spaces after you create it; Just Goto: the 'AppProject' folder; just select the App Name, and then select rename). Next, add the package name, 'com.aac.spritesheet_example'.Click Create; Spritesheet app is created, and the MyGdxGame.java page opens in your AIDE coding editor.
App Shot - Spritesheet
Screen Size, 5.8"; White Screen
Landscape Mode
Code For This Tutorial
Import statements - we first code our import statements adding all the required ones for the code calls we are implementing. So we include Texture, Image, ExtendViewport, Camera, Sprite, Spritebatch; and since we are adding the TextureRegion method, we must include all those imports as well. And, do include the 'ApplicationAdapter' class import here also.Add Variables - here we add all the variables we use in code for this tutorial. We include Spritebatch, Texture, TextureRegion; and also for ExtendViewport, and OrthographicCamera. You can name your variables for these code calls as you like; Texture we name it twoTextures; ExtendViewport we named it viewport; and OrthographicCamera - camera; and for our texture region variables we add two because we are going to get 2 regions(2 sprites - aka images) from our 'spritesheet.png;. Again, you can name them as you like, so I named them as regionOne, and regionTwo.
At Create method, we create instances of our camera and viewport, and set the screen viewport size to 800,600, for width and height. Next, we load our 'spritesheetx.png', by using the Texture call variable we named it- 'twoTextures'. Then we get each region(sprite warrior) from the spritesheet using the TextureRegion code call.
Since we are getting 2 separate sprites(the images) from our spritesheet, we must call the TextureRegion for each one. Hence, the variable names 'textureOne', and 'textureTwo'. And, for each texture we are loading, we must define their parameters. The first warrior; we want to being its draw at 0,0 on the spritesheet, so we add 0,0 for width and height, aka x and y, then 128,128 for its' actual size. The second warrior, is at 128 width, we know this because it is to the right of the first image, and we know that it is 128 wide. So, for the second image sprite, we code, 128,0,128,128. This means to start drawing it at 128 width, 0 for height, then draw its actual size as 128x128.
And, lastly in create method, add the instance of spritebatch with our named variable 'batch'.
Add the Projection Matrix call and Resize method, so the viewport updates when the screen gets resized during the game.
At the Render method, we add the color we want for our game screen. Then we begin our batch and draw the texture regions to the game screen using the batch.draw call. Because in this tutorial we are not using a Stage we must draw our assets to the screen with the 'batch.draw', and not 'stage.draw', which is used if we had included a Stage. And, we add the parameters to position our warriors on the screen. So, the first warrior(regionOne), is at 20,40; meaning 20 along the x, and 40 for height. The second warrior(regionTwo), we positioned at 240,280; meaning 240 along the x, and 280 for height from base of the game screen.
And, lastly we dispose of the game assets. All code, and the spritesheetx.png is at the 'Example Code' section on this page.
Summary
In this tutorial, we added a spritesheet to our app project, which has all our game images(assets). You can add as many images as you like, and you can also add other game assets like tilemaps, image letters(game fonts), which you could include to design your game screens. All these items can be added to the spritesheet which makes it easy to load. Using the power of two when creating your images is also good coding practice, because this means the TexturePacker can pack the images more efficiently, thus saving on space, and overall game performance.Online free Texture Packers can be found at these links: The Leshy Labs can pack your images, and also you can edit your spritesheets(remove and add new ones), and it supports several useful features. Do read the intro articles for best tips and how tos. Note: with this texture packer, once you've loaded all your images, you must select SAVE, at Filename, and at the Spritesheet select SAVE.
A free online texture packer(spritesheet maker):
Leshy Lab Spritesheet Maker
This next link also provides free online texture packer: FREE online Texture Packer
With this one, similar to Leshy, just add your images you want packed, then here you will select the size of your spritesheet, so if you want it to match your image exactly(which you would) then add the image sizes together and then use that number. Example- you have 2 images, each sized 256x256, then you want a 512x256, if it packs it horizontally, and 256x512, if it packs it vertically. So once you load them see how it packed them, horizontally or vertically, then just adjust the 'width', 'height', values.
Also, with this texture packer, you can see at 'format', there a lots of choices with many of the game engines listed. You can just select 'xml' or leave it at the default showing. This only affects the 'metadata' file as engines are specific to which type of format is used. However, we are not using the 'metadata' file in our game code, so we don't require the metadata file.
Once you've added your images, and added the 'metadata' file name, and 'spritesheet' name you want, and the spritesheet size(width,height), you can click the Export button to create the new spritesheet. Note: if you don't add a name for the spritesheet(png) or metadata file, it will generate based on the default settings, and you can just rename them as you like.
With each of these free texture packers, you must add the file name for the 'texture metadata'(plain text) file, and the spritesheet itself(recommended to use .png file type). Note: you don't have to use the metadata file, but it creates it by default. It's more useful like we mentioned, for larger spritesheets with lots of images and assets.
EXAMPLE CODE - Code For This Tutorial.
JUST copy and paste to update your code.
JUST copy and paste to update your code.