
PREV Page
Goto - All Tutorials
Resources Drawable Tutorial
AppProject/nameOfApp/res/drawable-hdpiSee Why More First Dates at eharmony Become Happy Relationships !
nameOfApp is the name you gave the app when creating the AppProject
ic_launcher.png is the default icon for the android app; and is placed in the res/drawable-hdpi folder. It will show on the top of the app's first page(top left) as it's icon. The name you give your app will show next to it. The ic_launcher is also the default icon used when you create an app using a simple 'template' as we will be doing in our tutorials.
Naming Your App Images
You can name your images anything you want; usually developers name them to match what they represent. Use underscores for spacing: Example: my_photo_image.The res/drawable folder is where you place your graphics, photos, for your android app. Example, it could be an icon for your app, or photos being displayed within your app. JPG and PNG are most common ones, example, apphoto.png.
For all types of media that can be used, browse to Android Developer guides:
Android Developer Media Formats

Looking at the top of this image we can see we are in the AppProjects folder and the App name is Math. Res is short for resources; the resources folder where you place all your app's images, graphics, and other media types you want in your android app.
The res/drawable-hdpi is the most common place to put your app's images, however, there are other drawable folders as well:
drawable-mdpi, drawable-xhdpi, drawable-xxhdpi.
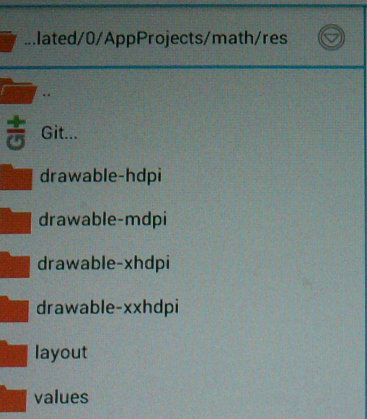
These represent different screen densities on tablets- smartphones.
All you do is place your image(s) in the appropriate folder, or one in each folder if you want to have an image for each screen density type.
The android system knows to grab the image which matches the tablet's screen density.
How to Scale Images For
The Various Densities
The actual coding for drawable resources is placed in xml files:
This code is for adding an image:
android:src="@drawable/myimage
This code is for adding an image as your background
android:background="@drawable/imagebutton
Coding The Manifest.xml File
androidmanifest.xml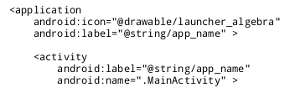
If you change the default app icon or logo; then you must code its name in the application property of the androidmanifest.xml file as shown.
And, you must add the actual image to res/drawable-hdpi folder.
The androidmanifest.xml is in the root of your AppProjects.
Please note: You cannot copy, move, paste files within the AIDE editor.
So, to put an image in the res drawable hdpi folder you can use your tablet's/smartphone's File Manager. Most android devices have a File Manager App preloaded when you buy them. If not, you can download one easily from Google Play store or Amazon. These stores have many Free ones to choose from.
Images are often added to a Textview, Imageview, and Button elements. These elememts are coded in a layout xml file; typically named main.xml; and you can name and rename them as you like. For our tutorials, they will mostly be named main.xml.
If your adding an image to a TextView, ImageView, or Button element then you code the drawable name in that element.
This xml file is at res/layout/main.xml(or whatever you named it). This file is edited often as you add, and change items in your app's textView pages.
When coding the actual image (media) name you don't include the extension. Example myphoto.png, would be coded as myphoto, you don't need to add the .png in the code.
The example codes show how to code images and add them to the textView.
To learn more about drawables:
Developer Guide Drawable Elements
AIDE for creating Android Apps on your tablet or cell phone(android).
Free and Paid.
GoTo Aide
ANDROID STUDIO - for creating Android Apps on your desktop computer.
Free to Install and Use
Learn more - Android Studio
The Java XML files we code(example codes) and the Android Apps we create in our Free Tutorials are compatible with Android Studio and AIDE. Just choose Java XML as your Programming Language.
You May Like:
Make Sushi Rolls Taste World Wines Flavours and Aromas