Python Tkinter Game Tutorial
Tkinter Game Dev: Chase the Enemy, Click Button
Functions and Methods of this Tutorial:
We use several methods and functions in this tutorial. We write code for the PhotoImage, method, which is how we load our game image, our pixelart character. And, we write code for the Move method, another popular method in Tkinter. The methods label, and random, are written into code also. These two methods let us write code to the game screen(label), and set the game character so it moves randomly around the game screen.All code for this tutorial is at the Example Code section on this page. At Game Shot, you can see an image of the game.
Where To RUN Tkinter Code
In addition to running your code in Python 3.13 REPL, on your Windows computer, the code from this game dev tutorial can be RUN with Pydroid3, a mobile IDE and Python interpreter, and also ACode's built in Linux terminal(Alpine). Pydroid3 and ACode also have built in code editors you can use to write, edit, and save Python Tkinter code. These are both available to download and install on your Android phone from Google Play store.Coding Tkinter: How to Create the Game File
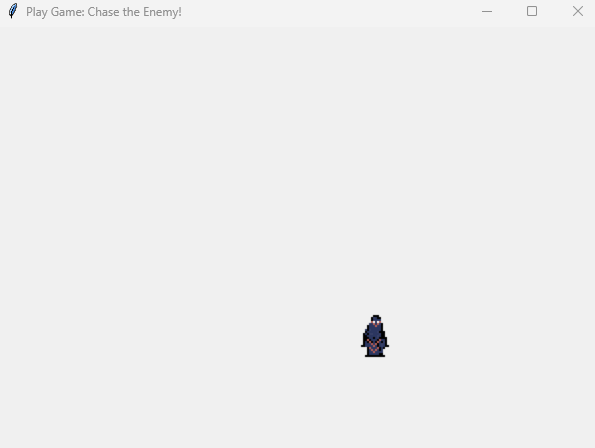
To write Tkinter game code on my laptop, I use Notepad, which is a free Windows code editor. On my cell phone, I use Pydroid3's built in code editor, and also, ACode's built in code editor. Any code editor is good to write your code, and save it, example, mygamecode.py, a .py file type.Tkinter Game Shot from Laptop
Code For This Tutorial
This tutorial has a pixelart game character we created with Pixel Studio. It is an enemy sprite, being chased by you, the user, around the game screen. It moves because we are using the move method of Tkinter, and, with each click, it moves randomly, because we are using the random method. These two methods are used often in Tkinter games, to action the game characters, and facilitate game interaction.So, the enemy sprite randomly moves here and there. We cannot catch it, because each time we click to catch it, it moves quickly to its' next random position. This is how 'random' method works in Python.
Code Call
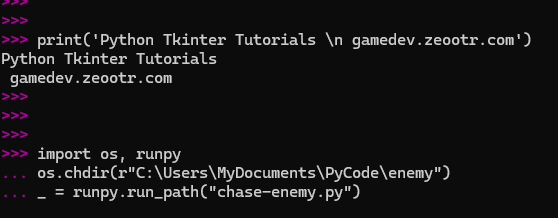
To RUN our code in the REPL at the prompt: >>> we must tell the REPL where the file is. This next image shows the code we must write and then paste into the REPL. Just tap the 'enter' button on your laptop twice to RUN the code, once you have pasted it. A game window populates with the game. Each time you click the pixelart game character, it moves to another place on the game screen.The copy and paste code is at the 'Example code' section for this tutorial. Remove the comment tag #, before you copy, and re add the comment #, before you RUN the code, and save the file.
First Code Blocks:
We named our game file, chase-enemy.py. At your Tkinter game dev folder on your computer or laptop, just create a new folder named 'enemy', and add the 'chase-enemy.py', file, and the game images. Save the images from the Example code section for this tutorial.Next, edit the 'code call' code. Replace folder names' location with their location on your computer.
The pixelart game characters are named:
enemy_128.png, and enemy_64.png.
They are both included in the game code. We can simply toggle the one we want to use, and use #, to comment out the one we don't use.
One of the pixelart images is for the laptop(windows), and the other is for the cell phone. If you RUN code on laptop/computer, then uncomment the 'enemy_64.png', because that is the one we use for the REPL, If you RUN the code at Pydroid3 on your cell phone, then uncomment for the 'enemy_128.png'.
Then, we import our tkinter class, and the random method, in our first lines of code.
import tkinter as tk
import random
We call our Tkinter class to the game with
'window = tk.Tk()',
Tk means Tkinter Interface, Tkinter -the GUI Toolkit we use to code games in Python. And, we create our class function name for the game. For this game we used 'window',
window = tk.Tk()
However, this name can be any name you like - mygame, thisgame, window, newgame,fungame. Additionally, whatever name you use, must be added throughout the code where required. Just read through this codeset, and look for the word 'window'. You can see the code lines, where it needs to be included - canvas, label, and the start game loop. That is how we attach the different sections of code - label, canvas, gameloop, to the Tkinter class.
Next, in our block of code, we give a name for the game with Title
mygame.title("....
window = tk.Tk()
window.title("Play Game: Chase the Enemy!")
We create the canvas and attach to it the size
canvas = tk.Canvas(window, width=600, height=600)
Canvas pack means to create the canvas window with the dimensions we gave.
canvas.pack()
Adding text to the game screen with label
label = tk.Label(window, text="Click: Try To Chase The Enemy!")
label.pack()
Next Code Block:
In these next lines of code, we write code to create our 'random movement' for the pixelart character. Here to use the move method of Tkinter. We add the position coordinates as - x, y, meaning the position of the enemy game character for width(x) and height(y), when it gets clicked.For this, we coded 40,560. That sets the boundry for the character's movement on the game screen when clicked. We know our game screen size is 600,600, width, height. So, to keep our 'enemy' game character within the bounds of the screen size we set; we will make our random x,y coordinates less than the game window size. That way, the enemy character is not too close to the edge of the game screen, and won't disapear from the game screen.
The code here also adds the click event, and attaches it to the 'move_enemy' function we created - def move_enemy().
#create function to move enemy
#add random method
def move_enemy():
x = random.randint(40, 560)
y = random.randint(40, 560)
canvas.coords(enemy, x, y)
#attach function to the click
def clicked(event):
label.config(text="Chase the Enemy!")
move_enemy()
Then, we draw our sprite(enemy png) to the canvas at position 100(x),100(y). The image is automatically placed at center position at 100,100. However, if you want to position it- n-north, s-south, e-east, w-west, you can. For example to position the image at 100,100, with a north west position, we use '...image = enemy_img, anchor = "nw"). You can use any combination of the n,s,e,w, coordinates.
So, the image is at 100,100; this is its' starting position until it gets clicked. Also in this code, we create a new variable - enemy - that attaches sprite, canvas, together.
After that, we bind the 'enemy' variable we created, with the actual click event method, and the canvas.
# Place sprite onto canvas
enemy = canvas.create_image(100, 100, image=enemy_img)
# bind enemy to the click event
canvas.tag_bind(enemy, "
move_enemy()
#start game loop
window.mainloop()
And, lastly, we start the game loop:
window.mainloop()
Summary
In this tutorial, we learned how to implement a pixelart game character and have it move randomly around the game screen. This is quite easy to do with 'random' and 'move' methods in Tkinter. We also added a 'click event' so that when the user clicks on the pixelart character, it can move to another position on the game screen.Pixelart game characters are small in size and very common in 2D games. Because of their small size, like 1-11kb, they are ideal for small game frameworks and GUI Toolkits' like Tkinter.
You can make your own pixelart game characters with mobile apps like Pixel Studio, and online websites, such as Pixilart. Both are free to use. We have made our own pixelart characters, and are free to download, and use. Free Pixelart Game Sprites And, we have a tutorial on making Pixelart characters with Pixel Studio, and some good info on pixelart game types. GoTo this tutorial, and to section 'What is Pixelart' - What is Pixelart: How To Make Your Own with Pixel Studio
EXAMPLE CODE - Code For This Tutorial.
JUST copy and paste this code.
JUST copy and paste this code.