Python Tkinter Game Tutorials
Tkinter Game Dev: Color Tiles Creator: Make Colored Game Tiles For Game Fixtures, and, Backgrounds
Creating Color Tiles
For this tutorial lesson, we write code with several methods and functions in order to create our color tile editor. We add code for the Palette which is how we add our variety of colors. You can add as many colors as you like. We use Grid to add the rows and columns and specify the size we want for them.Once we run the code, we can see the color tile editor window. To add a color to the grid, we first select a color, and then tap a grid square to display that color. You can make a row or column of same color or mix and match the colors. For an example game scenario, you can add rows of brown to simulate earth color, and green for land colors, and blue for sky color.
Additionally, with the color tile editor, we can make simple game fixtures; example - make a colored row or just a few tiles, for one section of your game, and then another colored row, to place at another area in the game screen. Or, create a complete game background.
Once you've created a color tile design; just take a screenshot, and crop. Save the cropped color tiles as a .png file type. Then, just add the image to the same folder where the game py file is. Write code to add the image into your game action, either as a foreground fixture, or a background. If you create color tiles for the background you can add additional game fixtures and game characters in the foreground.
All code for this tutorial is at the Example Code section on this page. At Game Shot, you can see a image of the tile creator with some tiles colored.
FYI: In addition to running your code in Python 3.13 REPL, on your Windows computer, the code from this game dev tutorial can be RUN with Pydroid3, a mobile IDE and Python interpreter.
Pydroid3 and ACode mobile Android apps also have built in code editors you can use to write, edit, and save Python Tkinter code. These are both available to download and install on your Android phone from Google Play store.
Coding Tkinter: How to Create the Game File
To write our game code file, we are going to use Notepad which is available to use on a Windows laptop or computer. If it isn't already available as an app on your computer, you can download it from the Microsoft store. From your Start menu on your computer just click the icon for Microsoft store. From there, you can browse or do a search for the app you want. Notepad is a basic code editor, and we can paste or write our Python Tkinter code into the editor, and save the file as, example: a mygame.py, py file type. If you prefer to use another coding editor that is fine also.Coding Tkinter: How to Create a Game File
To write Tkinter game code on my laptop, I use Notepad, which is a free Windows code editor. On my cell phone, I use Pydroid3's built in code editor, and also, ACode's built in code editor. Any code editor is good to write your code, and save it, example, mygamecode.py, a .py file type.How To Load The Game File
There are several ways to get your code running. For laptop(any windows computer), just call the code, its' the three lines(call code) included at the Example code section with the game's code. Just change the folder names to match those on your computer, that has 'name-of-file.py'. Simply paste the lines into the REPL at the >>> prompt, tap the 'enter' button twice, and the game window populates. To rerun same code, tap up arrow on your keyboard, and tap enter again. Note: you must have clicked out(tap x) of the game window, to rerun the code this way. You can also paste the codeset(all the code) into the REPL, but this is not recommended, unless it is just a few lines, as large codesets can be problematic, especially if you get 'run code errors'.For Cell Phone with Pydroid3: 2 Ways to Run the Code, Paste the codeset into the editor(white screen), and tap the RUN icon. A game screen will populate, and run your game. Or, you can save the 'name-of-file.py' file to a folder named Pydroid3; then, use the folder icon at top of Pydroid3 editor to open that file. File loads the code into the editor(white screen), then, tap the RUN icon to run the code.
Keep Py File and Images Together
With Android cell phones, you can run, example: mygame.py file to play the game. So these file types can be opened from any folder on your phone. I created a folder named Pydroid3, to easily know where the files go.
Just remember to keep the game images in the same folder as the mygame.py py file. Open Pydroid3 app, select the folder icon at top of white screen editor, goto your files, select the py file; it loads into Pydroid3. Just tap RUN icon at bottom of screen, to RUN your game code.
Create ShortCut
To organize your py files, and games, shortcuts can be created from the game file. Any file(link) can be added and become a shortcut which gets placed on the home screen, like an app icon. You can also customize the icon.
To open the tkinter game, you simply tap on the 'shortcut' link you created on the home screen, and then Pydroid3 app opens, and loads that link, and plays the tkinter game.
Shortcut apps are free to download from Google Play Store. Shortcut Maker is a popular one, that allows you to customize the shortcut's icon.
Link to Video Tilemaker Tutorial
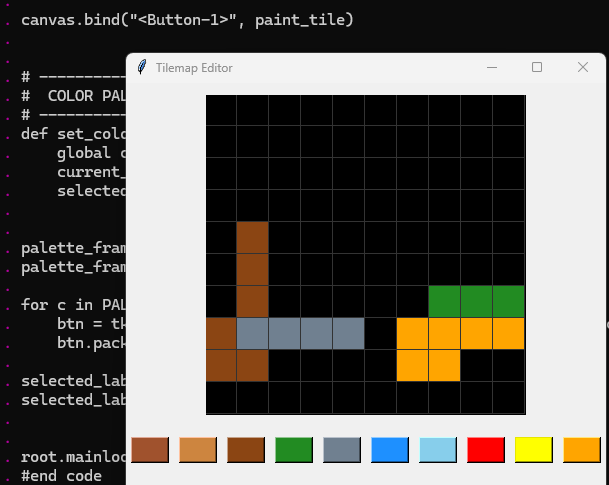
Tkinter Color Tile Editor, Shot from Laptop
Run the code in Python 3.13
Select a color, then click a tile.
Make a row or column of colors.
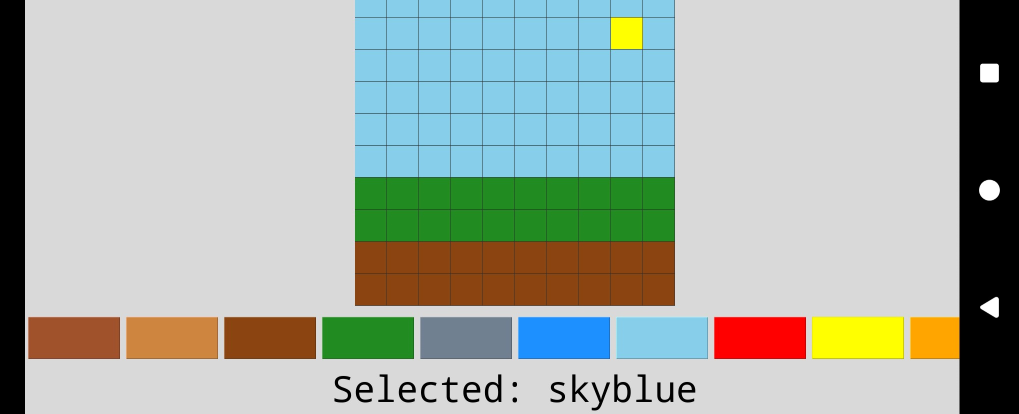
Tkinter Color Tile Editor, from Phone(landscape mode)
Run the code in Pydroid3 IDE
Make a Background
Code For This Tutorial
The code has been commented as to what each section of code does. Here we explain each section in detail.Firstly, we import the 'tkinter' game class. Then we declare our settings for the color tile size, rows, and columns. You can set this as you want, but this is a typical size for a laptop game window. If you run the code with Pydroid3 on your Android phone or tablet, you can change the tile size to 64, because at size 32, the color tile window appears very small. The Palette is where we can add our color choices. Add as many as you want.
import tkinter as tk
#tile size,change to 64 for cell phone
TILE_SIZE = 32
ROWS = 10
COLS = 10
# Colors you can paint with
PALETTE = ["sienna", "peru", "saddlebrown", "forestgreen",
"slategray", "dodgerblue", "skyblue", "red", "yellow", "orange"]
current_color = PALETTE[0] # default color
Next code section, we are creating the rectangle shape and adding the particulars for it: and adding a border outline color and a color for the tiles themselves.
tiles = [] # store tile IDs
for r in range(ROWS):
row_tiles = []
for c in range(COLS):
x1 = c * TILE_SIZE
y1 = r * TILE_SIZE
x2 = x1 + TILE_SIZE
y2 = y1 + TILE_SIZE
tile = canvas.create_rectangle(
x1, y1, x2, y2,
fill="black", outline="gray20"
)
row_tiles.append(tile)
tiles.append(row_tiles)
We use the shape rectangle to create the window for the color tile editor. Then the grid like squares are placed within that window.
Next code: Bind the Tiles to the Canvas and the Buttons.
With this code block, we create a function 'paint_tile', and pass an argument, (event) to it. Then, we attached the tile width and height to the event. Then we create the variable 'tile_id',and assign the width and height of the tiles to that variable. And, we assign the 'tile_id' variable and the 'current_color' to the canvas. Lastly we bind the button to the tiles and the canvas.
def paint_tile(event):
col = event.x // TILE_SIZE
row = event.y // TILE_SIZE
if 0 <= row < ROWS and 0 <= col < COLS:
tile_id = tiles[row][col]
canvas.itemconfig(tile_id, fill=current_color)
canvas.bind("
The next block of code: We set the Palette colors and define their action. We create a function 'set_color, and give it an argument (c). We then create a global variable current_color. Then we assign to it, value 'c'. Then we configure the selected label with both the text=f, and selected {c}.
Next, we create the variable 'palette_frame', and attach it to our game class - (gametiles). Then, we create the variable palette_frame.grid, and assign it 1 row, no column, and a padding of 10.
At line, 'for c in PALETTE:', the current selected color, we attach that color to the class and palette frame and give it width of 4, set the color to the column with, set_color(col), and then attach it to the button with, btn.pack.Lastly, we create another variable selected_label, and attach it to the game class, and the text, along with the current color we assign a font and font size.
def set_color(c):
global current_color
current_color = c
selected_label.config(text=f"Selected: {c}")
palette_frame = tk.Frame(gametiles)
palette_frame.grid(row=1, column=0, pady=10)
for c in PALETTE:
btn = tk.Button(palette_frame, bg=c, width=4, command=lambda
col=c: set_color(col))
btn.pack(side="left", padx=5)
selected_label = tk.Label(gametiles, text=f"Selected:
{current_color}", font=("Courier", 14))
selected_label.grid(row=2, column=0, pady=5)
Last line of code: Here we include the code to run the game. We write code for the game class name, gametiles, and attach it to the game loop.
gametiles.mainloop()
Summary
In this lesson, we learned how to develop a color tile maker - editor. The Color Tiles editor makes it easy to create fixtures for your Tkinter game screen. You can create small single row columns or rows, or a complete game background. It is also a great way to check a variety of colors for your game scenes. Once you develop this tile editor, simply run it on your windows computer or laptop. You can also run the same code at Pydroid3 on your Android cell phone, and it populates the same rectangle display, just a smaller version of it.
EXAMPLE CODE - Code For This Tutorial.
JUST copy and paste this code.
JUST copy and paste this code.