Python Tkinter Game Tutorials
Tkinter Game Dev: Create Square Shape: Use Inputs to Move the Square
Function and Methods Of This Codeset:
We first code our Tkinter game class, with the line:import tkinter as tk.
This implements our Tkinter module. Then we include codes for what we want to include in this game. Because we want to draw our own shape instead of adding an image; we can draw the shape to the game screen with the canvas code. We must add input controls to the square shape so we can move it around the game screen.
So, we can create a function to do that; we create move functions for the arrow directions we want; then, attach those to an event, and, the event gets attached to the keypress(laptop), and button frame(cell phone).
That way, when the arrow keys on the laptop's keyboard are selected, or, the on-screen arrows on the phone's screen are selected, the square shape moves in the arrow direction chosen.
All code for this tutorial is at the Example Code section on this page. At Game Shot, you can see a image of the game.
FYI: In addition to running your code in Python 3.13 REPL, on your Windows computer, the code from this game dev tutorial can be RUN with Pydroid3, a mobile IDE and Python interpreter, and also ACode's built in Linux terminal(Alpine). Pydroid3 and ACode also have built in code editors you can use to write, edit, and save Python Tkinter code. These are both available to download and install on your Android phone from Google Play store.
Coding Tkinter: How to Create the Game File
To write our game code file, we are going to use Notepad which is available to use on a Windows laptop or computer. If it isn't already available as an app on your computer, you can download it from the Microsoft store. From your Start menu on your computer just click the icon for Microsoft store. From there, you can browse or do a search for the app you want. Notepad is a basic code editor, and we can paste or write our Python Tkinter code into the editor, and save the file as, example: a mygame.py, py file type. If you prefer to use another coding editor that is fine also.Coding Tkinter: How to Create a Game File
To write Tkinter game code on my laptop, I use Notepad, which is a free Windows code editor. On my cell phone, I use Pydroid3's built in code editor, and also, ACode's built in code editor. Any code editor is good to write your code, and save it, example, mygamecode.py, a .py file type.How To Load The Game File
There are several ways to get your code running. For laptop(any windows computer), just call the code, its' the three lines(call code) included at the Example code section with the game's code. Just change the folder names to match those on your computer, that has 'keyboard-inputs.py'.Simply paste the lines into the REPL at the >>> prompt, tap the 'enter' button twice, and the game window populates. To rerun same code, tap up arrow on your keyboard, and tap enter again. Note: you must have clicked out(tap x) of the game window, to rerun the code this way. You can also paste the codeset(all the code) into the REPL, but this is not recommended, unless it is just a few lines, as large codesets can be problematic, especially if you get 'run code errors'.
For Cell Phone with Pydroid3: 2 Ways to Run the Code, Paste the codeset into the editor(white screen), and tap the RUN icon. A game screen will populate, and run your game. Or, you can save the 'keyboard-inputs.py' file to a folder named Pydroid3; then, use the folder icon at top of Pydroid3 editor to open that file. File loads the code into the editor(white screen), then, tap the RUN icon to run the code.
Keep Py File and Images Together
With Android cell phones, you can run, example: mygame.py file to play the game. So these file types can be opened from any folder on your phone. I created a folder named Pydroid3, to easily know where the files go.
Just remember to keep the game images in the same folder as the mygame.py py file. Open Pydroid3 app, select the folder icon at top of white screen editor, goto your files, select the py file; it loads into Pydroid3. Just tap RUN icon at bottom of screen, to RUN your game code.
Create ShortCut
To organize your py files, and games, shortcuts can be created from the game file. Any file(link) can be added and become a shortcut which gets placed on the home screen, like an app icon. You can also customize the icon.
To open the tkinter game, you simply tap on the 'shortcut' link you created on the home screen, and then Pydroid3 app opens, and loads that link, and plays the tkinter game.
Shortcut apps are free to download from Google Play Store. Shortcut Maker is a popular one, that allows you to customize the shortcut's icon.
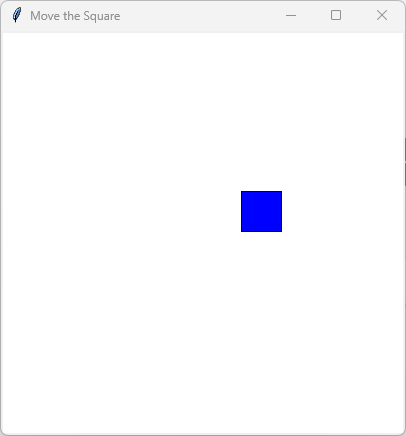
Tkinter Game Shot from Laptop
Use arrow keys on the Windows keyboard,
to move the square.
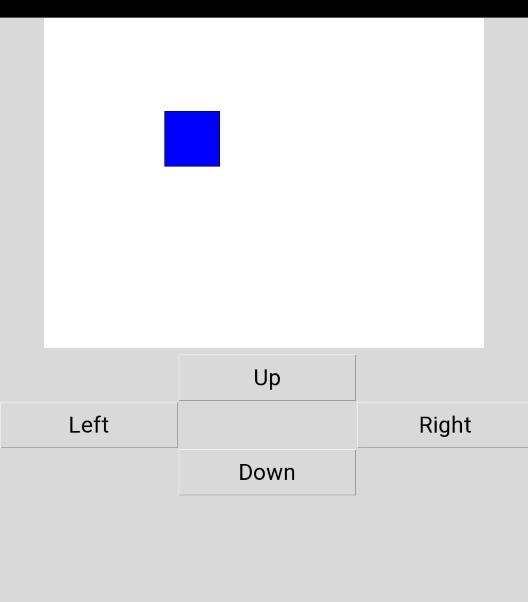
Tkinter Game Shot from Phone
Use on-screen arrow keys to move the square.
Code For This Tutorial
Because Android cell phone's don't have a built in keyboard like a windows computer, we must write code to implement on screen inputs for our arrow selectors.The laptop code and android cell phone code can be toggled, for the on screen buttons that implement the input(arrow selections). At the code where it says TRUE, FALSE, just enter False, for laptop, and TRUE, for cell phone. That way, the arrow selector input controls will appear on screen for the cell phone version of the game.
We don't require them for the laptop, because we can use our keyboard, which already has the arrow keys built in. So, when running the code on our laptop, or windows computer, just use FALSE, at the toggle line in our game code. Note: We don't have to comment out(#) the lines of code we are not using because Tkinter module will just ignore it.
This next code, we specify our game window size with 800 and 600, width and height. And, for background color (bg), we chose 'white'. This is drawn to the canvas with the line 'canvas.pack()'.
canvas = tk.Canvas(mygame, width=800, height=600, bg="white") canvas.pack()
This line of code, creates the square blue box we are using as our shape. So to get our size; 100x100, width and height; we use: 180, 280 for the width, and 180, 280, for the height. Just subtract the two numbers, this gives the 100x100 size. For our square shape color we chose 'blue'.
player = canvas.create_rectangle(180, 180, 280, 280, fill="blue")
Next, in code, we create 'functions' for all the arrow directions we need for the laptop code, that uses the keyboard arrows.
def move_up():
def move_down():
def move_left():
def move_right():
Once we write that code, we write code for the 'event functions'
def move(event): and, again, for all the directions. Finally, we use the bind method, to bind them all together. Now, when an arrow key is pressed on the laptop, the blue square moves in the direction selected.
Cell Phone Code
To get the arrows working on the cell phone, we use a different approach. We don't have the required built in keyboard on a cell phone, so instead, we can place our arrows keys onto the game screen on the cell phone.
We can write code to use buttons created from frames, as shown in this next code block. We create a variable named 'btn_frame', and attach it to the Tkinter class with a frame. Then we draw it to the game screen using 'btn_frame.pack'. Next, we write code for all the arrow directions and attach them to the command method, and giving them a row and column position with 'grid'.
Next, we change our Toggle code to read TRUE, for cell phone. Now when we RUN our game code in Pydroid3(for cell phone), the arrow buttons will display on the game screen itself, and we can just tap an arrow to move our blue shaped square.
if USE_BUTTONS:
btn_frame = tk.Frame(mygame)
btn_frame.pack(pady=10)
tk.Button(btn_frame, text="Up", width=10,
command=move_up).grid(row=0, column=1)
tk.Button(btn_frame, text="Left", width=10,
command=move_left).grid(row=1, column=0)
tk.Button(btn_frame, text="Right", width=10,
command=move_right).grid(row=1, column=2)
tk.Button(btn_frame, text="Down", width=10,
command=move_down).grid(row=2, column=1)
Summary
In this tutorial, we learned how to implement a shape and add input controls to it so we can move it around the game screen. With an Android cell phone, we can place our arrow keys directly on the game screen. With a Windows laptop, we can use the built-in keyboard, and its' arrow keys.To do this, we must write code for the two implementations, cell phone and laptop, however, we can easily add a toggle for this. Also, we don't have to comment out the code we are not using, because Python will simply ignore it. This will make coding much easier for the two platforms - Android and Windows.
With this tutorial, we included one set of arrow keys to move our shape. However, with Tkinter we can add two sets of 'input controls', that way, two players can be playing a game at the same time - on a laptop or cell phone. We can learn how to implement this as we continue our tutorials.
Next Tutorial: Next Week
EXAMPLE CODE - Code For This Tutorial.
JUST copy and paste this code.
JUST copy and paste this code.