
Python Tkinter Game Tutorials
Tkinter Game Dev: Create Simple Robot
About This Tutorial:
For this tutorial we are going to create a simple robot using the Tkinter code class of Python. This is actually quite easy to do. First we create our game, and then we add all the pieces for the simple robot. And, we can also add some animation to the robot. In this tutorial, we are going to add some movement to the robot's eyes, so that they blink. Read all the details at section - Code for This Tutorial.The code for this tutorial can easily be copied and pasted. Get that code at the Example Code section on this page. Also, at Game Shot, you can see an image of the game window; for Windows, Cell Phone, and also a Video Link(if available).
If you're just new to our website, we recommend to read these next few sections, otherwise, you can scroll to the, Code For This Tutorial, section.
FYI: In addition to running your code in Python 3.13 REPL, on your Windows computer, the code from this game dev tutorial can be RUN with Pydroid3, an Android mobile IDE and Python interpreter. Pydroid3 has a built in code editor you can use to write, edit, and save Python Tkinter code. Pydroid3 is available to download and install on your Android phone from Google Play store. It has ads, but you can write and edit your Tkinter code, RUN your code, and see the GUI display.
Windows: How to Create the Tkinter Game File
To write our game code file, we are going to use Notepad which is available to use on a Windows laptop or computer. If it isn't already available as an app on your computer, you can download it from the Microsoft store. From your Start menu on your computer just click the icon for Microsoft store. From there, you can browse or do a search for the app you want. Notepad is a basic code editor, and we can paste or write our Python Tkinter code into the editor, and save the file as, example: a mygame.py, py file type. If you prefer to use another coding editor that is fine also.Android Cell Phone: How to Create a Tkinter Game File
On my cell phone, I use Pydroid3's built in code editor(white screen), and also, the ACode mobile editor(white screen). Both of these mobile apps are free to download and use from Google Play store. Also, any code editor can be used to write, and edit, your Tkinter code. Just remember to save the code as a .py file type - example, mygamecode.py.How To Load The Game File
There are several ways to get your code running. For laptop(any windows computer), just call the code, its' the three lines(call code) included at the Example Code section with the game's code. Just change the folder names to match those on your computer, that has 'name-of-file.py'. Simply paste the lines into the REPL at the >>> prompt, tap the 'enter' button twice, and the game window populates.If you edit the code, just repaste it again, to RUN the code again. Also, to rerun same code, tap up arrow on your keyboard, and tap enter again.
Note: you must have clicked out(tap x) of the game window, to rerun the code this way. You can also paste the codeset(all the code) into the REPL, but this is not recommended, unless it is just a few lines, as large codesets can present issues. With this Windows version of PHP 3.13, you cannot scroll back through all the code once it has been pasted. So, if you get an error it could be problematic to resolve. For these reasons, using the Call Code is much simpler.
For Cell Phone with Pydroid3: 2 Ways to Run the Code, Paste the codeset into the editor(white screen), and tap the RUN icon(bottom of editor). A game screen will populate, and run your game. Or, you can save the 'name-of-file.py' file to a folder named Pydroid3; then, use the Folder Icon at top of Pydroid3 editor to open that folder and get the file. File loads the code into the editor(white screen), then, tap the RUN icon to run the code. You can name your file folder any name you like. I use Pydroid3, to keep it simple to find. Pydroid3 loads your file, and goes to it also.
And, with Pydroid3, you can keep many tabs open at top of editor. To view them, just scroll left, and right; and tap on the name you want to view, and that file's code will display in the editor. Then, you can edit the code, add code, then just Save, by clicking on the Folder Icon at top of editor, and select to Save it. To Close a tab, just select it, then select Folder Icon, and select Close.
To Create a new file, select Folder Icon, and select New. Add your code, (paste, or write it), then select SAVE AS, from the Folder Icon, select the Folder you created(Pydroid3) from the selections available, and then add a name for the file, and click to save it. Now your new file has been saved in the folder Pydroid3. When you want to Run code, just open Pydroid3 app, select Folder Icon(top of editor), and then select the .py file you want to view. All files must have the .py name, example -mygame.py.
Keep Py File and Images Together
With Android cell phones, you can run, example: mygame.py file to play the game. So these file types can be opened from any folder on your phone. I created a folder named Pydroid3, to easily know where the files go.
Just remember to keep the game images in the same folder as the mygame.py py file. Open Pydroid3 app, select the folder icon at top of white screen editor, goto your files, select the py file; it loads into Pydroid3. Just tap RUN icon at bottom of screen, to RUN your game code.
Create ShortCut
To organize your py files, and games, shortcuts can be created from the game file. Any file(link) can be added and become a shortcut which gets placed on the home screen, like an app icon. You can also customize the icon.
To open the tkinter game, you simply tap on the 'shortcut' link you created on the home screen, and then Pydroid3 app opens, and loads that link, and plays the tkinter game.
Shortcut apps are free to download from Google Play Store. Shortcut Maker is a popular one, that allows you to customize the shortcut's icon.
Tkinter Simple Robot
Shot from Laptop
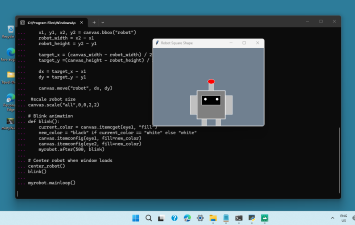
Tkinter Simple Robot
Shot from Phone
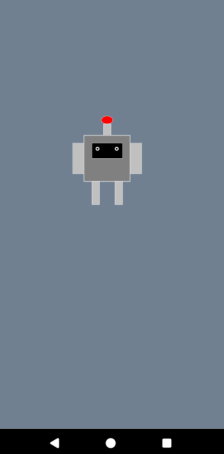
Code For This Tutorial
First we created the game name and added the Tkinter class, with:import tkinter as tk
#create your game
myrobot = tk.Tk()
#title displays on the game window
myrobot.title("Robot Square Shape")
We must import the tkinter class. Then we create a game name, so I used, myrobot. Then we add a title for the game window. This name shows on Windows, but not on Pydroid3 game window. Usually game names are shown on screen before the game starts, so it's not really a necessity, but you can add it for Windows if you want to.
FYI: The # symbols are just how we add comments to the code, so we can change these as we want. If you add a comment but forget to add the # symbol, you will get build errors.
NEXT, in our code, we want to create a game screen size, and also set the canvas. Since we are coding cross platform, we set two different sizes for this, otherwise, the robot won't center properly on one of the screens. I code on a 6" screen for the Pydroid3 app on my Android phone, so size 930 width, and 1500 height, works to get the robot centered on the game screen. Windows is easier for this, and 400,400 works fine. Just change the values for the screen your coding.
#set screen size
#windows use 400.400
#pydroid3 use 930,1500
canvas_width= 400
canvas_height = 400
#add a color
#slate grey
BG_COLOR = "#708090"
# Canvas
#fill all screen areas w color
canvas = tk.Canvas(myrobot, bg= BG_COLOR)
canvas.pack(fill="both", expand=True)
In this code, we also add our color choice which is a slate grey. And, for the canvas, we add code so that the color will expand to fill all areas of the screen. You can tweak the color, and the screen sizes as you want, as your mobile screen size may differ. The sizes coded here keep the robot size similar for both cell phone and Windows computer. On a Windows game screen, you might want the robot size larger, depending on how you plan to action it.
Next in code, we want to create our Simple Robot, and to do this, we are going to add(code) each piece of the robot. Here we have the code for body and arms. All the body pieces - legs, antenna, face, pupils, follow the same code process.
To create body pieces, we have to use shapes; oval, rectangle, line, polygon, are common shapes used in Tkinter. To get our shape size, we use two numbers for a width and a height; then the difference of those is the actual size that is drawn to the game screen.
First, the body, has a 40, 88 for width, and a 40, 88 for height, so we subtract each 88 - 40, and get 48, so the width and height are 48 x 48 for the body piece, so basically a square shape.
# Create Robot, add tag "robot"
#code the robot pieces
# Body
canvas.create_rectangle(40, 40, 88, 88, fill="gray",
outline="white", width=2, tags="robot")
# Arms
canvas.create_rectangle(28, 48, 40, 80, fill="silver",
outline="white", width=1, tags="robot")
canvas.create_rectangle(88, 48, 100, 80, fill="silver",
outline="white", width=1, tags="robot")
For the arms, the same shape is used, rectangle, and again, two numbers for width and height, then substracted, to get the size that is drawn to the game screen.
Next, we create a function so we can center the robot on the game screen, here is that code:
First we get the bounding box of the shapes, then add the code to center the robot based on those values. We also added code to scale the robot. This is great for cross platform coding. You can tweak the values as you like. You can try any number, example - 'canvas.scale("all", 0,0,3,3). If you want it smaller or larger just adjust the number values. This is an easy way to scale your game characters for Windows and Android cell phone(assuming you're coding for both).
#Create function to center robot
#on the screen
def center_robot():
# Get bounding box of all shapes with tag "robot"
x1, y1, x2, y2 = canvas.bbox("robot")
robot_width = x2 - x1
robot_height = y2 - y1
#center the robot on screen
#for width and height
target_x = (canvas_width - robot_width) / 2
target_y =(canvas_height - robot_height) / 2
dx = target_x - x1
dy = target_y - y1
#move to the position
canvas.move("robot", dx, dy)
#can scale robot size
canvas.scale("all",0,0,2,2)
In our last codeblock, we are going to add the code that gives the impression the robot is blinking. To get the robot to blink, we are adding two colors for the eyes, and setting a timer so that they display opposite each other, thus giving the blink effect. We set the timer for 500mm, that is milliseconds. So in code, we are saying to fill with the white color, else, use the black color, and to set a time for each color of 500mm. In the code, myrobot.after(500.blink), we use the word after, which in Tkinter means time, or to set a timer.
# Blink animation
def blink():
current_color = canvas.itemcget(eye1, "fill")
new_color = "black" if current_color == "white" else "white"
canvas.itemconfig(eye1, fill=new_color)
canvas.itemconfig(eye2, fill=new_color)
myrobot.after(500, blink)
# Center robot when window loads
center_robot()
blink()
#start the game
myrobot.mainloop()
The last line of code is the game loop. Here we attach our game(myrobot) name to the game loop so it will start the game, and display the game window.
Summary
In this tutorial, we learned how to code a simple robot with Tkinter and implement shapes for the robot body.We also added some tags to the code for each of the robot body pieces. You can name the tag whatever you like. For this robot code, we used the name 'robot', for all the robot body pieces.
Adding a tag to each robot piece makes it easier to move or animate the robot, and we don't have to code as much to do so.
In this tutorial, we used the, tags=robot, when we created our function to center the simple robot in the game screen. Since we had those tags included in code, we could simply add the tag name(robot), when we wanted to move the robot: canvas.move("robot", dx, dy). The robot(with all its' pieces) were moved together using just one simple line of code.
Game characters like robots can be fun for game play, and you can get as creative as you like.
In our next tutorial, we will learn how to code a more complex robot, and animate it also.
EXAMPLE CODE - Code For This Tutorial.
JUST copy and paste this code.
JUST copy and paste this code.