
PREV Page
Goto - All Tutorials
Lets Edit Our Newly Created App Named- Tutorials

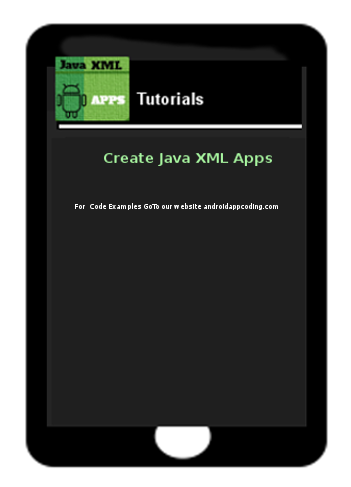
We have created our simple app named Tutorials; and, as you can see by looking at the image of it here: it has a small android icon and next to the icon; its name - Tutorials. The text showing on this app`s first page (textView) is Hello World.
In the previous Tutorial, we learned about the various pages that were created for this simple app, and now we can add to our app by editing our code pages to add additional components, elements, and text.
Lets edit this first page of our app (usually known as the View or textView): It is in fact a View, as the View represents the screen view of your Activity: and things that can be added Like: ImageView, TextView, Button, to name a few. we are going to:
change the app`s icon.
rename the app's text string AND change its text
add another string -some new additional text, and
add some style attributes to the text strings ;
Change the App Icon
We will add an Icon to the app. It can be downloaded from this page at the Example Code section.A png file It is 85px X 74 px; small enough to be used for the drawable-hdpi screen density.
To download this to your tablet, tap on the image shown; then choose the SAVE IMAGE; Save it as: icon_app_green.png
It will be saved to your designated image folder on your tablet usually - download, images, or pictures folder. Then, copy it from that folder and paste it into the AppProjects folder.....where your App; named Tutorials files are....use your device file manager to copy and paste images into your App Projects, as you cannot copy paste while using AIDE coding editor.
AppProjects/Tutorials/Res/Drawable-hdpi folder.
The AppProjects folder is found in your tablets files so named AppProjects.
Just click into this folder then to the Tutorials folder, then the Res folder, then the Drawable-hdpi folder where you will place the icon image png.
This will replace the png there now named ic_launcher.png, however, both images can stay in the folder.
Then goto AIDE, and open your AppProject files for Tutorials;
Then code the file name icon_app_tutorials.png , into the androidmanifest.xml file code; where it shows ic_launcher.png, (you don`t need to add .png just the image name) Our new icon will replace this one, so we remove this one from the code.
SAVE the file once you have added the code for the new icon.
To SAVE the file click the icon top right of your AIDE screen, then choose SAVE.
To view your newly added icon, you must RUN and then INSTALL your app.
(to RUN the app click the icon from top right of AIDE then choose RUN)
Once the RUN has completed, it will ask you if you want to INSTALL the update to your app; choose YES. Then simply open your app to see the changes you made; your new icon should now be on the Screen's View; as shown in this image.
Add Additional Text To The TextView
As we mentioned, our app named Tutorials has only 1 short text - Hello World. This first page in your app can be used to describe what your app is about and then add links to the other pages in your app.(assuming your app is more than 1 page)And, each page of your app must have a TextView because each TextView is where you code all 'text' you want shown on your app's screen. If your app doesn't have any text; example your app just has photos, then perhaps you don't need a textview on the View or on every View. (if more than a one page app) .
The actual page you created is known as the Activity; the 'text' you want to place on that page is coded in the TextView. If you wanted to show an image, then you would code that in the ImageView element; or if you wanted to code a button you would code that in a Button element.
Browse the code in the example code on this page to view a 'TextView' coded.
The file that has the textView code is at: res/layout/filename.xml
For this simple app template we are using, the file name is main.xml, and this filename can be changed at anytime to whatever name you choose. Usually you would name it appropriate to your app, and any other app java pages it may be correlated with.
Example, you could name it tutorialsintro.xml which would be a good name since it is the first page of your app.
And, when creating an app using a ,'simple template' as we are doing for each of our tutorials, the res/layout filename is by default named main.xml. To keep learning simpler it is best to leave it as main.xml. When you know more about coding the pages you can change layout page names as you like.
And, as mentioned, you can add whatever you like to each textView: like text, text links, images, buttons, to name a few. To style the text you add to your apps pages (textView) you can use a variety of style attributes :
like - textSize, textColor, typeface, textColorLink; then just add an value for each one you add.
For the complete list of what can be added to TextView:
View 'TextView Attributes'
For example: typeface="sans", typeface is the attribute and "sans" is a value.
If you look at the Example Code on this page you can see the various textView attributes that we added to each of the apps strings (the text)
...also read... Coding TextViews
For our app: Tutorials - we are going to change the already coded string named Hello; and also
add a new line of text (string) and style it.
First,we are going to change the string Hello :
rename it to abouttutorials and
replace its text with this new text:
Create Java XML Apps ,
Also, we will change its text color to green' and make the text size larger, so it appears like a title. To see how this is coded and how to code color and text size look at the images shown here.
All Styling for a a TextView text (app text) is coded in the TextView element, then
referenced in the strings.xml file
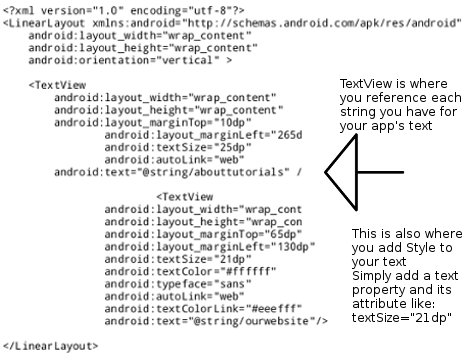
This is an image showing the strings.xml page. All strings are placed in this file.
Look at the first string name: it is named 'abouttutorials', and the text will read;
Create Java XML Apps

This is an image of the main.xml page
Look at the TextView element, at the line: android:text="@string/abouttutorials"
This is how we make a reference to and code our text string name in the TextView element.
Each string name you add to your TextView must have the name placed in the
strings.xml file.
Let's edit/change our code:
GoTo AppProjects/Tutorials/Res/Values/Strings.xml
to open this file to edit the code or simply replace it by using copy and paste from the code provided on this page.
GoTo AppProjects/Tutorials/Res/Layout/Main.xml
to open this file to edit the code or simply replace it by using copy and paste from the code provided on this page.
About The Example Codes on This Page
We provided codes to use so you can simply copy and paste them into your main.xml and strings.xml files. And after editing your files Save them: click right top
AIDE icon, then choose SAVE. Then choose RUN, INSTALL, and OPEN, the app to see the changes you made. You can RUN your app after each change you make or
make all changes, then RUN your app.
Next, we will add our new line of text
To add new text to our app Tutorials page, we must add a new string and give it a name; code it into our strings.xml file, located at
res/values/strings.xml, and also add as a TextView element in our main.xml file
Looking again at the above image of the TextView; you can see how this new string was coded into the strings.xml file and the
main.xml file at the TextView element.
Our new string is named: ourwebsite
In our strings.xml file we code it as : string name = "ourwebsite"
In the textView element we code it as:
android:text="@string/ourwebsite
This new text string will read:
For Code Examples GoTo our website androidappcoding.com
This strings.xml file is located at AppProjects/Tutorials/res/values/strings.xml
Add Style To The Text
As mentioned, to style your text you must add style attributes and a value for each one you add.
To code a style for the text you added; we use style attributes in the code: Example: android:textSize="25dp"
the android:textSize is known as the attribute, and the 25dp is known as the value of that attribute.
A style can be added to
a single string; like a single line, a paragraph, or to an entire page of text.
For our new string of text added we used several styling properties; as you can see by looking at the image shown for its Textview.
Adding various styles to your text is good because it allows you to be creative with your text; like our first line has larger
text which is better for the summary of what our app is about, then our next line of smaller text and different color text; gives additional information about our Tutorials.
You can also use a TextView style attribute to make a url text clickable as we did with our domain name androidappcoding.com. We only need to add the
android textView attribute named; android:autoLink="web"
to make any text that is a url (domain name) clickable.
You can look at the TextView image to see how this is coded.
Just click on androidappcoding.com in your apps page and you will goto our website.
For easier coding, just copy and paste the codes from our Example Code on this page to your apps files:
main.xml and strings.xml Paste the code to replace what's there, SAVE each file, then RUN your app to see the changes made.
(To RUN your app, click the top right icon in AIDE, the choose RUN. Follow prompts to install, and update the app.)
Then, simply OPEN the app when prompted, to view it. The app opens for you. To reopen or access your app, just find the icon associated with in
your tablet's apps, and click the icon, Your app will open.
The app now looks like this image:
Save to your device as:
icon_app_green.png,
then copy paste it into your res/drawable folder for your app images
This free script provided by
JavaScript
Kit
AIDE for creating Android Apps on your tablet or cell phone(android).
Free and Paid. GoTo Aide
ANDROID STUDIO - for creating Android Apps on your desktop computer.
Free to Install and Use
Learn more - Android Studio
The Java XML files we code(example codes) and the Android Apps we create in our Free Tutorials are compatible with Android Studio and AIDE. Just choose Java XML as your Programming Language.