Libgdx with Android For Game Dev
Game Dev Tutorial : Run Animation With 30 Frames using Animation Class of Libgdx
Game Dev -All Game Dev Tutorials
This tutorial shows a single game character running in a continuous loop. We can create this animation from a spritesheet containing 30 individual frames, which we can link together using the Animation class of Libgdx. The spritesheet has 6 columns, and 5 rows. To get the total frames we can multiply the 6 x 5, for a total of 30 frames. We can load our spritesheet with the Texture class member, and then get each of these frames by coding the TextureRegion code call.
We must create two TextureRegion class members, one to split the Texture and get the columns and rows, and then another TextureRegion, which is the result of the columns times the rows. This result then becomes our 'walkAnimaton' variable, which we can animate as we want.
All code for this tutorial is at the Example Code section on this page. At App Shot, you can see the animation in action.
FYI: The code from this game dev tutorial is compatible with Android Studio with the Libgdx component. Read more about Android Studio and Libgdx Here
Click Create; Animation - 30 Frames game app is created, and the MyGdxGame.java page opens in your AIDE coding editor.
For more info on navigating files and using the AIDE coding editor, goto Tutorial 1.
App Shot - Portrait 5.8" Game Screen
Animation with 30 Frames
This app is available for download.
Download/Install This App: Here

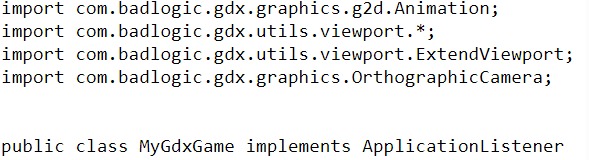
For this tutorial, we must include the necessary imports, game class, class members(with variables), create method, render method, and, dispose method. And, include any additional classes and methods we require for this tutorial. We include imports for Texture, TextureRegion, Animation, and, the standard imports of ExtendViewport, OrthographicCamera, SpriteBatch. And, for our game class for this code, we are coding 'ApplicationListener'. To note, when using this class we must include the Dispose, resize, pause, and resume methods. If we are using 'ApplicationAdapter' class then we do not have to include pause, resume methods. This next image shows how imports and class are coded.
Class Members -Variables At variables we include the class members and then our named variables for theme. So, for this tutorial, we include: OrthographicCamera camera; ExtendViewport viewport; Texture walkSheet; TextureRegion[][] tmp; TextureRegion[] walkFrames; SpriteBatch batch; float stateTime; Animation walkAnimation. Camera and viewport are necessary to make sure our game character is displayed properly across different viewport sizes. Spritebatch is necessary as it facilitates the drawing of the game character to the game screen. Texture is used to load our game asset, in this case, our spritesheet containing the 30 frames. TextureRegion is required to create the 'tmp' variable and the 'walkFrames' variable. So, there are two TextureRegion variables we must create. The 'tmp' variable for when we split the texture region and get all the frames, and the 'walkFrames' variable for getting all the frames together, columns times the rows.

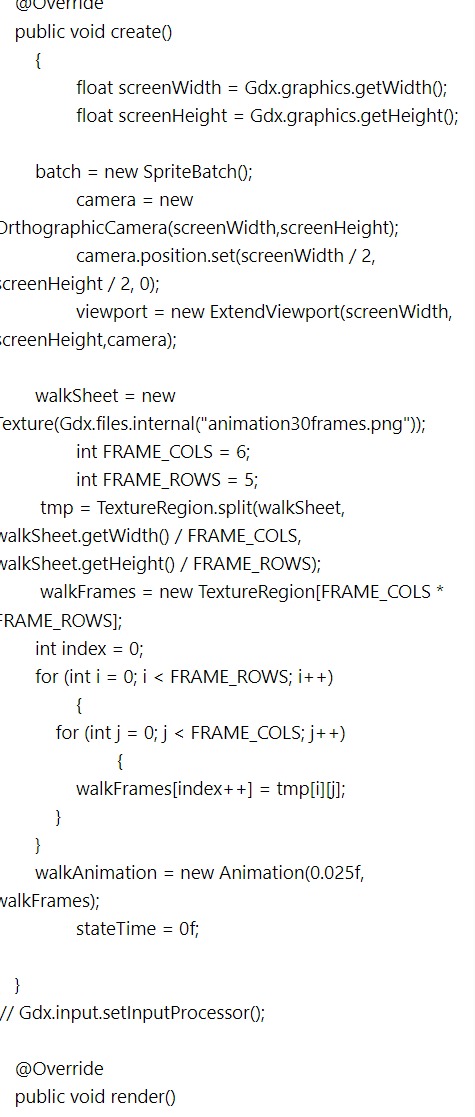
Create - At create method, we include the new instances of all the class members we are coding for this tutorial, and those are: Spritebatch, Viewport, and Camera. We set the camera so it is centered on the game screen, and the viewport is attached to the camera. By using float for width and height parameters, and including the ExtendViewport, our game screen assets will adjust properly on a variety of mobile screen sizes. This doesn't mean it will fit the entire screen on a landscape orientation, but it will render properly for aspect ratio on portrait and landscape screen modes.
And, that means our images won't look flattened or squished when you switch from portrait to landscape on your cell phone or tablet. Since we are coding our game for portrait orientation, we don't have to include the code to make it look good in landsape orientation, but it certainly looks nicer if we do.
Looking at the game code in the previous and next image, we can see how we code for the Texture, and the two TextureRegion code calls; first loading our game image, the spritesheet, and then getting the frames(columns and rows) with the 'tmp' texture region variable call, and then creating the 'walkFrames' variable from another TextureRegion code call. Then once we have our two TextureRegions coded, we can pass that along to the Animation class and to our 'walkAnimation' variable. And, we want to give a timing for each of the frames, so we add 0.025f, meaning, .025 of a second. You can set this as you want. Bascially, how fast you want the game character to move, and you want the animation to look smooth. If we slow the timing, the character's motion won't look as fluid, and won't look as natural.
Render
Render method, is where we draw our game graphics to the screen. So this would include images, fonts, game characters, and the like. If we use Stage, we can draw them to stage with the 'stage.draw()' code call, otherwise, we can draw them with batch, as in this tutorial.
First in code, we must clear the game screen, and then set our new screen color, as seen in this next image of the game code. Because we want a black screen color, we code it as 0,0,0,1. Then we set the camera to update, and include the 'setProjectionMatrix' code, which is required for proper resizing of the game screen. This code is necessary for the camera, and viewport to work together, along with the code that sets the width height parameters in the create method.
Next in code, we include 'getDeltaTime', which sets the proper timing for our animation and gets the time we set in the create method for our animation.
To draw our game character to screen we want to use batch for this tutorial. However, we cannot draw our animation variable, 'walkAnimation', with 'batch', as batch requires a current frame in this scenario. So, we have to instead get a frame from the walkAnimation variable, and once we get that, then we can use it with the 'batch' call, to draw it to our game screen. The code,
TextureRegion currentFrame = walkAnimation.getKeyFrame(stateTime, true);
is how we get the currentFrame. Then we can code the currentFrame when setting the batch to draw our game animation frames.
This code:
batch.draw(currentFrame,260,460,95,115)
draws our frames to the screen, and sets their position for width and height, and the character's size also. So, 260 is for width on the game screen, 460 is for height on the game screen. 95 is for the width of the game character, and 115 is for its' height, as shown in this next image.

Dispose - At dispose method, we get to dispose of all our game assets, to keep our game performance at its' best. If using Stage, we can dispose of all assets at once, with 'Stage.dispose();' code call, otherwise we can dispose of each variable directly. Because in this tutorial, we are not using stage, we will dispose of our asset with this code.
walkSheet.dispose().
Note, we don't include the class member name, Texture, only the variable name for it - walkSheet.
We set the 'int index' at 0, so the animation starts with the first frame from the spritesheet, and we set a time duration for each of the frames at 0.025f of a second, and added the logic code so each frame(columns and rows) are presented in proper order of each other.
Before we draw our animation to the game screen, we get the 'currentFrame' from the TextureRegion by using the 'get key frame' code call. Then we draw each frame of the animation to the game screen with the batch method. Within the batch, we can set the size for our animation character, and define its' position on the game screen with x and y, for width and height.
In this animation, each frame was set with the same timing(of a second), however, we can also code an animation where some or all frames do not share the same timing. This could be useful in a game scene scenario. We'll learn more about coding this type of animation as we continue our tutorials.
Game Dev -All Game Dev Tutorials
App Project Name: Animation - 30 Frames
This tutorial shows a single game character running in a continuous loop. We can create this animation from a spritesheet containing 30 individual frames, which we can link together using the Animation class of Libgdx. The spritesheet has 6 columns, and 5 rows. To get the total frames we can multiply the 6 x 5, for a total of 30 frames. We can load our spritesheet with the Texture class member, and then get each of these frames by coding the TextureRegion code call.
We must create two TextureRegion class members, one to split the Texture and get the columns and rows, and then another TextureRegion, which is the result of the columns times the rows. This result then becomes our 'walkAnimaton' variable, which we can animate as we want.
All code for this tutorial is at the Example Code section on this page. At App Shot, you can see the animation in action.
FYI: The code from this game dev tutorial is compatible with Android Studio with the Libgdx component. Read more about Android Studio and Libgdx Here
Create our Game App Screen
We are creating a new app for this tutorial. First, we must create our new mobile game app, so in AIDE, at the AppProject file hierachy, Choose Create New Project, select Mobile Game, and New Mobile Game; then add the App name, Animation - 30 Frames(Note: no spaces in the app name(can use _ ), or you can add spaces after you create it; Just Goto: the 'AppProject' folder; just select the App Name, and then select rename). Next, add the package name, 'com.aac.animation_30frames'.Click Create; Animation - 30 Frames game app is created, and the MyGdxGame.java page opens in your AIDE coding editor.
For more info on navigating files and using the AIDE coding editor, goto Tutorial 1.
App Shot - Portrait 5.8" Game Screen
Animation with 30 Frames
This app is available for download.
Download/Install This App: Here
Code For This Tutorial
Imports and Game ClassFor this tutorial, we must include the necessary imports, game class, class members(with variables), create method, render method, and, dispose method. And, include any additional classes and methods we require for this tutorial. We include imports for Texture, TextureRegion, Animation, and, the standard imports of ExtendViewport, OrthographicCamera, SpriteBatch. And, for our game class for this code, we are coding 'ApplicationListener'. To note, when using this class we must include the Dispose, resize, pause, and resume methods. If we are using 'ApplicationAdapter' class then we do not have to include pause, resume methods. This next image shows how imports and class are coded.
Class Members -Variables At variables we include the class members and then our named variables for theme. So, for this tutorial, we include: OrthographicCamera camera; ExtendViewport viewport; Texture walkSheet; TextureRegion[][] tmp; TextureRegion[] walkFrames; SpriteBatch batch; float stateTime; Animation walkAnimation. Camera and viewport are necessary to make sure our game character is displayed properly across different viewport sizes. Spritebatch is necessary as it facilitates the drawing of the game character to the game screen. Texture is used to load our game asset, in this case, our spritesheet containing the 30 frames. TextureRegion is required to create the 'tmp' variable and the 'walkFrames' variable. So, there are two TextureRegion variables we must create. The 'tmp' variable for when we split the texture region and get all the frames, and the 'walkFrames' variable for getting all the frames together, columns times the rows.
Create - At create method, we include the new instances of all the class members we are coding for this tutorial, and those are: Spritebatch, Viewport, and Camera. We set the camera so it is centered on the game screen, and the viewport is attached to the camera. By using float for width and height parameters, and including the ExtendViewport, our game screen assets will adjust properly on a variety of mobile screen sizes. This doesn't mean it will fit the entire screen on a landscape orientation, but it will render properly for aspect ratio on portrait and landscape screen modes.
And, that means our images won't look flattened or squished when you switch from portrait to landscape on your cell phone or tablet. Since we are coding our game for portrait orientation, we don't have to include the code to make it look good in landsape orientation, but it certainly looks nicer if we do.
Looking at the game code in the previous and next image, we can see how we code for the Texture, and the two TextureRegion code calls; first loading our game image, the spritesheet, and then getting the frames(columns and rows) with the 'tmp' texture region variable call, and then creating the 'walkFrames' variable from another TextureRegion code call. Then once we have our two TextureRegions coded, we can pass that along to the Animation class and to our 'walkAnimation' variable. And, we want to give a timing for each of the frames, so we add 0.025f, meaning, .025 of a second. You can set this as you want. Bascially, how fast you want the game character to move, and you want the animation to look smooth. If we slow the timing, the character's motion won't look as fluid, and won't look as natural.
Render
Render method, is where we draw our game graphics to the screen. So this would include images, fonts, game characters, and the like. If we use Stage, we can draw them to stage with the 'stage.draw()' code call, otherwise, we can draw them with batch, as in this tutorial.
First in code, we must clear the game screen, and then set our new screen color, as seen in this next image of the game code. Because we want a black screen color, we code it as 0,0,0,1. Then we set the camera to update, and include the 'setProjectionMatrix' code, which is required for proper resizing of the game screen. This code is necessary for the camera, and viewport to work together, along with the code that sets the width height parameters in the create method.
Next in code, we include 'getDeltaTime', which sets the proper timing for our animation and gets the time we set in the create method for our animation.
To draw our game character to screen we want to use batch for this tutorial. However, we cannot draw our animation variable, 'walkAnimation', with 'batch', as batch requires a current frame in this scenario. So, we have to instead get a frame from the walkAnimation variable, and once we get that, then we can use it with the 'batch' call, to draw it to our game screen. The code,
TextureRegion currentFrame = walkAnimation.getKeyFrame(stateTime, true);
is how we get the currentFrame. Then we can code the currentFrame when setting the batch to draw our game animation frames.
This code:
batch.draw(currentFrame,260,460,95,115)
draws our frames to the screen, and sets their position for width and height, and the character's size also. So, 260 is for width on the game screen, 460 is for height on the game screen. 95 is for the width of the game character, and 115 is for its' height, as shown in this next image.
Dispose - At dispose method, we get to dispose of all our game assets, to keep our game performance at its' best. If using Stage, we can dispose of all assets at once, with 'Stage.dispose();' code call, otherwise we can dispose of each variable directly. Because in this tutorial, we are not using stage, we will dispose of our asset with this code.
walkSheet.dispose().
Note, we don't include the class member name, Texture, only the variable name for it - walkSheet.
Summary
In this tutorial, we used the Animation class of Libgdx to create our animation with 30 frames. The frames were added to a spritesheet which we loaded using the Texture method. From that, we used TextureRegion to split the spritesheet in order to get the columns and rows for the animation, and a second TextureRegion, to get the result of multiplying the columns times the rows. Then, we passed that result onto our Animation class, with the variable name 'walkAnimation'.We set the 'int index' at 0, so the animation starts with the first frame from the spritesheet, and we set a time duration for each of the frames at 0.025f of a second, and added the logic code so each frame(columns and rows) are presented in proper order of each other.
Before we draw our animation to the game screen, we get the 'currentFrame' from the TextureRegion by using the 'get key frame' code call. Then we draw each frame of the animation to the game screen with the batch method. Within the batch, we can set the size for our animation character, and define its' position on the game screen with x and y, for width and height.
In this animation, each frame was set with the same timing(of a second), however, we can also code an animation where some or all frames do not share the same timing. This could be useful in a game scene scenario. We'll learn more about coding this type of animation as we continue our tutorials.
EXAMPLE CODE - Code For This Tutorial.
JUST copy and paste to update your code.
JUST copy and paste to update your code.