Libgdx with Android For Game Dev
Game Dev Tutorial: Create Walk Animation with 4 Frames from Spritesheet
Game Dev -All Game Dev Tutorials
In this tutorial we are going to learn about animations. Animations are commonly used in game dev to create complex action scenes. In previous tutorials, we learned how to add action to our game characters with MoveToAction of Action class, using methods like fadeIn, fadeOut, moveTo, moveBy, rotateBy, and others. Animated game characters can add yet another dimension to the game play scene.
Animations can be created in a couple of ways with Libgdx. For this tutorial, we are going to animate a game character from a four frame spritesheet. Each frame is one component of our animation. And, we are going to animate the four frames by implementing calls from the MoveToAction methods of Action class. As mentioned, these are the same action methods we used in several of our previous tutorials. For this tutorial, we are going to use some of those methods from Action class to make our game character animation.
We must first load the spritesheet, and for this, we can use Texture code call. Then to get each of the four frames, we are going to use TextureRegion. Once we have coded all four regions from the Spritesheet, we can then declare them each as Image, and declare each image as Actor, and add all the actors to the Stage. And, lastly, we add all the actions we want to our four frames. Because this is an animation, we must sync our timing just so, we that the four frames appear to be one image, even though we know that they are not. And, also important, because we want our animation to loop continously, we are going to add the 'forever' action to each frame as well.
All code for this tutorial is at the Example Code section on this page. At App Shot, you can see the Walk Animation in action.
FYI: The code from this game dev tutorial is compatible with Android Studio with the Libgdx component. Read more about Android Studio and Libgdx Here
Click Create; Walk Animation 4 Frames game app is created, and the MyGdxGame.java page opens in your AIDE coding editor.
For more info on navigating files and using the AIDE coding editor, goto Tutorial 1.
App Shot - Portrait 5.8" Game Screen
Walk Animation - 4 Frames
This app is available for download.
Download/Install This App: Here

Imports -

Game Class and Class Members(with Variables) For our class for this game we used - MyGdxGame extends ApplicationAdapter. Each game we code requires a game class. At variables we include the class members and then our named variables for theme. So, for this tutorial, we include:
Stage - we named as stage; Spritebatch - we named as batch; ExtendViewport we named as viewport; OrthographicCamera we named as camera; Texture we named as fourTextures(because we have 4 frames in the image); and then we name our four TextureRegions with TextureRegion regionOne, TextureRegion regionTwo, TextureRegion regionThree, TextureRegion regionFour; we must code four because we are getting the four frames from the spritesheet, one frame for each animation sequence.
Also, four Image class members as Image named as myImageOne, Image named as myImageTwo, Image named as myImageThree, Image named as myImageFour. These are required because we are going to create/declare our four Images from the four TextureRegions. Like all class members we create, we can name the variables for them as we like.

Create - At create method, we include the new instances of all the class members we are coding for this tutorial.
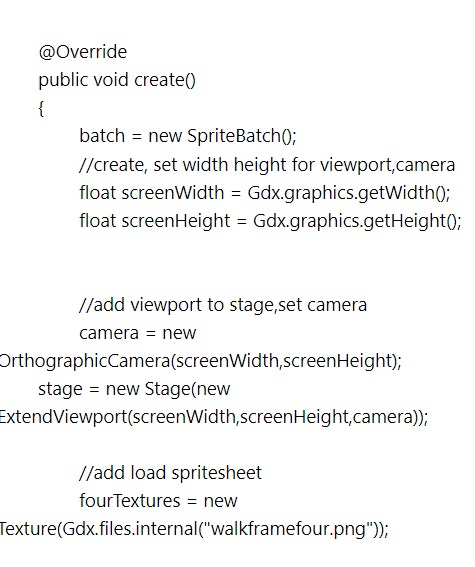
First, we create an instance of the Spritebatch, and the viewport, camera. These are standard, usually for every game we create. Next, for this tutorial we code for the texture regions, but, first we load the spritesheet as shown in this next image of the code. And, we include the width and height settings for the screen. These values are important for the viewport and camera, as they work together to position the game characters properly, including when the screen is resized.
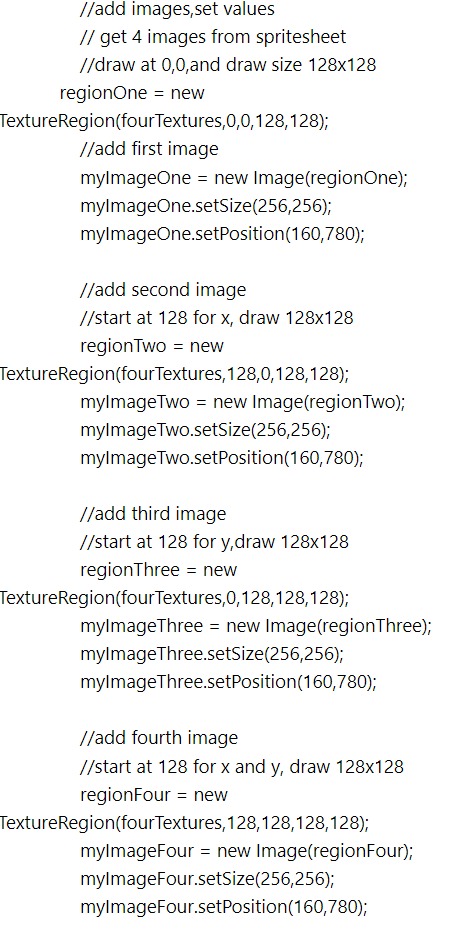
Get the 4 frames with texture region. We can code TextureRegion method to load each of the four frames from the spritesheet. Then, we pass each texture region to an Image,code call, and give each image a specific name: myImageOne, myImageTwo, myImageThree, myImageFour. Now that we have declared each of the texture regions as an Image, we can add all the images we create to the Stage, as shown in this next image of the code.
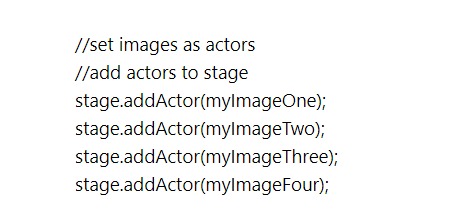
Each of the four Images we created, are now passed to Actor; and from actor we add the images to the Stage. Once they get added to the stage, we can then add the 'actions' to each of the images, and create our four frame animation.
Add frame duration time to get a better smooth loop action. Add actions for each of the four frames, and set their timing so the four frames action properly for the walk animation.

Next, we must add the code to keep the animation looping continuously, so this next image shows that code. We simply add the 'forever' action to each of the four frames.

Render - At render method, we first clear the game screen, and then set our new screen color. Here we set the screen color as black, and also we must include the 'setProjectionMatrix' code. This is how the screen updates properly for the viewport. And, as shown in the next image of our game code, we set the 'deltaTime' also. This is required for the timing of our animation.

Render method, is where we draw our game graphics to the screen. So this would include fixed game graphics, fonts, action and non action game characters, and the like. If we use Stage, we can draw them to stage with the stage.draw(), as we have done with this code, otherwise, we can draw them with batch. Stage is simpler, because we don't have to name each asset directly to draw them, we need only use the 'stage.draw()'.
Dispose - At dispose method, we get to dispose of all our game assets, to keep our game performance at its' best. If using Stage, we can dispose of all assets at once, with 'Stage.dispose();' code call, otherwise we can dispose of each variable directly.

In libgdx, animations made as, for example- myanimation.gif, a 'gif' format type, are not supported directly. So, we cannot add a gif by loading it into code like we can do with an image - for example - myimage.png. However, we can load the individual frames from an animation(as png format type) and then proceed to animate them in code as we have done in this tutorial. You can make your own animation, then save it as a spritesheet(save it as png format), then load the spritesheet into code. Because it is in png type, the system can load it for us, and we can then animate those frames as we want.
Animation can include setting the size and timing of each frame. To learn about and make your own spritesheet, goto our tutorial, Create A Spritesheet.
You can also create frames from a pre-made game character that has been animated. Like an animated pixelart character you might find on the web. To do this, you must use an online converter(free), that converts gif(the animation) to individual png frames, or that can get the frames from the gif in the png format. If you have the individual frames in png format, then you can load them and then animate them in code. You can load them all separately, or create a spritesheet for them as we did in this tutorial. And, you can size them as you want also. If the original frames are large enough, you can resize them for the game scene. Example, if your frames are each 256x256, you can set in code to size them as 128x128, or 64x64, and perhaps, 512x512. For example, I test my apps by installing them on a device with a 5.8" screen(cell phone), and a 8" screen(tablet).
There are free mobile apps and websites where you can create your own animations. I have used Pixel Studio, an Android app, which has a lot of free features, for creating pixelart characters and making animations from pixelart. The website, Pixilart, also has a free version for pixelart creation and creating animations. If don't have to join to use Pixilart, but if you do, you can save all your creations.
Another common way to create animations for Android mobile games, is by using the Animation class of Libgdx. We will learn about this class as we continue our tutorials.
Game Dev -All Game Dev Tutorials
App Project Name: Walk Animation 4 Frames
In this tutorial we are going to learn about animations. Animations are commonly used in game dev to create complex action scenes. In previous tutorials, we learned how to add action to our game characters with MoveToAction of Action class, using methods like fadeIn, fadeOut, moveTo, moveBy, rotateBy, and others. Animated game characters can add yet another dimension to the game play scene.
Animations can be created in a couple of ways with Libgdx. For this tutorial, we are going to animate a game character from a four frame spritesheet. Each frame is one component of our animation. And, we are going to animate the four frames by implementing calls from the MoveToAction methods of Action class. As mentioned, these are the same action methods we used in several of our previous tutorials. For this tutorial, we are going to use some of those methods from Action class to make our game character animation.
We must first load the spritesheet, and for this, we can use Texture code call. Then to get each of the four frames, we are going to use TextureRegion. Once we have coded all four regions from the Spritesheet, we can then declare them each as Image, and declare each image as Actor, and add all the actors to the Stage. And, lastly, we add all the actions we want to our four frames. Because this is an animation, we must sync our timing just so, we that the four frames appear to be one image, even though we know that they are not. And, also important, because we want our animation to loop continously, we are going to add the 'forever' action to each frame as well.
All code for this tutorial is at the Example Code section on this page. At App Shot, you can see the Walk Animation in action.
FYI: The code from this game dev tutorial is compatible with Android Studio with the Libgdx component. Read more about Android Studio and Libgdx Here
Create our Game App Screen
We are creating a new app for this tutorial. First, we must create our new mobile game app, so in AIDE, at the AppProject file hierachy, Choose Create New Project, select Mobile Game, and New Mobile Game; then add the App name, Walk Animation 4 Frames(Note: no spaces in the app name(can use _ ), or you can add spaces after you create it; Just Goto: the 'AppProject' folder; just select the App Name, and then select rename). Next, add the package name, 'com.aac.animation_example'.Click Create; Walk Animation 4 Frames game app is created, and the MyGdxGame.java page opens in your AIDE coding editor.
For more info on navigating files and using the AIDE coding editor, goto Tutorial 1.
App Shot - Portrait 5.8" Game Screen
Walk Animation - 4 Frames
This app is available for download.
Download/Install This App: Here
Code For This Tutorial
For this tutorial, we must include the imports, game class, class members(with variables), create method, render method, dispose method. And, include any additional classes and methods we require for this tutorial. This tutorial requires imports for Actions, Stage, Actor, Image, Texture, TextureRegion, ExtendViewort, Orthographic Camera, as shown in this image of the imports.Imports -
Game Class and Class Members(with Variables) For our class for this game we used - MyGdxGame extends ApplicationAdapter. Each game we code requires a game class. At variables we include the class members and then our named variables for theme. So, for this tutorial, we include:
Stage - we named as stage; Spritebatch - we named as batch; ExtendViewport we named as viewport; OrthographicCamera we named as camera; Texture we named as fourTextures(because we have 4 frames in the image); and then we name our four TextureRegions with TextureRegion regionOne, TextureRegion regionTwo, TextureRegion regionThree, TextureRegion regionFour; we must code four because we are getting the four frames from the spritesheet, one frame for each animation sequence.
Also, four Image class members as Image named as myImageOne, Image named as myImageTwo, Image named as myImageThree, Image named as myImageFour. These are required because we are going to create/declare our four Images from the four TextureRegions. Like all class members we create, we can name the variables for them as we like.
Create - At create method, we include the new instances of all the class members we are coding for this tutorial.
First, we create an instance of the Spritebatch, and the viewport, camera. These are standard, usually for every game we create. Next, for this tutorial we code for the texture regions, but, first we load the spritesheet as shown in this next image of the code. And, we include the width and height settings for the screen. These values are important for the viewport and camera, as they work together to position the game characters properly, including when the screen is resized.
Get the 4 frames with texture region. We can code TextureRegion method to load each of the four frames from the spritesheet. Then, we pass each texture region to an Image,code call, and give each image a specific name: myImageOne, myImageTwo, myImageThree, myImageFour. Now that we have declared each of the texture regions as an Image, we can add all the images we create to the Stage, as shown in this next image of the code.
Each of the four Images we created, are now passed to Actor; and from actor we add the images to the Stage. Once they get added to the stage, we can then add the 'actions' to each of the images, and create our four frame animation.
Add frame duration time to get a better smooth loop action. Add actions for each of the four frames, and set their timing so the four frames action properly for the walk animation.
Next, we must add the code to keep the animation looping continuously, so this next image shows that code. We simply add the 'forever' action to each of the four frames.
Render - At render method, we first clear the game screen, and then set our new screen color. Here we set the screen color as black, and also we must include the 'setProjectionMatrix' code. This is how the screen updates properly for the viewport. And, as shown in the next image of our game code, we set the 'deltaTime' also. This is required for the timing of our animation.
Render method, is where we draw our game graphics to the screen. So this would include fixed game graphics, fonts, action and non action game characters, and the like. If we use Stage, we can draw them to stage with the stage.draw(), as we have done with this code, otherwise, we can draw them with batch. Stage is simpler, because we don't have to name each asset directly to draw them, we need only use the 'stage.draw()'.
Dispose - At dispose method, we get to dispose of all our game assets, to keep our game performance at its' best. If using Stage, we can dispose of all assets at once, with 'Stage.dispose();' code call, otherwise we can dispose of each variable directly.
Summary
In this tutorial, we used the MoveToAction class of Libgdx to animate our four frames from a spritesheet. Each frame has variances for leg movement, arm movement, and hair movement. Once we animate the four frames, all the variations sync together, and create our smooth animation that loops continuously.In libgdx, animations made as, for example- myanimation.gif, a 'gif' format type, are not supported directly. So, we cannot add a gif by loading it into code like we can do with an image - for example - myimage.png. However, we can load the individual frames from an animation(as png format type) and then proceed to animate them in code as we have done in this tutorial. You can make your own animation, then save it as a spritesheet(save it as png format), then load the spritesheet into code. Because it is in png type, the system can load it for us, and we can then animate those frames as we want.
Animation can include setting the size and timing of each frame. To learn about and make your own spritesheet, goto our tutorial, Create A Spritesheet.
You can also create frames from a pre-made game character that has been animated. Like an animated pixelart character you might find on the web. To do this, you must use an online converter(free), that converts gif(the animation) to individual png frames, or that can get the frames from the gif in the png format. If you have the individual frames in png format, then you can load them and then animate them in code. You can load them all separately, or create a spritesheet for them as we did in this tutorial. And, you can size them as you want also. If the original frames are large enough, you can resize them for the game scene. Example, if your frames are each 256x256, you can set in code to size them as 128x128, or 64x64, and perhaps, 512x512. For example, I test my apps by installing them on a device with a 5.8" screen(cell phone), and a 8" screen(tablet).
There are free mobile apps and websites where you can create your own animations. I have used Pixel Studio, an Android app, which has a lot of free features, for creating pixelart characters and making animations from pixelart. The website, Pixilart, also has a free version for pixelart creation and creating animations. If don't have to join to use Pixilart, but if you do, you can save all your creations.
Another common way to create animations for Android mobile games, is by using the Animation class of Libgdx. We will learn about this class as we continue our tutorials.
EXAMPLE CODE - Code For This Tutorial.
JUST copy and paste to update your code.
JUST copy and paste to update your code.