Libgdx with Android For Game Dev
Game Dev Tutorial: Basic Physics - Create Restitution with Circle and VelocityY
Game Dev -All Game Dev Tutorials
To work with Box2d code, you are required to implement a World, and make your calculations based on meters and units, rather than pixels, which is what we commonly use in Libgdx, for 2d mobile games development.
The learning curve for Box2d, is a tad more challenging, however, Box2d can still be used for small or large games, although probably best suited to large scale physics interactions.
For this tutorial, we are going to learn an easy way to code basic physics, and have it simulate an actual Box2d property, the restitution of a body.
For our tutorial, we want to look at one scenario, where a game object falls onto a stationary ground, our body.
If you would like to read more on Box2d, we have included links later in this tutorial, at the Summary.
We are going to create a Circle, and attach it to our game coin image, then it is ready to be actioned. We are going to create a Rectangle, and position it at the bottom of the game screen, to be our ground, our stationary object.
In Box2d, we can add the restitution directly to the body.
For our code, we cannot add restitution directly, like in Box2d. However, we can use VelocityY; as this is how we can create both speed and bounce on our circle(coin) once it collides with the ground. We will also use math logic, this way, we can use numeric values, which allow us to adjust the speed and bounce effect as we want. For this, we can include some boolean if statements and then whatever criteria we want like: how many bounces do we want once it collides, and, set a max bounce number. With our simple code, we can include several criteria to facilitate our physics example.
We will create our Circle, and then add the coin image to the circle by centering it over the circle. Then we can add logic to move the circle around the game screen which is essentially the coin that we see moving. For this tutorial, we want the coin to fall onto the ground which we positioned at the bottom of the game screen. Then we need only adjust our numeric game code values for VelocityY, the gravity, which simulates the restitution, so it falls and bounces-rebounds how we want it to.
In the following code sections we will explain more on how each coded section implements.
All code for this tutorial is at the Example Code section on this page. At App Shot, you can see the App Action.
FYI: The code from this game dev tutorial is compatible with Android Studio with the Libgdx component. Read more about Android Studio and Libgdx Here
Click Create; Collision_VelocityY game app is created, and the MyGdxGame.java page opens in your AIDE coding editor.
For more info on navigating files and using the AIDE coding editor, goto Tutorial 1.
App Shot - Portrait 5.8" Game Screen
Collision with VelocityY
This app is available for download.
Download/Install This App: Here

Imports and Game Class
We include for this tutorial, imports for Circle and Rectangle, and Camera, Viewport, BitmapFont, Spritebatch, Texture, and our game class import - ApplicationAdapter. Imports for these must be included, along with the standard imports that load when we create our mobile game screen from the template in AIDE.
Variables At variables, we include the class members and then our named variables for theme. So, for this tutorial, we include those, as shown in this next image.
Note we added the ShapeRender class member, and also the Boolean logic, and the MaxCount. MaxCount represents how many bounces we want in total.
For the Circle, we named it bitcoin, Rectangle, named it ground, and the image, the round bitcoin, we load with Texture class member and name it bitcoinTexture. And, also velocityX, and velocityY are included. We included a numerical value for the fall speed of the coin; you can adjust this as you want. BitmapFont is added here also, this is the system default font, and since we are adding text to the game screen, we must include a bitmapFont for that. Do note, because this is the system font it is best suited to small text size only, about 2 or so; otherwise it will look somewhat unperfect.

Create - At create method, we include the new instances of all the class members we are coding for this tutorial. So, we include new Camera, Viewport, and Spritebatch instances. And, we create one for the bitmap font we are going to include in the code. We set a size for the font with 'setScale', and also a color - green.

Next, in code, we load our coin image with the Texture code call and name it bitcoinTexture. And, we create the Circle with variable name bitcoin. For the Circle we set its' width to center screen with /2, and for the height, we use -490. That represents its' distance from top of game screen. And, its' radius is set to 16. That determines how large the circle will appear on the game screen. You can adjust these as you want.

Next, in Create, we want to add our new Rectangle. We are going to use the rectangle as our ground, and position it at the bottom of the game screen with a height of 49. Since we know it is going to be used as our 'ground', we will name the rectangle variable as 'ground'. And, after the rectangle, we are going to create a new ShapeRenderer. For variable name, we will just name it 'shapeRenderer'.
ShapeRenderer is important, because we are going to draw our rectangle with it, and also add a color for the rectangle. So, in the Render method, we will do this. At Create method, we only create new instance of Rectangle and ShapeRenderer.

Render - At render method, we first clear the game screen, and then set our new screen color. For this app, we are using a white screen. So, we set the color code numbers for that.
Next, we write and add the boolean logic to our code that will move the coin, as shown in this next image. Boolean(true,false) statements work on the principal of: do this if the statement is 'true', else, do this if statement is 'false'. You can write boolean logic for anything you want to compare with true or false statements.
For this code we want to know if the coin(circle) has moved and bounced, so we write the variable for this with; the if statement by including it at our class member 'Boolean hasBounced ='false'; so we know this logic here is based on a false answer; which means, if the coin is not moving vertically wise; then we do this; bitcoin.x += 100* deltaTime;(move the coin's width by 100 times the deltaTime; which is basically the speed of something per seconds or fraction of seconds like 1/15 or 1/30.
So we are saying, if the coin(circle) is not moving vertically, then lets move it horizontally, and if it is not moving horizontally, then lets move it vertically. And, before we can move it again after it rolls off the game screen, we do need to 'reset' it, and set its' starting position again. Once we do that, our Boolean code will keep it going in a continuous loop.
And, this logic tells the coin how to move both for width and height, and also to apply the gravity to it. We can apply the gravity by using the velocityY += -380. The -380 gives less or more bounce once it hits the ground. You can adjust these as you want.
Next, we add the logic code for the collision or when the coin collides with the ground. When that happens, how many bounces do we want, and what type of bounce. To do this, we again include a boolean statement here, but now with the 'hasBounced = true;' this indicates if it has bounced - Yes, it has bounced. If it has bounced, then we know we can now move it horizontally, and set those values.
So, our logic says to give some bounce effect with the 0.3f; at velocityY, and we only want it to bounce once, then stop on the ground, and continue its' movement to the right and off the screen; only to reset itself and loop again, as shown in the next image - //reset pos once rolls off.
Next, in code, we have the reset logic. This logic is saying if the coin rolls off the screen, then send it back to the start of the logic or where it began, and here we can set the same start position or add a different start position for the coin.
We use the same start position. And the coin will just continue to loop, move down the screen, collide with the ground, bounce once, and roll to the right off the game screen. The boolean logic code we added, will keep the coin in a loop forever.(until the player exits the app)

Now we have all the logic code completed, we can draw the coin(circle), ground(rectangle, shapeRenderer) to the game screen. Each is drawn separately; batch.draw for the circle and coin; and, we use shapeRenderer(begin); for the ground; and font.draw for the bitmapFont, the text on the game screen. The next image shows how these are all drawn to the game screen.
We draw the ground using the ShapeRenderer code call, as seen in this next image of the code. We used ShapeRenderer because it also allows us to color the ground shape, as well as draw it to the game screen.
We can draw our bitcoin, circle, and text to the screen as shown in this next image of the code, and shown just here:
So, with this batch.draw, the coin image gets drawn(bitcoinTexture), and the bitcoin.x, bitcoin.y. radius, makes sure the coin gets drawn centered in the Circle; and lastly; the imageWidth, imageHeight, is getting info from our imageWidth float values of 54 for width, and 54 for height. You can adjust these as you want; larger value means the coin is drawn at larger scale, smaller number it is drawn at smaller scale.
batch.draw(bitcoinTexture, bitcoin.x - bitcoin.radius, bitcoin.y - bitcoin.radius,imageWidth,imageHeight); Note, we have coded font.draw twice, once for the word, 'Cryptocurrency', and then for the '$' dollar sign. Because we want to put text at different positions on the ground, we can use more than one 'font.draw'. The numerical values, 36,40 are their positions for width, and height; likewise, 400,40, for width and height.

Dispose - At dispose method, we get to dispose of all our game assets, to keep our game performance at its' best. If using Stage, we can dispose of all assets at once, with 'Stage.dispose();' code call, otherwise we can dispose of each variable directly. For this code we must dispose of:
bitcoinTexture.dispose();
batch.dispose();
font.dispose();
shapeRenderer.dispose();
We are not using Stage, so we must dispose of these assets directly.
This is a simple example of how you can add physics properties to your game objects(coin) by using velocityY, circle, rectangle, if statements, and math logic of Libgdx.
Using circle, rectangle, and velocityY in this manner isn't just confined to working with shapes, like a circle or rectangle. Any game character or object scenario could be created with the same process. So, we could load game image one, and give it variable name body1, load another game image, and give it variable name body2, and so on. Then, we could create a Circle, and name it body3. Then we can apply physics to these game objects(variables), just as we did in this tutorial example. Physics can work well with smaller games, and also large games.
As we continue our tutorials, we will learn about World units and how to apply them when creating a mobile game, and making it screen size compatible.
The following links provide a good starting point for Box2d. At Libgdx, website, you can read about the various methods of Box2d, and at Code and Web website, they have a tutorial on how to add images, and then transform them with shapes in the physics editor, so they can work with Box2d code. The tutorial provides complete code and good explanations.
Box2d, Libgdx
Code and Web Physics Tutorial
Game Dev -All Game Dev Tutorials
App Project Name: Collision_ VelocityY
In our previous tutorials, we learned how to action our game characters with the Action class of Libgdx. But what about adding physics to our game characters and objects. For example, we can move a ball image or round shape we create around the game screen by using a particular action from Action class. But how can we make those game objects respond to a collision, like colliding with another moving object or a fixed object, and have it respond with some type of physics. How can we make it react to its' environment.Shape, Mass, Friction, Restitution
If any type of shaped object - round, square, or even a game pixelart character were to fall some distance onto another object, a moving object, we would expect it to respond, with some type of reaction; perhaps a bounce. If it were to fall onto a fixed object, like the ground, then we expect it to react a specific way also. To consider how they would interact in these two scenarios, we must look at shape, mass, friction, and restitution. Or, as we like to say, the laws of gravity.Box2d - Physics
Libgdx has a class specifically for physics, it is Box2d. Box2d is a very comprehensive class for applying physics to your game objects to make them react in a more natural way. With Box2d, you can use a physics editor, to create any shape you want and also add shapes together. These shapes can then be used in your game play, to create some interesting physics scenarios.To work with Box2d code, you are required to implement a World, and make your calculations based on meters and units, rather than pixels, which is what we commonly use in Libgdx, for 2d mobile games development.
The learning curve for Box2d, is a tad more challenging, however, Box2d can still be used for small or large games, although probably best suited to large scale physics interactions.
Considerations for Restitution
Shape, mass, friction, and restitution are commonly used in Box2d, to apply fixtures to the created bodies. Shape is a shape, mass is weight, friction is texture, and restitution, an object's bounce. In this tutorial, we want to look at restitution, how something like a shape or ball reacts when it collides with a ground - a fixed or stationary body. To consider what numeric values to use for the restitution, we would likely look at the mass, friction, and texture of our object. At least the mass, or its' weight. Something light is likely to have more bounce when colliding with a ground(a stationary object), than something with more weight. Consider a falling boulder versus a light ball.Simple Physics
There is a way we can simulate the physics of Box2d, without actually using Box2d. It is a simpler approach and a great way to introduce yourself to coding physics into your game play.For this tutorial, we are going to learn an easy way to code basic physics, and have it simulate an actual Box2d property, the restitution of a body.
For our tutorial, we want to look at one scenario, where a game object falls onto a stationary ground, our body.
If you would like to read more on Box2d, we have included links later in this tutorial, at the Summary.
Physics - Restitution
To achieve our simple approach to creating physics, we are going to use: Circle, Rectangle, and, VelocityY with some boolean logic, to create and simulate the Restitution effect on our game object, the coin image. The coin image is actually added to the circle, and it is the circle that we are going to be moving on the game screen. The rectangle is created, and it will represent our 'ground'. It is our Box2d version of creating a ground.What Is A Ground
A ground is any body you create, and then define as your ground. So, in Box2d, it is called a ground, which is created from a body. In Box2d, all objects are considered to be a body. So, in Box2d you create a body, and then add some fixture to it, like shape, mass, friction, restitution, then add numeric values so it behaves how you want it to. If your not working with Box2d, you can create your ground using 'Rectangle' of Libgdx. And, like Box2d, you can position your ground anywhere on the game screen. A ground is considered to be a stationary object. Technically, with Box2d, you can have a ground that is movable, like a platform in your game, but for our tutorial, it is stationary.Create Circle and Rectangle
Libgdx provides two shapes we can use for our basic physics implementation - Circle and Rectangle.We are going to create a Circle, and attach it to our game coin image, then it is ready to be actioned. We are going to create a Rectangle, and position it at the bottom of the game screen, to be our ground, our stationary object.
In Box2d, we can add the restitution directly to the body.
For our code, we cannot add restitution directly, like in Box2d. However, we can use VelocityY; as this is how we can create both speed and bounce on our circle(coin) once it collides with the ground. We will also use math logic, this way, we can use numeric values, which allow us to adjust the speed and bounce effect as we want. For this, we can include some boolean if statements and then whatever criteria we want like: how many bounces do we want once it collides, and, set a max bounce number. With our simple code, we can include several criteria to facilitate our physics example.
The Game Code
Let's look at our game code: Here we want to have a small coin fall some distance on the game screen, then collide and react to its' collision with the bottom of the game screen. At the bottom of the game screen we are going to create a 'ground'. This is an actual coding term used in Box2d of Libgdx. We can assume the coin would react somewhat to the collision, since it is so light, but how much it would react; would depend ultimately on its' weight(mass), shape, and friction. But most important here is its' 'restitution', how much bounce would the collision cause. Because it is just a mobile game, we can give it as much bounce or react as we want. That's the fun thing about coding mobile games.About: Velocity, Circle, Rectangle
Rectangle and Circle are just classes in Libgdx that let us draw shapes, like a rectangle and a circle. Boolean is for creating true, false logic statements to include in your code. And Velocity is like a math where you can apply numeric values to your game objects, so that they will respond how you want them to in the game interaction amongst the game objects.Position the Ground
For our tutorial, we want to position our rectangle shape, the 'ground', so that it is placed at the bottom of the game screen, and goes widthwise to cover the width of the game screen. For its' height we set it to 49, which is a small height. And, we want to color it gray, and have some text written over top of it, with color of light green; the text reads 'Cryptocurrency'.The Bounce
As mentioned, everything in Box2d, is created from a 'body', including the ground, and then we can add at least one fixture to it. A fixture has a shape, density, friction and restitution attached to it. Restitution is how bouncy something is: a boulder would have a very low restitution but a basketball would have a fairly high restitution. A body with a restitution of 0 will come to a fast halt as soon as it hits the ground, whereas a body with a restitution of 1 would bounce to the same height. Restitution is what we want to create for our falling circle(coin).VelocityY
We will use VelocityY to create the restitution effect for our circle(coin).We will create our Circle, and then add the coin image to the circle by centering it over the circle. Then we can add logic to move the circle around the game screen which is essentially the coin that we see moving. For this tutorial, we want the coin to fall onto the ground which we positioned at the bottom of the game screen. Then we need only adjust our numeric game code values for VelocityY, the gravity, which simulates the restitution, so it falls and bounces-rebounds how we want it to.
In the following code sections we will explain more on how each coded section implements.
All code for this tutorial is at the Example Code section on this page. At App Shot, you can see the App Action.
FYI: The code from this game dev tutorial is compatible with Android Studio with the Libgdx component. Read more about Android Studio and Libgdx Here
Create our Game App Screen
We are creating a new app for this tutorial. First, we must create our new mobile game app, so in AIDE, at the AppProject file hierachy, Choose Create New Project, select Mobile Game, and New Mobile Game; then add the App name, Collision_VelocityY(Note: no spaces in the app name(can use _ ), or you can add spaces after you create it; Just Goto: the 'AppProject' folder; just select the App Name, and then select rename). Next, add the package name, 'com.aac.circle_rectangle_ground'.Click Create; Collision_VelocityY game app is created, and the MyGdxGame.java page opens in your AIDE coding editor.
For more info on navigating files and using the AIDE coding editor, goto Tutorial 1.
App Shot - Portrait 5.8" Game Screen
Collision with VelocityY
This app is available for download.
Download/Install This App: Here
Code For This Tutorial
For this tutorial, we must include the imports, game class, class members(with variables), create method, render method, dispose method. And, include any additional classes and methods we require for this tutorial.Imports and Game Class
We include for this tutorial, imports for Circle and Rectangle, and Camera, Viewport, BitmapFont, Spritebatch, Texture, and our game class import - ApplicationAdapter. Imports for these must be included, along with the standard imports that load when we create our mobile game screen from the template in AIDE.
Variables At variables, we include the class members and then our named variables for theme. So, for this tutorial, we include those, as shown in this next image.
Note we added the ShapeRender class member, and also the Boolean logic, and the MaxCount. MaxCount represents how many bounces we want in total.
For the Circle, we named it bitcoin, Rectangle, named it ground, and the image, the round bitcoin, we load with Texture class member and name it bitcoinTexture. And, also velocityX, and velocityY are included. We included a numerical value for the fall speed of the coin; you can adjust this as you want. BitmapFont is added here also, this is the system default font, and since we are adding text to the game screen, we must include a bitmapFont for that. Do note, because this is the system font it is best suited to small text size only, about 2 or so; otherwise it will look somewhat unperfect.
Create - At create method, we include the new instances of all the class members we are coding for this tutorial. So, we include new Camera, Viewport, and Spritebatch instances. And, we create one for the bitmap font we are going to include in the code. We set a size for the font with 'setScale', and also a color - green.
Next, in code, we load our coin image with the Texture code call and name it bitcoinTexture. And, we create the Circle with variable name bitcoin. For the Circle we set its' width to center screen with /2, and for the height, we use -490. That represents its' distance from top of game screen. And, its' radius is set to 16. That determines how large the circle will appear on the game screen. You can adjust these as you want.
Next, in Create, we want to add our new Rectangle. We are going to use the rectangle as our ground, and position it at the bottom of the game screen with a height of 49. Since we know it is going to be used as our 'ground', we will name the rectangle variable as 'ground'. And, after the rectangle, we are going to create a new ShapeRenderer. For variable name, we will just name it 'shapeRenderer'.
ShapeRenderer is important, because we are going to draw our rectangle with it, and also add a color for the rectangle. So, in the Render method, we will do this. At Create method, we only create new instance of Rectangle and ShapeRenderer.
Render - At render method, we first clear the game screen, and then set our new screen color. For this app, we are using a white screen. So, we set the color code numbers for that.
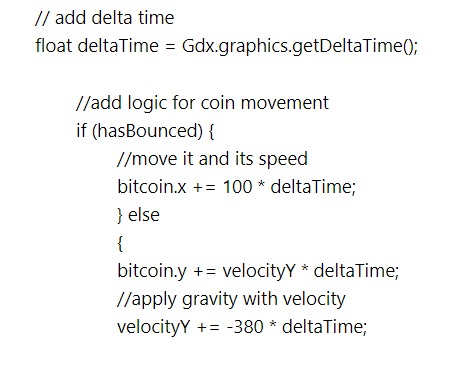
Next, we write and add the boolean logic to our code that will move the coin, as shown in this next image. Boolean(true,false) statements work on the principal of: do this if the statement is 'true', else, do this if statement is 'false'. You can write boolean logic for anything you want to compare with true or false statements.
For this code we want to know if the coin(circle) has moved and bounced, so we write the variable for this with; the if statement by including it at our class member 'Boolean hasBounced ='false'; so we know this logic here is based on a false answer; which means, if the coin is not moving vertically wise; then we do this; bitcoin.x += 100* deltaTime;(move the coin's width by 100 times the deltaTime; which is basically the speed of something per seconds or fraction of seconds like 1/15 or 1/30.
So we are saying, if the coin(circle) is not moving vertically, then lets move it horizontally, and if it is not moving horizontally, then lets move it vertically. And, before we can move it again after it rolls off the game screen, we do need to 'reset' it, and set its' starting position again. Once we do that, our Boolean code will keep it going in a continuous loop.
And, this logic tells the coin how to move both for width and height, and also to apply the gravity to it. We can apply the gravity by using the velocityY += -380. The -380 gives less or more bounce once it hits the ground. You can adjust these as you want.
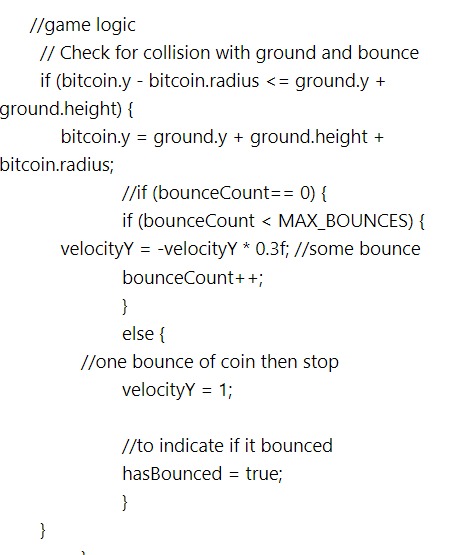
Next, we add the logic code for the collision or when the coin collides with the ground. When that happens, how many bounces do we want, and what type of bounce. To do this, we again include a boolean statement here, but now with the 'hasBounced = true;' this indicates if it has bounced - Yes, it has bounced. If it has bounced, then we know we can now move it horizontally, and set those values.
So, our logic says to give some bounce effect with the 0.3f; at velocityY, and we only want it to bounce once, then stop on the ground, and continue its' movement to the right and off the screen; only to reset itself and loop again, as shown in the next image - //reset pos once rolls off.
Next, in code, we have the reset logic. This logic is saying if the coin rolls off the screen, then send it back to the start of the logic or where it began, and here we can set the same start position or add a different start position for the coin.
We use the same start position. And the coin will just continue to loop, move down the screen, collide with the ground, bounce once, and roll to the right off the game screen. The boolean logic code we added, will keep the coin in a loop forever.(until the player exits the app)
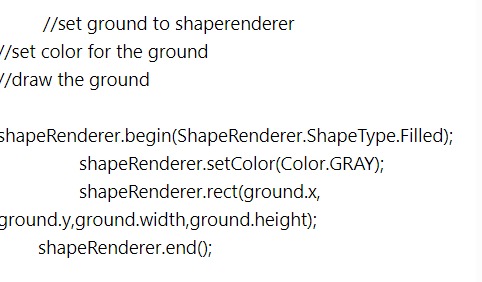
Now we have all the logic code completed, we can draw the coin(circle), ground(rectangle, shapeRenderer) to the game screen. Each is drawn separately; batch.draw for the circle and coin; and, we use shapeRenderer(begin); for the ground; and font.draw for the bitmapFont, the text on the game screen. The next image shows how these are all drawn to the game screen.
We draw the ground using the ShapeRenderer code call, as seen in this next image of the code. We used ShapeRenderer because it also allows us to color the ground shape, as well as draw it to the game screen.
We can draw our bitcoin, circle, and text to the screen as shown in this next image of the code, and shown just here:
So, with this batch.draw, the coin image gets drawn(bitcoinTexture), and the bitcoin.x, bitcoin.y. radius, makes sure the coin gets drawn centered in the Circle; and lastly; the imageWidth, imageHeight, is getting info from our imageWidth float values of 54 for width, and 54 for height. You can adjust these as you want; larger value means the coin is drawn at larger scale, smaller number it is drawn at smaller scale.
batch.draw(bitcoinTexture, bitcoin.x - bitcoin.radius, bitcoin.y - bitcoin.radius,imageWidth,imageHeight); Note, we have coded font.draw twice, once for the word, 'Cryptocurrency', and then for the '$' dollar sign. Because we want to put text at different positions on the ground, we can use more than one 'font.draw'. The numerical values, 36,40 are their positions for width, and height; likewise, 400,40, for width and height.
Dispose - At dispose method, we get to dispose of all our game assets, to keep our game performance at its' best. If using Stage, we can dispose of all assets at once, with 'Stage.dispose();' code call, otherwise we can dispose of each variable directly. For this code we must dispose of:
bitcoinTexture.dispose();
batch.dispose();
font.dispose();
shapeRenderer.dispose();
We are not using Stage, so we must dispose of these assets directly.
Summary
In this tutorial, we learned how to create a ground shape at the bottom of the game screen and give it a color and add some text to it. Then we have an object fall onto that ground, an image coin centered on a circle shape we created; and have a response, in this case, we gave the coin(circle) some restitution, some gravity, by giving it a bounce effect. Once it bounced, we set the code so it would roll off the game screen, and then reset itself, and continue to loop in the same fashion.This is a simple example of how you can add physics properties to your game objects(coin) by using velocityY, circle, rectangle, if statements, and math logic of Libgdx.
Using circle, rectangle, and velocityY in this manner isn't just confined to working with shapes, like a circle or rectangle. Any game character or object scenario could be created with the same process. So, we could load game image one, and give it variable name body1, load another game image, and give it variable name body2, and so on. Then, we could create a Circle, and name it body3. Then we can apply physics to these game objects(variables), just as we did in this tutorial example. Physics can work well with smaller games, and also large games.
Box2D, Libgdx
When discussing Box2d, we mentioned that it must be implemented with a World, and World works with meters and units. Coding with the Physics class is not the only way to use World in your game code. It is also commonly used to make screen sizes adaptive and compatible across a variety of devices. As we know, there are lots of different screens sizes among smartphones and tablets. So, if you build one game, but want it to be compatible on all mobile screen sizes, then coding with World units, is the way to go. If however, you build a game and want to target only one screen size, then you do not need to code with World units, unless of course, you want to.As we continue our tutorials, we will learn about World units and how to apply them when creating a mobile game, and making it screen size compatible.
The following links provide a good starting point for Box2d. At Libgdx, website, you can read about the various methods of Box2d, and at Code and Web website, they have a tutorial on how to add images, and then transform them with shapes in the physics editor, so they can work with Box2d code. The tutorial provides complete code and good explanations.
Box2d, Libgdx
Code and Web Physics Tutorial
EXAMPLE CODE - Code For This Tutorial.
JUST copy and paste to update your code.
JUST copy and paste to update your code.