Libgdx with Android For Game Dev
Game Dev Tutorial : Tap the Button: Circles Move, Then Collide
Game Dev -All Game Dev Tutorials
With ShapeRenderer of Libgdx, we can create circles, and add action to them with math logic; and have them collide by implementing Intersector code call. In this tutorial, we create two round circles, add some match logic to action them. We create a TextButton, that when clicked, begins the circles action. Because we set the two circles ia a vertical line of each other, they do collide. We will write our own class for the logic, to include the action for the circles, and the collision detection. In this tutorial, we also will use a custom font, and see how to add it to a TextButton, and a Label.
All code for this tutorial is at the Example Code section on this page. At App Shot, you can see the App Action.
FYI: The code from this game dev tutorial is compatible with Android Studio with the Libgdx component. Read more about Android Studio and Libgdx Here
Click Create; Circles_Collide_Intersector game app is created, and the MyGdxGame.java page opens in your AIDE coding editor.
For more info on navigating files and using the AIDE coding editor, goto Tutorial 1.
App Shot - Portrait 5.8" Game Screen
Circles Collide: Intersector

Imports and Game Class At imports, we add the standard imports and, also those for the additional code functions we are going to use. So, we include: Click Listener - to handle the onClick event; Shape Renderer - to draw the circles, Intersector - to intercept the two circles; Label - to set the text for the screen; Stage - of scene2d - required for using Actor, and Table in our code; Actor - to easily add our assets; and Table - to easily assemble our assets to the game screen. Add the imports before you RUN/BUILD your game app; they can be added in any order.
For our Game Class, we are going to use the Application Adapter class, which we code with this line of code:
public class MyGdxGame extends ApplicationAdapter

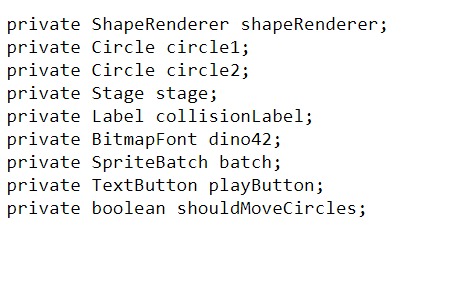
Variables At variables, we include the Class Members and then our named variables for each of them. You can name your variables as you want, I usually use names that are simple and make sense for the code I'm using.
So, for this tutorial, we include:
Circles - we code two because we require two circles:
Boolean for the two circles - and the 'if' logic ,'shouldMoveCircles';
TextButton - for our click event and is the play button;
Label - to set the text for the collision;
Spritebatch - draws our assets to the screen;
Stage - of scene2d, to add actor and table;
BitmapFont - this class member is required to create our custom font and ready it for the screen. Here, i named the variable as dino42; because this fonts' name is 'dino' and its' size is 42. This is a good way to keep your custom fonts organized and easy to find when you want them. Most likely, you'll want to have lots of customized font choices for your mobile games.
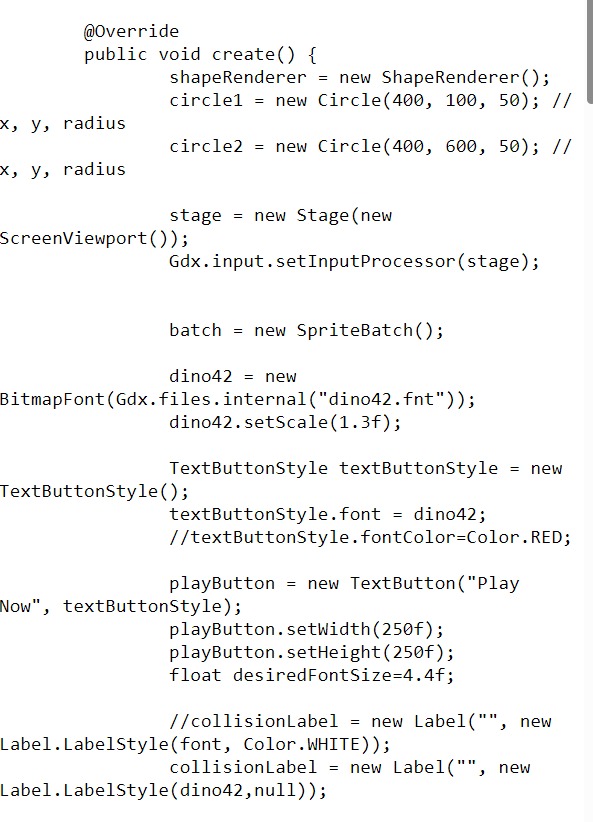
Create - At create method, we include the new instances of all the class members we are coding for this tutorial, and those are: Spritebatch, ShapeRenderer, BitmapFont, Stage, Viewport, TextButtonStyle, TextButton, Label, and Input Processor.
We create our instance of Spritebatch, for our Render method batch calls. Then we create new instance of ShapeRenderer, and define our two circles for position, and size. Position of 400,100, is x,y, on the game screen. Our first circle is at position 400 width at bottom of game screen, and 100 or y, its' height on the game screen. The second circle is same for width, and positioned away from the first circle, at 600 for y, but in the same vertical line. Because they are in the same line vertically, we can add some logic, so that they move towards each other, and then collide. Each circle has a size of 50 diameter. You can change this to whatever size you want for the circles.
BitmapFont is created and we load the dino42.fnt, customized font file. It in turn, will get the image file- dino42.png, as we linked it from the 'dino42.fnt' file we loaded. Then this customized font, is added at the TextButtonStyle as the font we want to use. And, then, TextButtonStyle is added to TextButton. BitmapFont has been scaled with this code:
dino42.setScale(1.3f),
but with custom fonts you don't have to scale them, because they are premade with various font sizes. So, you can just get them for the actual font size you want your text to be, and omit this 'setScale' property in your code.
And, next in create code, we create our 'collisionLabel', for the text, so when the circles collide; this text will appear on the game screen. Because we also want to use the custom font 'dino42' for this text, we code it as shown in this next image and this line:
collisionLabel = new Label("", new Label.LabelStyle(dino42,null));
If we were just to add color and not a customized font, then we would use this next line of code instead. We use 'font,Color.WHITE', when coding with the default system font, but use the actual font name when using a custom font here.
collisionLabel = new Label("", new Label.LabelStyle(font, Color.WHITE));
Note, 'null' in the custom font code, if you are adding a custom font, you can replace 'font,Color.WHITE', with our font name, 'dino42,null', and then add the word 'null'.
Also, if you want a preclick text to be added to the game screen, then add it here as shown:
("PreClick Text Add Here", new Label.LabelStyle(dino42,null)); at the two apostrophes.
Next, in the create method, we add the Click Listener to handle the 'tap' event on the PlayNow text, with this code; and, we set the 'shouldMoveCircles, to 'true', because when the 'Play Button' is tapped, we want the circles to action themselves.
public void clicked(InputEvent event, float x, float y) {
shouldMoveCircles = true;
Then, we add a Table, of Scene2d, and add our 'playButton', and 'collisionLabel' to the table. We added the button to the top of the game screen with Table properties, and the label that displays once the collision occurs, also displays at the top of the game screen.
Table is like Actor, in that we add our game variables to the Table, and then add the Table to the Stage. Table is useful just like Actor. With Actor we can add our game assets easily to stage and add actions to them. With Table, we can also add our game assets and add actions, and additionally, we can position our game assets more effectively. Table includes 'row', positioning, and we also place assets at top and bottom of the game screen. Table is most useful, if your game has lots of game characters and action. But, it can be implemented in simpler scenarios as well. For this tutorial, we added Table with some of its' basic properties for setting our button and label.
Also with create method, we create a Label for the collision text, so that when the two circles collide, the text 'Collision Detected', will appear on the game screen. But we don't want it to happen until the circles collide, so we place the label in the class we wrote for the circles collision. We can set the text with this code:
collisionLabel.setText("Collision Detected");
and its' in our class for the 'moveCircles', this code:
private void moveCircles() {, this is the class name - moveCircles.
And, in the 'moveCircles' class, this code:
circle1.y +=1; circle2.y -= 1;,
is what moves the two circles towards each other. The 'y', means to move them vertically, and the '+=1, -=1'; is what moves them towards each other. Also, in this 'moveCircles' class we wrote, we add the 'intersector' within our 'if' statement. This checks if the two circles have overlapped each other, and if so, then display the text on screen, 'Collision Detected'. Lastly, we have added our boolean, 'shouldMoveCircles' variable. Boolean is used for 'true', 'false', scenarios in the logic of your game code. We set this boolean to 'false', meaning, once the collision of the two circles has taken place, not to continue moving the circles, or basically says ' should we continue to move the circles after collision', answer, NO(false).
At Click Listener, as mentioned, we set 'shouldMoveCircles', to 'true', as the circles are going to action themselves. However, for 'shouldMoveCircles', at Intersector, in the 'collisionLabel' code, we set it to 'false', because after they collide we don't want them to action themselves.
We can however, set this to 'true', and the circles will keep going along the vertical line we set for them until they reach the top and bottom of the game screen. At that point, they will disappear off the screen because we have not set any bounds to keep them in play.
Render - At render method, we first clear the game screen, and then set our new screen color. If we are including more than one game screen, we also can set individual colors for each game screen, or have them all the same color, Either or, all game screen colors are set in the Render method. For multiple game screen colors, we can easily implement the 'switch' case function, to show the correct screen color for the game screen we are currently displaying.
Render method, is where we draw our game graphics to the screen. So this would include images, fonts, game characters, and the like. If we using Stage, we can draw them to stage with the 'stage.draw()' code call, otherwise, we can draw them with batch.
For this tutorial, we draw our customized font to the game screen, and draw the two circles with the Shape Renderer function. Because we are using Stage, we can use stage.draw(), to draw the customized font to the game screen.
And, we include this code for the move circles class:
if (shouldMoveCircles) {
moveCircles();
We include it here, so it can be drawn to the game screen with the stage.draw call.
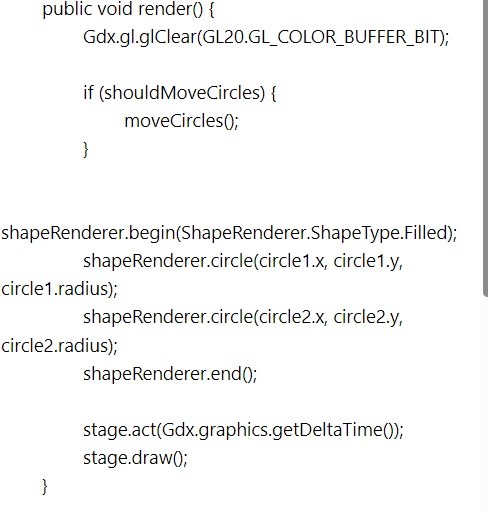
Also, at Render method, we include - 'stage.act('Gdx.graphics.getDeltaTime()', in our code, as this is what facilitates the timing of the action for the two circles.
Dispose - At dispose method, we get to dispose of all our game assets, to keep our game performance at its' best. If using Stage, we can dispose of all assets at once, with 'Stage.dispose();' code call, otherwise we can dispose of each variable directly.
Game Dev -All Game Dev Tutorials
App Project Name: Circles Collide: Intersector
With ShapeRenderer of Libgdx, we can create circles, and add action to them with math logic; and have them collide by implementing Intersector code call. In this tutorial, we create two round circles, add some match logic to action them. We create a TextButton, that when clicked, begins the circles action. Because we set the two circles ia a vertical line of each other, they do collide. We will write our own class for the logic, to include the action for the circles, and the collision detection. In this tutorial, we also will use a custom font, and see how to add it to a TextButton, and a Label.
All code for this tutorial is at the Example Code section on this page. At App Shot, you can see the App Action.
FYI: The code from this game dev tutorial is compatible with Android Studio with the Libgdx component. Read more about Android Studio and Libgdx Here
Create our Game App Screen
We are creating a new app for this tutorial. First, we must create our new mobile game app, so in AIDE, at the AppProject file hierachy, Choose Create New Project, select Mobile Game, and New Mobile Game; then add the App name, Circles_Collide_Intersector(Note: no spaces in the app name(can use _ ), or you can add spaces after you create it; Just Goto: the 'AppProject' folder; just select the App Name, and then select rename). Next, add the package name, 'com.aac.circles_collide'.Click Create; Circles_Collide_Intersector game app is created, and the MyGdxGame.java page opens in your AIDE coding editor.
For more info on navigating files and using the AIDE coding editor, goto Tutorial 1.
App Shot - Portrait 5.8" Game Screen
Circles Collide: Intersector
Code For This Tutorial
For this tutorial, we must add the these imports: game class, class members(with variables), create method, render method, dispose method. And, include any additional classes and methods we require for the code we want to implement.Imports and Game Class At imports, we add the standard imports and, also those for the additional code functions we are going to use. So, we include: Click Listener - to handle the onClick event; Shape Renderer - to draw the circles, Intersector - to intercept the two circles; Label - to set the text for the screen; Stage - of scene2d - required for using Actor, and Table in our code; Actor - to easily add our assets; and Table - to easily assemble our assets to the game screen. Add the imports before you RUN/BUILD your game app; they can be added in any order.
For our Game Class, we are going to use the Application Adapter class, which we code with this line of code:
public class MyGdxGame extends ApplicationAdapter
Variables At variables, we include the Class Members and then our named variables for each of them. You can name your variables as you want, I usually use names that are simple and make sense for the code I'm using.
So, for this tutorial, we include:
Circles - we code two because we require two circles:
Boolean for the two circles - and the 'if' logic ,'shouldMoveCircles';
TextButton - for our click event and is the play button;
Label - to set the text for the collision;
Spritebatch - draws our assets to the screen;
Stage - of scene2d, to add actor and table;
BitmapFont - this class member is required to create our custom font and ready it for the screen. Here, i named the variable as dino42; because this fonts' name is 'dino' and its' size is 42. This is a good way to keep your custom fonts organized and easy to find when you want them. Most likely, you'll want to have lots of customized font choices for your mobile games.
Create - At create method, we include the new instances of all the class members we are coding for this tutorial, and those are: Spritebatch, ShapeRenderer, BitmapFont, Stage, Viewport, TextButtonStyle, TextButton, Label, and Input Processor.
We create our instance of Spritebatch, for our Render method batch calls. Then we create new instance of ShapeRenderer, and define our two circles for position, and size. Position of 400,100, is x,y, on the game screen. Our first circle is at position 400 width at bottom of game screen, and 100 or y, its' height on the game screen. The second circle is same for width, and positioned away from the first circle, at 600 for y, but in the same vertical line. Because they are in the same line vertically, we can add some logic, so that they move towards each other, and then collide. Each circle has a size of 50 diameter. You can change this to whatever size you want for the circles.
BitmapFont is created and we load the dino42.fnt, customized font file. It in turn, will get the image file- dino42.png, as we linked it from the 'dino42.fnt' file we loaded. Then this customized font, is added at the TextButtonStyle as the font we want to use. And, then, TextButtonStyle is added to TextButton. BitmapFont has been scaled with this code:
dino42.setScale(1.3f),
but with custom fonts you don't have to scale them, because they are premade with various font sizes. So, you can just get them for the actual font size you want your text to be, and omit this 'setScale' property in your code.
And, next in create code, we create our 'collisionLabel', for the text, so when the circles collide; this text will appear on the game screen. Because we also want to use the custom font 'dino42' for this text, we code it as shown in this next image and this line:
collisionLabel = new Label("", new Label.LabelStyle(dino42,null));
If we were just to add color and not a customized font, then we would use this next line of code instead. We use 'font,Color.WHITE', when coding with the default system font, but use the actual font name when using a custom font here.
collisionLabel = new Label("", new Label.LabelStyle(font, Color.WHITE));
Note, 'null' in the custom font code, if you are adding a custom font, you can replace 'font,Color.WHITE', with our font name, 'dino42,null', and then add the word 'null'.
Also, if you want a preclick text to be added to the game screen, then add it here as shown:
("PreClick Text Add Here", new Label.LabelStyle(dino42,null)); at the two apostrophes.
Next, in the create method, we add the Click Listener to handle the 'tap' event on the PlayNow text, with this code; and, we set the 'shouldMoveCircles, to 'true', because when the 'Play Button' is tapped, we want the circles to action themselves.
public void clicked(InputEvent event, float x, float y) {
shouldMoveCircles = true;
Then, we add a Table, of Scene2d, and add our 'playButton', and 'collisionLabel' to the table. We added the button to the top of the game screen with Table properties, and the label that displays once the collision occurs, also displays at the top of the game screen.
Table is like Actor, in that we add our game variables to the Table, and then add the Table to the Stage. Table is useful just like Actor. With Actor we can add our game assets easily to stage and add actions to them. With Table, we can also add our game assets and add actions, and additionally, we can position our game assets more effectively. Table includes 'row', positioning, and we also place assets at top and bottom of the game screen. Table is most useful, if your game has lots of game characters and action. But, it can be implemented in simpler scenarios as well. For this tutorial, we added Table with some of its' basic properties for setting our button and label.
Also with create method, we create a Label for the collision text, so that when the two circles collide, the text 'Collision Detected', will appear on the game screen. But we don't want it to happen until the circles collide, so we place the label in the class we wrote for the circles collision. We can set the text with this code:
collisionLabel.setText("Collision Detected");
and its' in our class for the 'moveCircles', this code:
private void moveCircles() {, this is the class name - moveCircles.
And, in the 'moveCircles' class, this code:
circle1.y +=1; circle2.y -= 1;,
is what moves the two circles towards each other. The 'y', means to move them vertically, and the '+=1, -=1'; is what moves them towards each other. Also, in this 'moveCircles' class we wrote, we add the 'intersector' within our 'if' statement. This checks if the two circles have overlapped each other, and if so, then display the text on screen, 'Collision Detected'. Lastly, we have added our boolean, 'shouldMoveCircles' variable. Boolean is used for 'true', 'false', scenarios in the logic of your game code. We set this boolean to 'false', meaning, once the collision of the two circles has taken place, not to continue moving the circles, or basically says ' should we continue to move the circles after collision', answer, NO(false).
At Click Listener, as mentioned, we set 'shouldMoveCircles', to 'true', as the circles are going to action themselves. However, for 'shouldMoveCircles', at Intersector, in the 'collisionLabel' code, we set it to 'false', because after they collide we don't want them to action themselves.
We can however, set this to 'true', and the circles will keep going along the vertical line we set for them until they reach the top and bottom of the game screen. At that point, they will disappear off the screen because we have not set any bounds to keep them in play.
Render - At render method, we first clear the game screen, and then set our new screen color. If we are including more than one game screen, we also can set individual colors for each game screen, or have them all the same color, Either or, all game screen colors are set in the Render method. For multiple game screen colors, we can easily implement the 'switch' case function, to show the correct screen color for the game screen we are currently displaying.
Render method, is where we draw our game graphics to the screen. So this would include images, fonts, game characters, and the like. If we using Stage, we can draw them to stage with the 'stage.draw()' code call, otherwise, we can draw them with batch.
For this tutorial, we draw our customized font to the game screen, and draw the two circles with the Shape Renderer function. Because we are using Stage, we can use stage.draw(), to draw the customized font to the game screen.
And, we include this code for the move circles class:
if (shouldMoveCircles) {
moveCircles();
We include it here, so it can be drawn to the game screen with the stage.draw call.
Also, at Render method, we include - 'stage.act('Gdx.graphics.getDeltaTime()', in our code, as this is what facilitates the timing of the action for the two circles.
Dispose - At dispose method, we get to dispose of all our game assets, to keep our game performance at its' best. If using Stage, we can dispose of all assets at once, with 'Stage.dispose();' code call, otherwise we can dispose of each variable directly.
Summary
In this tutorial, we created two circles with ShapeRenderer, and then added action and collision detection to our circles. We added a Listener to the TextButton, that when clicked, actions the two circles, so that they collide with each other. We wrote a class to handle the 'moveCircles' game logic, and a boolean class member for the 'true', 'false' of the circles action. For the text on screen, we implemented a custom font, and we used Table of scene2d to position our game play button and text label.
EXAMPLE CODE - Code For This Tutorial.
JUST copy and paste to update your code.
JUST copy and paste to update your code.