Libgdx with Android For Game Dev
Game Dev Tutorial : Create a Code Class that Extends Actor
Game Dev -All Game Dev Tutorials
However, we are planning to use that same code in another app we will be making, and, we want to be able to add it to a Stage. That way, we can add additional action to it, and or, it can be included with any other Action class sequences we might want to implement.
public class CoinActor extends Actor; this is how we change our code into an Actor class.
We just have to add all the code for coin, circle, and the logic, to this newly created class, and then this new class codeset is just included in the app code. CoinActor class also has its' own set of class members, just like our game class - 'ApplicationAdapter' class does.
Several of these class members were repositioned from the ApplicationAdapter class; those that pertained to the coin, the circle, and its' logic. You might ask: Where should we put this newly added CoinActor class code: Best place is just after the class members and before the code of 'Create' method.
Looking at the previous code(previous tutorial), you see that most of the math logic for the coin action logic was in the Render method, but now with the updates all that code gets placed in the CoinActor class itself.
You can name this CoinActor class as you want, but usually a name that represents the class your creating; so here, CoinActor is appropriate. Once we create this separate new class that extends Actor, we can then add the class name CoinActor, and its' variable name 'coinActor', as an Actor to the Stage. With that, we can now add actions to CoinActor, just like any other actor we add to the Stage.
In the following code sections we will explain more on how each coded section implements.
All code for this tutorial is at the Example Code section on this page. At App Shot, you can see the App Action. It is the same video as the previous tutorial.
FYI: The code from this game dev tutorial is compatible with Android Studio with the Libgdx component. Read more about Android Studio and Libgdx Here
Click Create; CoinActor_Class game app is created, and the MyGdxGame.java page opens in your AIDE coding editor.
For more info on navigating files and using the AIDE coding editor, goto Tutorial 1.
App Shot - Portrait 5.8" Game Screen
CoinActor_Class
This app is available for download.
Download/Install This App: Here

Here, we sectioned the code to make it easier to explain.
At first shot, we see the variable for CoinActor it is, coinActor; has been included at ApplicationAdapter's class members. This is required for the code to work proper. Stage has been added here also. Anytime you create a new separate class, you must include its' name and variable name as a class member at the game class members. Your game class is the required class or core class of your code. Without it, you cannot add additional classes nor run/build the game code. For this apps' codeset, the ApplicationAdapter is our game class, and CoinActor class is an additional class we created and added.

Next here, we write code for the class CoinActor,and include all its' members with variable name for them. Most were just repositioned from the game class, ApplicationAdapter class, to CoinActor class members. Next in this code section, we set the ground, rectangle and circle, and give size for the circle. And, with velocityY, we set the falling speed for the coin. We also add the boolean variable for the code logic.

We can set a max bounce before it starts to move widthwise off the game screen. And, we can set the bounce gravity, how bouncy it will be. The 'velocityY -380' is how bouncy you want the coin to be, and at our class member variable you can see we set the MAX COUNT to 1, meaning we only want it to bounce once(one time) before it moves to the right and off the game screen. You can adjust these values as you want for: if you wanted it to be more or less bouncy, how many bounces in total before it stops, and, also its' speed as it falls to the ground.
Next code section is setting the height logic code for the coin action. And, also if it has bounced the one time, then 'Yes', if it has bounced; to continue the code action.
This last code logic is setting the action for the coin after it has completed its' action which means it has already moved down the game screen, has bounced one time, and has rolled to the right and off the game screen. This next code is saying to start the code again, or reset the action, and begin the action from the exact same place where is began the first time. We set the start position the same, but you can adjust these values if you wanted it to start from a different position after it completes its' first action run.
Bitcoin.x, is the position set for width, which we say in this code to position widthwise at center of screen by using - / 2. And, for height position, bitcoin.y, we used -490, meaning it will set the starting position of the coin at -490 from the top of the game screen. On our 5.8" game screen size, this is about 3/4 height of the game screen. Velocity.Y = -80; is the speed we set for the falling coin. You can change this value as you want.

Imports and Game Class - CoinActor class requires that we include additional import statements for Stage, Actor, Label, LabelStyle, Batch. And for ApplicationAdapter game class, we include all other imports. All these can be added together at the import statements section of code.
Variables At variables we include the class members and then our named variables for each of them. Because we added CoinActor class we must include a class member and variable name for it at the game class class members at ApplicationAdapter; so CoinActor we named coinActor for its' variable name.
The other class members and variables:
Circle(class member) we name bitcoin(variable);
boolean(class member) we name, hasBounced(variable);
int(class member) bounceCount = 0:(variable);
and, also,
float velocityX = 0;
float velocityY = 0;
final int(class member) MAX_BOUNCES = 1;(variable);
Label(class member) label;(variable);
All these class members and their variables, with exception of Label, get moved from game class ApplicationAdapter class members to CoinActor class members. We kept them in code, but commented them out at the code for game class ApplicationAdapter, and you can see them at the Example Code section; as they were coded for the previous tutorial.
We added a new 'Label' member, because we decided to add a Label to code our text that is on the ground, that reads, 'Cryptocurrency' '$'. It is not necessary to use Label, you can add text by using only the default BitmapFont(class member) font(variable); as we did in the previous tutorial, but just in case you want to add text to anything while working with Stage and Actor, Label is best suited. And, Label can be coded into Action sequences also, which is good. We named our Label(class member) as label(variable), but the variable name can be any name you want. So, we could have named it cryptoLabel(variable), to better suit the text it represents. If your code has a lot of labels, naming them in this manner is best practice.
Note: The CoinActor class code, public class CoinActor extends Actor; should be added or placed just after the class members of ApplicationAdapter class code, and, before the code of Create method; which you can see at the Example Code section.
Create - At create method, we include the new instances of all the class members we are coding for this tutorial; Important to note is the CoinActor code; here we declare the bitcoinTexture(the coin image) as the CoinActor, and then we set its' position on the game screen for width and height, set its' position from top of game screen, and then we add it to the stage with its' variable name: coinActor.
Because we created the class; 'public class CoinActor extends Actor'; we can now declare or pass the bitcoinTexture to that CoinActor, and because it becomes an actor, we can add it to the Stage, as shown in this code. Note; when we add the coin actor to the stage, we use the variable name of coin actor, which is, coinActor. We do not use the class name which is, CoinActor. Variable names must be camel cased.
CoinActor(bitcoinTexture,screenWidth / 2,
screenHeight - 490, ground);
stage.addActor(coinActor);
To see the variable name, look to the class members at Game class, where we must declare our CoinActor and the variable name we gave for it, coinActor.
And now that it is added to the Stage, we can action it along with other game characters, to create fun action scenes. We can add actions to it directly, or just include it along with other actions we create, and then it becomes one sequence of several or many actions.
At Create, we also create new instances for the Circle, Rectangle, ShapeRenderer, Label, LabelStyle, and set the InputProcessor for the stage.
Render - At render method, we first clear the game screen, and then set our new screen color. Here we set the ProjectionMatrix for batch and shapeRenderer, and set the deltaTime, and set the Stage to act and draw. If you are coding for batch and shapeRenderer, you should set a Projection Matrix for each of them.
Render method, is where we draw our game graphics to the screen. So this would include images, fonts, game characters, and the like. If we using Stage, we can draw them to stage with the 'stage.draw()' code call, otherwise, we can draw them with batch.
Dispose - At dispose method, we get to dispose of all our game assets, to keep our game performance at its' best. If using Stage, we can dispose of all assets at once, with 'Stage.dispose();' code call, otherwise we can dispose of variables that need to be disposed of individually. Here we dispose of stage, along with bitcoinTexture, batch, font, and shapeRenderer.
By recoding certain aspects of your game code into separate classes, you can make your game code more modular, which can be well suited to small size mobile games, or larger codesets.
With Actor and Stage of Libgdx scene2d, you can build your mobile game apps, and scale them to your liking.
Game Dev -All Game Dev Tutorials
App Project Name: CoinActor Class
This tutorial continues from our previous tutorial, where we created a game action loop, which contained a coin falling some height on the game screen onto a ground we created at the bottom of the game screen. We added some physics to the coin so it would respond with a bounce after it landed on the ground. From there, the coin rolled off the game screen. It is considered a 'loop action', because based on the code, the coin will continue to action itself indefinitely in this action loop we created, or until the user exits the game app.Stage and Actor
One thing to note; the code from the previous tutorial was not written to include, Stage or Actor, so we could not declare our coin action as an Actor and add it to a Stage. As we have learned in our tutorials, working with Stage and Actor of Scene2d can make actioning your game characters much easier to achieve. But it depends on what you want to have in your game scene action. So, in this scenario, if we did not want our falling coin to interact with other game action then adding it to the Stage probably isn't necessary.However, we are planning to use that same code in another app we will be making, and, we want to be able to add it to a Stage. That way, we can add additional action to it, and or, it can be included with any other Action class sequences we might want to implement.
Create a Separate Game Class
In order to do that, to update the 'coin action' code to work with Stage and Actor, we must create a separate public class for all the code that pertains to the coin, the circle, and the action logic. So, we will create a class and name it:public class CoinActor extends Actor; this is how we change our code into an Actor class.
We just have to add all the code for coin, circle, and the logic, to this newly created class, and then this new class codeset is just included in the app code. CoinActor class also has its' own set of class members, just like our game class - 'ApplicationAdapter' class does.
Several of these class members were repositioned from the ApplicationAdapter class; those that pertained to the coin, the circle, and its' logic. You might ask: Where should we put this newly added CoinActor class code: Best place is just after the class members and before the code of 'Create' method.
Looking at the previous code(previous tutorial), you see that most of the math logic for the coin action logic was in the Render method, but now with the updates all that code gets placed in the CoinActor class itself.
You can name this CoinActor class as you want, but usually a name that represents the class your creating; so here, CoinActor is appropriate. Once we create this separate new class that extends Actor, we can then add the class name CoinActor, and its' variable name 'coinActor', as an Actor to the Stage. With that, we can now add actions to CoinActor, just like any other actor we add to the Stage.
In the following code sections we will explain more on how each coded section implements.
All code for this tutorial is at the Example Code section on this page. At App Shot, you can see the App Action. It is the same video as the previous tutorial.
FYI: The code from this game dev tutorial is compatible with Android Studio with the Libgdx component. Read more about Android Studio and Libgdx Here
Create our Game App Screen
We are creating a new app for this tutorial. First, we must create our new mobile game app, so in AIDE, at the AppProject file hierachy, Choose Create New Project, select Mobile Game, and New Mobile Game; then add the App name, CoinActor_Class(Note: no spaces in the app name(can use _ ), or you can add spaces after you create it; Just Goto: the 'AppProject' folder; just select the App Name, and then select rename). Next, add the package name, 'com.aac.public_class_CoinActor'.Click Create; CoinActor_Class game app is created, and the MyGdxGame.java page opens in your AIDE coding editor.
For more info on navigating files and using the AIDE coding editor, goto Tutorial 1.
App Shot - Portrait 5.8" Game Screen
CoinActor_Class
This app is available for download.
Download/Install This App: Here
Code For This Tutorial
Here, we sectioned the code to make it easier to explain.
At first shot, we see the variable for CoinActor it is, coinActor; has been included at ApplicationAdapter's class members. This is required for the code to work proper. Stage has been added here also. Anytime you create a new separate class, you must include its' name and variable name as a class member at the game class members. Your game class is the required class or core class of your code. Without it, you cannot add additional classes nor run/build the game code. For this apps' codeset, the ApplicationAdapter is our game class, and CoinActor class is an additional class we created and added.
Naming Variables
Note: Like all variables, the variable name has to camel cased.Next here, we write code for the class CoinActor,and include all its' members with variable name for them. Most were just repositioned from the game class, ApplicationAdapter class, to CoinActor class members. Next in this code section, we set the ground, rectangle and circle, and give size for the circle. And, with velocityY, we set the falling speed for the coin. We also add the boolean variable for the code logic.
Code the Game Logic
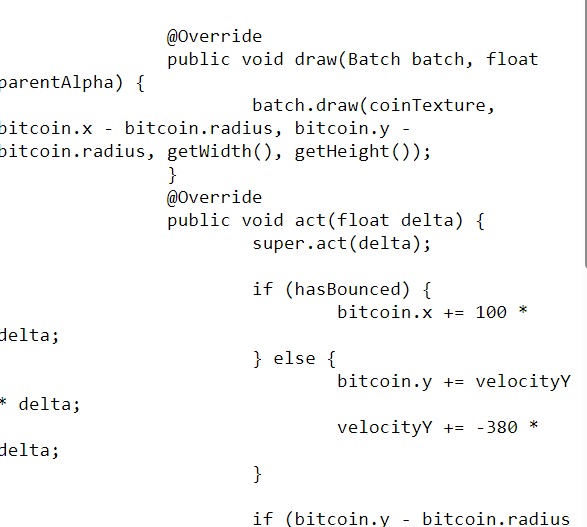
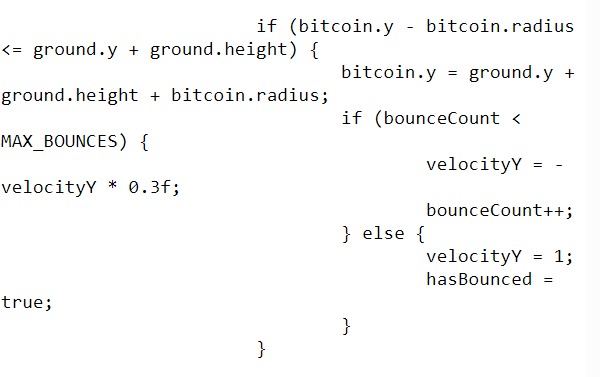
Next, we write the code to draw the coin to the center of the circle; and to the screen with 'batch.draw' code. We write the game logic code here for the coin action; so, first we include the code so it will roll off the game screen once it gets to the ground; the 'if hasBounced' boolean code actions this. It is set at 100* deltaTime, but you can adjust this if you want. Bitcoin.x - means the coin's width positioning. So, we want the coin to move width wise, after it gets to the ground, by a speed of 100* the deltaTime. The if 'hasBounced', is the coin when it gets to the ground, does it bounce(respond), and we include logic for that also.We can set a max bounce before it starts to move widthwise off the game screen. And, we can set the bounce gravity, how bouncy it will be. The 'velocityY -380' is how bouncy you want the coin to be, and at our class member variable you can see we set the MAX COUNT to 1, meaning we only want it to bounce once(one time) before it moves to the right and off the game screen. You can adjust these values as you want for: if you wanted it to be more or less bouncy, how many bounces in total before it stops, and, also its' speed as it falls to the ground.
Next code section is setting the height logic code for the coin action. And, also if it has bounced the one time, then 'Yes', if it has bounced; to continue the code action.
This last code logic is setting the action for the coin after it has completed its' action which means it has already moved down the game screen, has bounced one time, and has rolled to the right and off the game screen. This next code is saying to start the code again, or reset the action, and begin the action from the exact same place where is began the first time. We set the start position the same, but you can adjust these values if you wanted it to start from a different position after it completes its' first action run.
Bitcoin.x, is the position set for width, which we say in this code to position widthwise at center of screen by using - / 2. And, for height position, bitcoin.y, we used -490, meaning it will set the starting position of the coin at -490 from the top of the game screen. On our 5.8" game screen size, this is about 3/4 height of the game screen. Velocity.Y = -80; is the speed we set for the falling coin. You can change this value as you want.
Imports and Game Class - CoinActor class requires that we include additional import statements for Stage, Actor, Label, LabelStyle, Batch. And for ApplicationAdapter game class, we include all other imports. All these can be added together at the import statements section of code.
Variables At variables we include the class members and then our named variables for each of them. Because we added CoinActor class we must include a class member and variable name for it at the game class class members at ApplicationAdapter; so CoinActor we named coinActor for its' variable name.
The other class members and variables:
Circle(class member) we name bitcoin(variable);
boolean(class member) we name, hasBounced(variable);
int(class member) bounceCount = 0:(variable);
and, also,
float velocityX = 0;
float velocityY = 0;
final int(class member) MAX_BOUNCES = 1;(variable);
Label(class member) label;(variable);
All these class members and their variables, with exception of Label, get moved from game class ApplicationAdapter class members to CoinActor class members. We kept them in code, but commented them out at the code for game class ApplicationAdapter, and you can see them at the Example Code section; as they were coded for the previous tutorial.
We added a new 'Label' member, because we decided to add a Label to code our text that is on the ground, that reads, 'Cryptocurrency' '$'. It is not necessary to use Label, you can add text by using only the default BitmapFont(class member) font(variable); as we did in the previous tutorial, but just in case you want to add text to anything while working with Stage and Actor, Label is best suited. And, Label can be coded into Action sequences also, which is good. We named our Label(class member) as label(variable), but the variable name can be any name you want. So, we could have named it cryptoLabel(variable), to better suit the text it represents. If your code has a lot of labels, naming them in this manner is best practice.
Note: The CoinActor class code, public class CoinActor extends Actor; should be added or placed just after the class members of ApplicationAdapter class code, and, before the code of Create method; which you can see at the Example Code section.
Create - At create method, we include the new instances of all the class members we are coding for this tutorial; Important to note is the CoinActor code; here we declare the bitcoinTexture(the coin image) as the CoinActor, and then we set its' position on the game screen for width and height, set its' position from top of game screen, and then we add it to the stage with its' variable name: coinActor.
Because we created the class; 'public class CoinActor extends Actor'; we can now declare or pass the bitcoinTexture to that CoinActor, and because it becomes an actor, we can add it to the Stage, as shown in this code. Note; when we add the coin actor to the stage, we use the variable name of coin actor, which is, coinActor. We do not use the class name which is, CoinActor. Variable names must be camel cased.
CoinActor(bitcoinTexture,screenWidth / 2,
screenHeight - 490, ground);
stage.addActor(coinActor);
To see the variable name, look to the class members at Game class, where we must declare our CoinActor and the variable name we gave for it, coinActor.
And now that it is added to the Stage, we can action it along with other game characters, to create fun action scenes. We can add actions to it directly, or just include it along with other actions we create, and then it becomes one sequence of several or many actions.
At Create, we also create new instances for the Circle, Rectangle, ShapeRenderer, Label, LabelStyle, and set the InputProcessor for the stage.
Render - At render method, we first clear the game screen, and then set our new screen color. Here we set the ProjectionMatrix for batch and shapeRenderer, and set the deltaTime, and set the Stage to act and draw. If you are coding for batch and shapeRenderer, you should set a Projection Matrix for each of them.
Render method, is where we draw our game graphics to the screen. So this would include images, fonts, game characters, and the like. If we using Stage, we can draw them to stage with the 'stage.draw()' code call, otherwise, we can draw them with batch.
Dispose - At dispose method, we get to dispose of all our game assets, to keep our game performance at its' best. If using Stage, we can dispose of all assets at once, with 'Stage.dispose();' code call, otherwise we can dispose of variables that need to be disposed of individually. Here we dispose of stage, along with bitcoinTexture, batch, font, and shapeRenderer.
Summary
In this tutorial, we learned how to create a separate Actor class for the coin, circle, and logic code, so that it could be added to Stage as an Actor. Depending on game action requirements of your game, you might find it easier to work with Actor and Stage because of their convenient implementation with other codesets, and ease of use when adding and actioning game assets.By recoding certain aspects of your game code into separate classes, you can make your game code more modular, which can be well suited to small size mobile games, or larger codesets.
With Actor and Stage of Libgdx scene2d, you can build your mobile game apps, and scale them to your liking.
EXAMPLE CODE - Code For This Tutorial.
JUST copy and paste to update your code.
JUST copy and paste to update your code.