Libgdx with Android For Game Dev
Game Dev Tutorial : Character Animation: Create a Custom Animation From A Spritesheet
Game Dev -All Game Dev Tutorials
With this tutorial, we are going to create a custom animation from a spritesheet that has 4 frames(images) of the character we want to animate. Each frame of the animation was created with Pixel Studio(mobile app). With Pixel Studio, you can easily create the image frames, and watch them animate, frame by frame. The animation itself is a pixelart made warrior, which fires his wand to destroy the enemy. Each frame of the animated character is designed to follow the previous character's action, or non action. You can learn about pixelart, and creating animations with Pixel Studio, in this tutorial, and, also at our previous tutorial Game Sprites & Intro To Pixelart
So, in Pixel Studio, we can create and then run the animation, and see how it looks. We can also set the time for each frame as we want; or they can all have the same timing. Then, we just save the four frames to a spritesheet(name it as you like). The spritesheet created will position the four frames so they run after each other in proper sequence. An animation is typically saved as a gif type file.
Because it was saved as a spritesheet, it gets saved as a .png file type, not the .gif type. Png file type is not an animation, it is only saved as an image, or in case of the spritesheet, the images on the spritesheet are all png type because the spritesheet is saved as png file type.
And, this is what we want to do. Because in Libgdx, we cannot load an animation we created as an animation(with the gif file type), we must load each frame of our animation as a png file type, or load all frames together in a spritesheet, also as the 'png' file type, which is what we have done.
Then we use the Animation class of Libgdx; load our spritesheet, add some math logic to get and link all the frames; and lastly, we set the timing for the frames.
Because here we are coding a custom animation, we can set a unique time for each frame. That is, each frame can have its' own custom timing. So, in this animation, the first frame is 2 secs, the second frame 0.4 sec, the third frame is 0.4 of a sec, and the last frame is 1 sec.
Having your animation set with specific time intervals could be useful when designing your game play. For example, you might want other game character or characters to do something before the animation character begins, or perhaps a pause sometime after it begins to animate. Using the Custom Animation class of Libgdx, you can easily set unique timings for your game animated characters.
As mentioned, this game character, for this animation was created with Pixel Studio, a free app, for mobile pixelart creation. However, there a several mobile apps and online websites where you can now create pixelart for free, including creating animations. With Pixel Studio, you can create pixelart characters, animations, and save your work in a variety of file types, including a spritesheet(png file type). You can also create tilemaps, with Pixel Studio, but that does require you upgrade to a paid version.
All code for this tutorial is at the Example Code section on this page. At App Shot, you can see the Warrrior Animation.
FYI: The code from this game dev tutorial is compatible with Android Studio with the Libgdx component. Read more about Android Studio and Libgdx Here
Click Create; Custom Animation game app is created, and the MyGdxGame.java page opens in your AIDE coding editor.
For more info on navigating files and using the AIDE coding editor, goto Tutorial 1.
App Shot - Portrait 5.8" Game Screen
Custom Animation
This app is available for download.
Download/Install This App: Here

Imports and Game Class - For imports we include the necessary imports for the code we are including: Texture, TextureRegion, Animation, along with the standard imports like batch, camera, viewport; and, for our game class we are using the ApplicationAdapter class.
Variables At variables we include the class members and then our named variables for theme. So, besides the standard class members like camera, viewport, and batch, we also include these:
Texture walkSheet;
Texture[] frameTextures;
TextureRegion[] walkFrames;
TextureRegion[][] tmp;
CustomAnimation walkAnimation;
Texture class member for our spritesheet; its' variable name - walkSheet. Two Texture Regions added, one for the walk frames, and one for the 'tmp' texture region that will split the spritesheet and get the rows and columns. And, the Custom Animation class member and its' variable -walkAnimation.
Next, we must include the Custom Animation class, defining what we want to do with it. So this next code shot, shows that. We are using the Texture Region to get the frames, and then getting the frame durations(timing of frames), and adding some logic to start the frames at frame 0, and then to get those frames, in succession of each other. Then, after that, in our Create method, we have to create the new instances of all our class members, and including a new instance of the Custom Animation class.
The animation code,

Create - At create method, we include the new instances of all the class members we are coding for this tutorial, and any class methods we are including, like our Custom Animation. This screen shot shows that code;
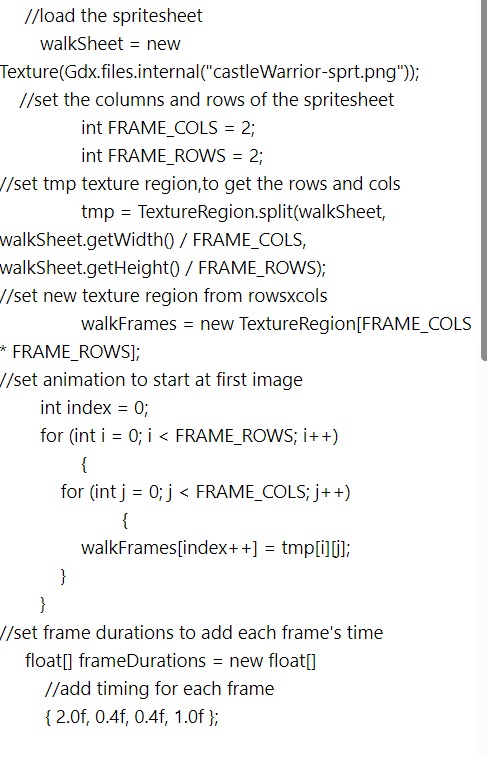
Here, we create new instances of the camera, and viewport, and spritebatch. Then we load the spritesheet with the Texture code call. Then from that, we set a tmp TextureRegion so we can split the spritesheet to get the columns and rows for the frames. Then we create a new TextureRegion, and that gets the columns times the rows from the spritesheet for our animation. Next, we write some logic so that the frames will begin at 0, the first frame.
And, we include the frame durations, the timing we want for each of the frames. So, we set 2 secs, 0.4 secs, 0.4 secs, and 1 sec, for the frames 1 to 4. Because we want to set each frame's time uniquely, we must create this custom animation as we have done.
Next, we must create a new instance of our animation class that we previously coded. This next shot shows that code. Note that we must include both the 'frameDurations', and the 'walkFrames' class members.

Render - Render method, is where we draw our game graphics to the screen, including those for animations. At render method, we first clear the game screen, and then set our new screen color. For this code, we are coding a light orange color for the background color, and using decimal code values for that.
Gdx.gl.glClearColor(1f,0.6f,0.2f,1f);
We also include the code for getDeltaTime, as this is required for our animation timing.
stateTime += Gdx.graphics.getDeltaTime();
Also, because it is an animation, we cannot draw the animation using the walkFrames variable, instead, we must create yet another TextureRegion, and set the currentFrame as our variable, and then draw the batch from that variable.
TextureRegion currentFrame =
walkAnimation.getKeyFrame(stateTime,true);
Now, we can draw our animation to the game screen with batch; and set the position of it: 260(width), 460(height) and its' size; 128(width) and, 128(height).
batch.begin();
//set character's pos and size
batch.draw(currentFrame,260,460,128,128);
batch.end();
Dispose - At dispose method, we get to dispose of all our game assets, to keep our game performance at its' best. If using Stage, we can dispose of all assets at once, with 'Stage.dispose();' code call, otherwise we can dispose of each variable directly.
For this code, we must dispose of the texture and the batch using this code:
walkSheet.dispose();
batch.dispose();
The first image shows a Quick Guide to getting started with making an animation in Pixel Studio. Once you've created your frames(the pixelart images you want), you can animate them, with same or unique frame timing.
To set the timings for each frame separately, you can click the settings button next the to 'play frames' arrow. The selected frame has a solid color border around it, whereas unselected frames do not. In Pixel Studio, the top animation menu row(frames) is hidden, until you click or select the 'film' icon at the bottom of app, as shown by the blue arrow.
The same for Layers mode, you can hide and unhide it by tapping the 'layers' icon, and like frames, the layer with the solid color around it is your selected layer. To create a regular pixelart character, at the bottom menu row, tap 'layers' mode. This opens the Layers menu row.
Newly added images(uploading or creating new) are automatically placed into layer one, for both creation modes, layers and frames. If tracing an image, once you've completed your tracing, just delete the first layer, before you save your pixelart creation. Look for the solid color border around your frame, to indiciate your on the current frame - at layers or frames.

You can create a pixelart image in 'layer' mode, and later add it to 'frames' mode row(animation frame), by going into settings at frames row, and selecting- add image, and select it from your device file manager. And, if your pixelart image is already in pixel studio canvas window(newly made), just select the 'film' icon, to open or populate the animation(frames row) menu. You image will appear as layer one, in the animation frame row, and, layers row as well, as shown in the previous image. You can then add more images from your device file manager, or create new pixelart images as you go. Just remember to select new frame for each new pixelart image you create and want to add as a frame in your animation.
Using Spritesheets with Pixel Studio
Pixel Studio allows you to create an animation, then save all the frames you created into a spritesheet(png file type), that you can then use in Libgdx. A spritesheet is just an image that contains a bunch of images. In Libgdx, we can load the spritesheet, and then remake the animation by coding with the Animation class of Libgdx.
This next image shows the Pixel Studio window with our saved spritesheet for this tutorial. We created four different frames, stances, of our warrior. Then, added our unique timing for each frame. Then we saved it as a spritesheet.

To Save Your Animation as a Spritesheet in Pixel Studio:
Click Save, by clicking the '3 line' colored icon to the right of the layer menu row.
Next, at the dialog displayed, select the 3 dots next to the Save selection,
Next, select, Save to files
Note: if you select Save, and not 'Save To Files', it is saved to Your Tabs menu, and won't save as a Spritesheet
Next, at Save dialog, select the dots next to MP4 selection
Next, at Image format dialog, select Sprite sheet near bottom of dialog
Next, at Export Sprite Sheet dialog, specify how many columns you want, for this warrior image, we added 2, so we get, 2x2 spritesheet
Next, select spacing, if adding, 1 is good, then tap Apply
Next, at Save dialog, change or add a name for the spritesheet, and select Save
(Here you can see total size of spritesheet, wxh)
opens file manager of your device, click Save, it saves it to Download folder.
To Note; you do not have to use the same timing when adding this animation to code; because, we are not adding the animation per say, we are only adding the 4 frames of the animation, and then, with our code, we are adding or setting the timing of each frame, by using the Animation class of Libgdx.
Save Animation as Gif Type
If you want to save your animation as an animation only, then you can save it as the .gif file type. Follow the same process to goto Save, then select gif as your file save type. Also select where you want to save it. Note: In Libgdx, we cannot load an animation as a .gif type, we must load each file(frame) separately or in a spritesheet with png file type, and then animate it with Animation class of Libgdx.
Work With Layers: Trace an Image
Once you tap or select Layers, the layers menu will open or populate, and it goes to first layer automatically. Select a new layer, for each new layer you want to create. Using a second layer is ideal for tracing an image. Put the image you want to trace in layer one, or just load it, and it goes to layer one, then hit the plus next to layer one to create or goto layer two. Start your tracing in layer two. A solid color border surrounds the current layer your on. To Save your traced image, delete the 1st layer, then save your second layer.
Saving Animation Frame as Single Image
Likewise, you can save any frame you created for an animation as a single image. To do so, just select the frame you want to save separately, (make sure it has solid color border around it), and select the Save icon, then select save as PNG format, it will save as a png file type.
Create A New Pixelart
To start a New pixelart creation, select the 3line color icon(can also SAVE, CREATE NEW, TABS, SAVE & QUIT, Tutorials), then select Create New, then select a preset size or enter your own width and height, then select a background color(transparent good) then, give it a name. Then at next dialog screen, select use Simple Template. Next, blank canvas appears on your app, you can start to create your pixelart. The canvas will look like this next image shot. (pixelart has been created) Note, the Layers mode, and Film mode are both selected, and therefore, the frames row and layers row are both displayed, and each shows the pixelart character, at frame one and layer one.

To display the Mini Map, select small layers icon next to pen width icon. This map can be dragged around the canvas.
To add a color, select the 'color palette' icon. Select the Pen icon to draw your pixelart, and select the 'Pen width' icon to toggle the pen width. Select eraser to erase any part of your drawing. Select the 'settings' icon, and select 'outline', to have an outline around your drawing, as your draw it, or after it is drawn. At settings icon, you can also copy layer, clone layer, merge all layers, export layers, delete layer.
To Save a color to your selected colors at top of app rows; first tap the color palette for the color you want, then select SAVE from the dialog, then select a square empty space at the top rows where colors are saved. Then just select to use it. The color is now saved to your color palette. To use any of your saved colors, just tap the color you want, then you can use it.
Pixelart Size
When you select to Create New pixelart, you will be prompted to select from preset sizes; from 32x32 to 512x512, or enter your own. To note, the larger your pixelart creation, the more time it takes to create it. I usually use 32x32. Then, when I save it, Pixel Studio recommends to save it as 256x256, reason being; it will get blurry, if you want to set the size of your creation at anything more than the 32x32. So, best practice to select the 256x256 selection when saving it,or whatever size Pixel Studio recommends. Then, when you use it in your mobile games, you can use any size from 32x32 to 256x256(or the size they recommended), and the pixelart character will look good.
For my 5.8 cell screen size, my characters sizes are mostly around 130 or less. And, when I install the game screen on my 8" tablet, they look good also. Note, these sizes are for individual game characters. If you were to make game fixed assets then you might want larger sizes, example, like creating tile maps. Tile Maps are like a background for your game screen, which can have various layers that together make the background scene for your game.
Tips For Creating Your Pixelart
To Save your work, from Layers or Frames, select or tap the 3line icon(SAVE icon) as shown in the image shot.
You can save your pixelart in a variety of formats, and you can save an animation as a gif, and a spritesheet as a png. If you don't select Save As, your work will be saved in the Tabs folder of pixelart, which you can view by selecting the Settings icon.(SAVE icon) You can delete creations from your Tabs folder as you like. Select the undo and redo arrows just above the Layers row, to undo and redo your creation as you create it.
You could make the same animation by loading each of these 4 frames separately, as single images. But using a spritesheet does make it easier to load the frames and to implement the animation code.
Pixel Studio and similar online apps and websites are ideal for making graphics for your mobile games. Most offer free versions with plenty of features, including saving your work.
Game Dev -All Game Dev Tutorials
App Project Name: Custom Animation
With this tutorial, we are going to create a custom animation from a spritesheet that has 4 frames(images) of the character we want to animate. Each frame of the animation was created with Pixel Studio(mobile app). With Pixel Studio, you can easily create the image frames, and watch them animate, frame by frame. The animation itself is a pixelart made warrior, which fires his wand to destroy the enemy. Each frame of the animated character is designed to follow the previous character's action, or non action. You can learn about pixelart, and creating animations with Pixel Studio, in this tutorial, and, also at our previous tutorial Game Sprites & Intro To Pixelart
So, in Pixel Studio, we can create and then run the animation, and see how it looks. We can also set the time for each frame as we want; or they can all have the same timing. Then, we just save the four frames to a spritesheet(name it as you like). The spritesheet created will position the four frames so they run after each other in proper sequence. An animation is typically saved as a gif type file.
Because it was saved as a spritesheet, it gets saved as a .png file type, not the .gif type. Png file type is not an animation, it is only saved as an image, or in case of the spritesheet, the images on the spritesheet are all png type because the spritesheet is saved as png file type.
And, this is what we want to do. Because in Libgdx, we cannot load an animation we created as an animation(with the gif file type), we must load each frame of our animation as a png file type, or load all frames together in a spritesheet, also as the 'png' file type, which is what we have done.
Then we use the Animation class of Libgdx; load our spritesheet, add some math logic to get and link all the frames; and lastly, we set the timing for the frames.
Because here we are coding a custom animation, we can set a unique time for each frame. That is, each frame can have its' own custom timing. So, in this animation, the first frame is 2 secs, the second frame 0.4 sec, the third frame is 0.4 of a sec, and the last frame is 1 sec.
Having your animation set with specific time intervals could be useful when designing your game play. For example, you might want other game character or characters to do something before the animation character begins, or perhaps a pause sometime after it begins to animate. Using the Custom Animation class of Libgdx, you can easily set unique timings for your game animated characters.
As mentioned, this game character, for this animation was created with Pixel Studio, a free app, for mobile pixelart creation. However, there a several mobile apps and online websites where you can now create pixelart for free, including creating animations. With Pixel Studio, you can create pixelart characters, animations, and save your work in a variety of file types, including a spritesheet(png file type). You can also create tilemaps, with Pixel Studio, but that does require you upgrade to a paid version.
All code for this tutorial is at the Example Code section on this page. At App Shot, you can see the Warrrior Animation.
FYI: The code from this game dev tutorial is compatible with Android Studio with the Libgdx component. Read more about Android Studio and Libgdx Here
Create our Game App Screen
We are creating a new app for this tutorial. First, we must create our new mobile game app, so in AIDE, at the AppProject file hierachy, Choose Create New Project, select Mobile Game, and New Mobile Game; then add the App name, Custom Animation(Note: no spaces in the app name(can use _ ), or you can add spaces after you create it; Just Goto: the 'AppProject' folder; just select the App Name, and then select rename). Next, add the package name, 'com.aac.custom_animation'.Click Create; Custom Animation game app is created, and the MyGdxGame.java page opens in your AIDE coding editor.
For more info on navigating files and using the AIDE coding editor, goto Tutorial 1.
App Shot - Portrait 5.8" Game Screen
Custom Animation
This app is available for download.
Download/Install This App: Here
Code For This Tutorial
For this tutorial, we must include the imports, game class, class members(with variables), create method, render method, dispose method. And, include any additional classes and methods we require for this tutorial.Imports and Game Class - For imports we include the necessary imports for the code we are including: Texture, TextureRegion, Animation, along with the standard imports like batch, camera, viewport; and, for our game class we are using the ApplicationAdapter class.
Variables At variables we include the class members and then our named variables for theme. So, besides the standard class members like camera, viewport, and batch, we also include these:
Texture walkSheet;
Texture[] frameTextures;
TextureRegion[] walkFrames;
TextureRegion[][] tmp;
CustomAnimation walkAnimation;
Texture class member for our spritesheet; its' variable name - walkSheet. Two Texture Regions added, one for the walk frames, and one for the 'tmp' texture region that will split the spritesheet and get the rows and columns. And, the Custom Animation class member and its' variable -walkAnimation.
Next, we must include the Custom Animation class, defining what we want to do with it. So this next code shot, shows that. We are using the Texture Region to get the frames, and then getting the frame durations(timing of frames), and adding some logic to start the frames at frame 0, and then to get those frames, in succession of each other. Then, after that, in our Create method, we have to create the new instances of all our class members, and including a new instance of the Custom Animation class.
The animation code,
Create - At create method, we include the new instances of all the class members we are coding for this tutorial, and any class methods we are including, like our Custom Animation. This screen shot shows that code;
Here, we create new instances of the camera, and viewport, and spritebatch. Then we load the spritesheet with the Texture code call. Then from that, we set a tmp TextureRegion so we can split the spritesheet to get the columns and rows for the frames. Then we create a new TextureRegion, and that gets the columns times the rows from the spritesheet for our animation. Next, we write some logic so that the frames will begin at 0, the first frame.
And, we include the frame durations, the timing we want for each of the frames. So, we set 2 secs, 0.4 secs, 0.4 secs, and 1 sec, for the frames 1 to 4. Because we want to set each frame's time uniquely, we must create this custom animation as we have done.
Next, we must create a new instance of our animation class that we previously coded. This next shot shows that code. Note that we must include both the 'frameDurations', and the 'walkFrames' class members.
Render - Render method, is where we draw our game graphics to the screen, including those for animations. At render method, we first clear the game screen, and then set our new screen color. For this code, we are coding a light orange color for the background color, and using decimal code values for that.
Gdx.gl.glClearColor(1f,0.6f,0.2f,1f);
We also include the code for getDeltaTime, as this is required for our animation timing.
stateTime += Gdx.graphics.getDeltaTime();
Also, because it is an animation, we cannot draw the animation using the walkFrames variable, instead, we must create yet another TextureRegion, and set the currentFrame as our variable, and then draw the batch from that variable.
TextureRegion currentFrame =
walkAnimation.getKeyFrame(stateTime,true);
Now, we can draw our animation to the game screen with batch; and set the position of it: 260(width), 460(height) and its' size; 128(width) and, 128(height).
batch.begin();
//set character's pos and size
batch.draw(currentFrame,260,460,128,128);
batch.end();
Dispose - At dispose method, we get to dispose of all our game assets, to keep our game performance at its' best. If using Stage, we can dispose of all assets at once, with 'Stage.dispose();' code call, otherwise we can dispose of each variable directly.
For this code, we must dispose of the texture and the batch using this code:
walkSheet.dispose();
batch.dispose();
Pixel Studio: How To Create Layers(Pixelart) and Frames(Pixelart Animations)
Using Pixel Studio, a mobile app, you can easily create pixelart characters, with either Frames mode or Layers mode, and use your newly created pixelart from either to create an animation. In these next few images, you can see the Pixel Studio layout screens for creating pixelart art and making animations from them.The first image shows a Quick Guide to getting started with making an animation in Pixel Studio. Once you've created your frames(the pixelart images you want), you can animate them, with same or unique frame timing.
To set the timings for each frame separately, you can click the settings button next the to 'play frames' arrow. The selected frame has a solid color border around it, whereas unselected frames do not. In Pixel Studio, the top animation menu row(frames) is hidden, until you click or select the 'film' icon at the bottom of app, as shown by the blue arrow.
The same for Layers mode, you can hide and unhide it by tapping the 'layers' icon, and like frames, the layer with the solid color around it is your selected layer. To create a regular pixelart character, at the bottom menu row, tap 'layers' mode. This opens the Layers menu row.
Newly added images(uploading or creating new) are automatically placed into layer one, for both creation modes, layers and frames. If tracing an image, once you've completed your tracing, just delete the first layer, before you save your pixelart creation. Look for the solid color border around your frame, to indiciate your on the current frame - at layers or frames.
You can create a pixelart image in 'layer' mode, and later add it to 'frames' mode row(animation frame), by going into settings at frames row, and selecting- add image, and select it from your device file manager. And, if your pixelart image is already in pixel studio canvas window(newly made), just select the 'film' icon, to open or populate the animation(frames row) menu. You image will appear as layer one, in the animation frame row, and, layers row as well, as shown in the previous image. You can then add more images from your device file manager, or create new pixelart images as you go. Just remember to select new frame for each new pixelart image you create and want to add as a frame in your animation.
Using Spritesheets with Pixel Studio
Pixel Studio allows you to create an animation, then save all the frames you created into a spritesheet(png file type), that you can then use in Libgdx. A spritesheet is just an image that contains a bunch of images. In Libgdx, we can load the spritesheet, and then remake the animation by coding with the Animation class of Libgdx.
This next image shows the Pixel Studio window with our saved spritesheet for this tutorial. We created four different frames, stances, of our warrior. Then, added our unique timing for each frame. Then we saved it as a spritesheet.
To Save Your Animation as a Spritesheet in Pixel Studio:
Click Save, by clicking the '3 line' colored icon to the right of the layer menu row.
Next, at the dialog displayed, select the 3 dots next to the Save selection,
Next, select, Save to files
Note: if you select Save, and not 'Save To Files', it is saved to Your Tabs menu, and won't save as a Spritesheet
Next, at Save dialog, select the dots next to MP4 selection
Next, at Image format dialog, select Sprite sheet near bottom of dialog
Next, at Export Sprite Sheet dialog, specify how many columns you want, for this warrior image, we added 2, so we get, 2x2 spritesheet
Next, select spacing, if adding, 1 is good, then tap Apply
Next, at Save dialog, change or add a name for the spritesheet, and select Save
(Here you can see total size of spritesheet, wxh)
opens file manager of your device, click Save, it saves it to Download folder.
To Note; you do not have to use the same timing when adding this animation to code; because, we are not adding the animation per say, we are only adding the 4 frames of the animation, and then, with our code, we are adding or setting the timing of each frame, by using the Animation class of Libgdx.
Save Animation as Gif Type
If you want to save your animation as an animation only, then you can save it as the .gif file type. Follow the same process to goto Save, then select gif as your file save type. Also select where you want to save it. Note: In Libgdx, we cannot load an animation as a .gif type, we must load each file(frame) separately or in a spritesheet with png file type, and then animate it with Animation class of Libgdx.
Work With Layers: Trace an Image
Once you tap or select Layers, the layers menu will open or populate, and it goes to first layer automatically. Select a new layer, for each new layer you want to create. Using a second layer is ideal for tracing an image. Put the image you want to trace in layer one, or just load it, and it goes to layer one, then hit the plus next to layer one to create or goto layer two. Start your tracing in layer two. A solid color border surrounds the current layer your on. To Save your traced image, delete the 1st layer, then save your second layer.
Saving Animation Frame as Single Image
Likewise, you can save any frame you created for an animation as a single image. To do so, just select the frame you want to save separately, (make sure it has solid color border around it), and select the Save icon, then select save as PNG format, it will save as a png file type.
Create A New Pixelart
To start a New pixelart creation, select the 3line color icon(can also SAVE, CREATE NEW, TABS, SAVE & QUIT, Tutorials), then select Create New, then select a preset size or enter your own width and height, then select a background color(transparent good) then, give it a name. Then at next dialog screen, select use Simple Template. Next, blank canvas appears on your app, you can start to create your pixelart. The canvas will look like this next image shot. (pixelart has been created) Note, the Layers mode, and Film mode are both selected, and therefore, the frames row and layers row are both displayed, and each shows the pixelart character, at frame one and layer one.
To display the Mini Map, select small layers icon next to pen width icon. This map can be dragged around the canvas.
To add a color, select the 'color palette' icon. Select the Pen icon to draw your pixelart, and select the 'Pen width' icon to toggle the pen width. Select eraser to erase any part of your drawing. Select the 'settings' icon, and select 'outline', to have an outline around your drawing, as your draw it, or after it is drawn. At settings icon, you can also copy layer, clone layer, merge all layers, export layers, delete layer.
To Save a color to your selected colors at top of app rows; first tap the color palette for the color you want, then select SAVE from the dialog, then select a square empty space at the top rows where colors are saved. Then just select to use it. The color is now saved to your color palette. To use any of your saved colors, just tap the color you want, then you can use it.
Pixelart Size
When you select to Create New pixelart, you will be prompted to select from preset sizes; from 32x32 to 512x512, or enter your own. To note, the larger your pixelart creation, the more time it takes to create it. I usually use 32x32. Then, when I save it, Pixel Studio recommends to save it as 256x256, reason being; it will get blurry, if you want to set the size of your creation at anything more than the 32x32. So, best practice to select the 256x256 selection when saving it,or whatever size Pixel Studio recommends. Then, when you use it in your mobile games, you can use any size from 32x32 to 256x256(or the size they recommended), and the pixelart character will look good.
For my 5.8 cell screen size, my characters sizes are mostly around 130 or less. And, when I install the game screen on my 8" tablet, they look good also. Note, these sizes are for individual game characters. If you were to make game fixed assets then you might want larger sizes, example, like creating tile maps. Tile Maps are like a background for your game screen, which can have various layers that together make the background scene for your game.
Tips For Creating Your Pixelart
To Save your work, from Layers or Frames, select or tap the 3line icon(SAVE icon) as shown in the image shot.
You can save your pixelart in a variety of formats, and you can save an animation as a gif, and a spritesheet as a png. If you don't select Save As, your work will be saved in the Tabs folder of pixelart, which you can view by selecting the Settings icon.(SAVE icon) You can delete creations from your Tabs folder as you like. Select the undo and redo arrows just above the Layers row, to undo and redo your creation as you create it.
Summary
In this tutorial, we learned how to implement a custom animation from our pixelart warrior with four frames. Because we wanted to have unique times for each frame, we had to make a custom animation.You could make the same animation by loading each of these 4 frames separately, as single images. But using a spritesheet does make it easier to load the frames and to implement the animation code.
Pixel Studio and similar online apps and websites are ideal for making graphics for your mobile games. Most offer free versions with plenty of features, including saving your work.
EXAMPLE CODE - Code For This Tutorial.
JUST copy and paste to update your code.
JUST copy and paste to update your code.