
Libgdx with Android For Game Dev
Game Dev Tutorial : Implement ShapeRenderer
Game Dev -All Game Dev Tutorials
In this tutorial lesson, we will learn about 'ShapeRenderer'; a useful method to add shapes to your game screen. Common shapes are circles and rectangles. We will create a line circle, and a filled circle using the ShapeRenderer code call. If you want to implement a Line type(not filled, just an outline around the circle), then you include 'Line', in your code snippet, however, if you want the circle to appear colored or filled, then you add 'Filled' to the code instead.
Shapes you create can also be actioned, like moving across the game screen. To do so, we can add some basic math logic to create action and we can also set the speed of our circle as it moves across the screen. We've included two App Shots, one where you have the outlined stationary circle example, and one with the filled circle example(with loop action). This lets you see how each would look on the game screen.
All code for this tutorial is at the Example Code section on this page. At the following App Shot photos, you can see the outlined circle we created, and the smaller filled circle, both in white color. You can also click the play button at the App Shot video to see the white ball in action as it rolls across the game screen.
Click Create; Round Shape Ball game app is created, and the MyGdxGame.java page opens in your AIDE coding editor.
FYI: The code from this game dev tutorial is compatible with Android Studio with the Libgdx component. Read more about Android Studio and Libgdx Here App Shot
Screen Size - Portrait 5.8"

App Shot Video
Click the Play button to see the Shape actioned.
At imports, we include our standard imports and also the import com.badlogic.gdx.graphics.glutils.ShapeRenderer; import code for the 'shapeRenderer' method. And, after imports we include our game class code. We are using the ApplicationAdapter game class, which can handle our code execution for the Shape Render Circle we want to implement.

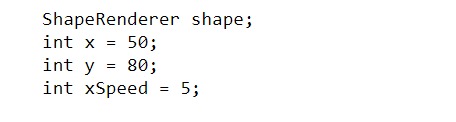
Variables
After coding our imports and game class, we must then add our game variables. At Variables we can declare our game variables; in this game's code we include the required ShapeRenderer shape: variable, and also the variables for
int x = 50;
int y = 80;
int xSpeed = 5;
The int x and int y are the coordinates for the circle from its' center outward, and the xSpeed is the speed we want our shape ball to be moving across the game screen when it first begins to move. You don't have to set a speed for your shape, it can also be stationary on the game screen, but for this tutorial we are giving it some action.
We must also set the size of our shape, it's radius, but we can do that at the Render method, with this code: shape.circle(x,y,70);. The Render method will execute our circle with the x and y variables we set, 50, and 80, basically its' position on the game screen; and we also set the radius for our shape circle which is its' total overall round size by using the 70; which can be adjusted to make the circle larger or smaller.
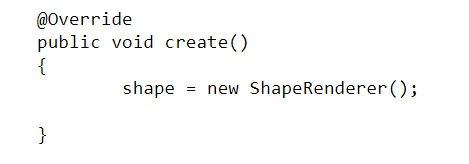
Create
At Create method, we shall create an instance of our ShapeRenderer; it uses our variable code to get the ShapeRenderer method code call and the variable name we declared. If you forget to include either of these, the variable or the instance of it, you will get a runtime error message when attempting to build your app code.
Render
In the render method, we can set our game screen color, draw our shape ball circle to the game screen, with this code:
shape.begin(ShapeRenderer.ShapeType.Filled);
and, then add the code for the math logic we want to include which will get our ball shape moving across the screen, going right then left, then returning to cross the screen again.
The xSpeed we originally coded was only int xSpeed = 5;
however, this code will only move the shape ball across the screen and then off the screen, it does nothing else.
We want our shape ball to move across the screen, and THEN, reverse its' direction once it gets to the right side of the game screen. Since we want it to stay on the screen and loop continously across the screen going right then left, we must add some math logic to our game code in the Render Method. This is easy to do.
The xSpeed = 5; is the starting speed of our Circle Shape Ball that is going to move horizontally. This is not measured as speed in seconds, but rather, pixels per frame. In order to get our Shape Ball to come back or reverse its' direction we must set a negative number to contrast the positive one we set, the 5. Depending on the screen size of your device this number may need to be adjusted. For our 5.8 size screen, in portrait mode, setting the xSpeed to -9 is sufficient to reverse the Shape Ball, and keep it moving in a loop like action on the game screen.
This code:
if (x > Gdx.graphics.getWidth()) { xSpeed = -9;
is saying: When the Shape Ball gets to the right side width of the device screen(getWidth), reverse the Shape Ball and make it move in the opposite or reverse direction on the game screen. And, this code:
(x < 0),
is saying: if the Shape Ball gets to the position of less than 0, on the left side of the game screen(bottom left side of game screen is 0,0), reverse the direction and send it back in the opposite direction again. So with our few lines of Math Logic Code we can send the Shape Ball across the game screen, and then reverse its' direction when it gets to either side of the game screen. This code updates the object’s horizontal position by adding xSpeed to x. Also, you can adjust the actual speed by setting the number, =5. Using, for example, =9 moves the shape ball at an increased speed, whereas, =1, would move the shape ball at a slower rate of speed.

Game Dev -All Game Dev Tutorials
App Project Name: Round Shape Ball
In this tutorial lesson, we will learn about 'ShapeRenderer'; a useful method to add shapes to your game screen. Common shapes are circles and rectangles. We will create a line circle, and a filled circle using the ShapeRenderer code call. If you want to implement a Line type(not filled, just an outline around the circle), then you include 'Line', in your code snippet, however, if you want the circle to appear colored or filled, then you add 'Filled' to the code instead.
Shapes you create can also be actioned, like moving across the game screen. To do so, we can add some basic math logic to create action and we can also set the speed of our circle as it moves across the screen. We've included two App Shots, one where you have the outlined stationary circle example, and one with the filled circle example(with loop action). This lets you see how each would look on the game screen.
All code for this tutorial is at the Example Code section on this page. At the following App Shot photos, you can see the outlined circle we created, and the smaller filled circle, both in white color. You can also click the play button at the App Shot video to see the white ball in action as it rolls across the game screen.
Create our Game App Screen
We are creating a new app for this tutorial. First, we must create our new mobile game app, so in AIDE, at the AppProject file hierachy, Choose Create New Project, select Mobile Game, and New Mobile Game; then add the App name, Round_Shape_Ball(Note: no spaces in the app name(can use _ ), or you can add spaces after you create it; Just Goto: the 'AppProject' folder; just select the App Name, and then select rename). Next, add the package name, 'com.aac.example_round_shape'Click Create; Round Shape Ball game app is created, and the MyGdxGame.java page opens in your AIDE coding editor.
FYI: The code from this game dev tutorial is compatible with Android Studio with the Libgdx component. Read more about Android Studio and Libgdx Here App Shot
Screen Size - Portrait 5.8"
App Shot Video
Click the Play button to see the Shape actioned.
Code For This Tutorial
Imports, Game ClassAt imports, we include our standard imports and also the import com.badlogic.gdx.graphics.glutils.ShapeRenderer; import code for the 'shapeRenderer' method. And, after imports we include our game class code. We are using the ApplicationAdapter game class, which can handle our code execution for the Shape Render Circle we want to implement.
Variables
After coding our imports and game class, we must then add our game variables. At Variables we can declare our game variables; in this game's code we include the required ShapeRenderer shape: variable, and also the variables for
int x = 50;
int y = 80;
int xSpeed = 5;
The int x and int y are the coordinates for the circle from its' center outward, and the xSpeed is the speed we want our shape ball to be moving across the game screen when it first begins to move. You don't have to set a speed for your shape, it can also be stationary on the game screen, but for this tutorial we are giving it some action.
We must also set the size of our shape, it's radius, but we can do that at the Render method, with this code: shape.circle(x,y,70);. The Render method will execute our circle with the x and y variables we set, 50, and 80, basically its' position on the game screen; and we also set the radius for our shape circle which is its' total overall round size by using the 70; which can be adjusted to make the circle larger or smaller.
Create
At Create method, we shall create an instance of our ShapeRenderer; it uses our variable code to get the ShapeRenderer method code call and the variable name we declared. If you forget to include either of these, the variable or the instance of it, you will get a runtime error message when attempting to build your app code.
Render
In the render method, we can set our game screen color, draw our shape ball circle to the game screen, with this code:
shape.begin(ShapeRenderer.ShapeType.Filled);
and, then add the code for the math logic we want to include which will get our ball shape moving across the screen, going right then left, then returning to cross the screen again.
The xSpeed we originally coded was only int xSpeed = 5;
however, this code will only move the shape ball across the screen and then off the screen, it does nothing else.
We want our shape ball to move across the screen, and THEN, reverse its' direction once it gets to the right side of the game screen. Since we want it to stay on the screen and loop continously across the screen going right then left, we must add some math logic to our game code in the Render Method. This is easy to do.
The xSpeed = 5; is the starting speed of our Circle Shape Ball that is going to move horizontally. This is not measured as speed in seconds, but rather, pixels per frame. In order to get our Shape Ball to come back or reverse its' direction we must set a negative number to contrast the positive one we set, the 5. Depending on the screen size of your device this number may need to be adjusted. For our 5.8 size screen, in portrait mode, setting the xSpeed to -9 is sufficient to reverse the Shape Ball, and keep it moving in a loop like action on the game screen.
This code:
if (x > Gdx.graphics.getWidth()) { xSpeed = -9;
is saying: When the Shape Ball gets to the right side width of the device screen(getWidth), reverse the Shape Ball and make it move in the opposite or reverse direction on the game screen. And, this code:
(x < 0),
is saying: if the Shape Ball gets to the position of less than 0, on the left side of the game screen(bottom left side of game screen is 0,0), reverse the direction and send it back in the opposite direction again. So with our few lines of Math Logic Code we can send the Shape Ball across the game screen, and then reverse its' direction when it gets to either side of the game screen. This code updates the object’s horizontal position by adding xSpeed to x. Also, you can adjust the actual speed by setting the number, =5. Using, for example, =9 moves the shape ball at an increased speed, whereas, =1, would move the shape ball at a slower rate of speed.
Summary
In this tutorial, we learned how to implement a filled white circle by using the 'ShapeRenderer'. Once created, we can add action to the Shape by adding some math logic to our code. If statements are useful for this purpose, and you can write the code any way you want to create your action scene. Setting the width of the device screen as our boundries, we can keep the ball in play by keeping it in a loop sequence. Shapes can be created to implement various interactions in our game including collision. We'll learn more about these methods as we continue with our game dev tutorials.
EXAMPLE CODE - Code For This Tutorial.
JUST copy and paste to update your code.
JUST copy and paste to update your code.