
How To Code a Toast Text Message
Prev Page
View All Tutorials
ANDROID - CODING STYLES
If you are just arriving at this page; and you are not familiar with with creating Android Apps, we suggest you begin with our tutorials: Coding Android App Pages and How To Create a Simple App in Android
From there follow along with each tutorial lesson and learn this tutorial - coding a style.
For this tutorial, we are going to learn how to add text styles to our TextView and a customized style definition to our styles.xml. We will also add some additional text to our view.
We are going to use the same app that we created in the previous tutorial, How to Code a Theme
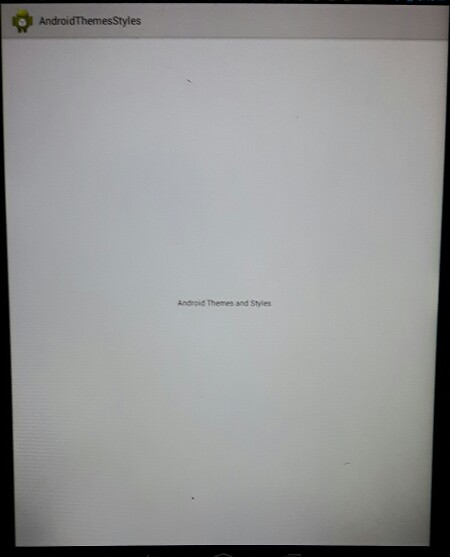
The app has the Theme.Holo.Light with Title Bar.
.
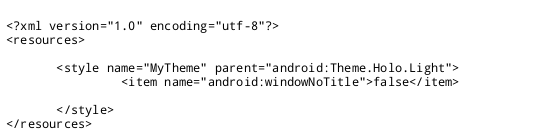
For this tutorial, we are going to use the same theme Theme.Holo.Light
So we do not need to code this as it is already coded from our previous tutorial - coding a theme.
and, here is the code for the theme holo light.
To Open Your App
From the AppProjects folder, just click on the app name(AndroidThemesStyles) then browse to, the androidmanifest.xml file at bottom of files, double click to open it. The file now shows in the
AIDE coding editor. To view all the apps files do either: from right menu choose FILES or GOTO, this will show the apps files along the top of editor, dropdown, and
side menu. Just double click a file to open it in the coding editor.
First lets add our additional text to our strings.xml code:
Learn How To Code A Style Definition
Tutorials at androidappcoding.com
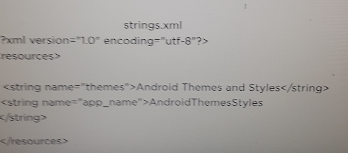
To add this text to our view we must open the strings.xml file, which contains the text for app views. The strings.xml is located in the same
directory as the style.xml
Here is what our strings now look like:
We just add the text we want to the appropriate string
So, we add the text for the view to the THEMES string,
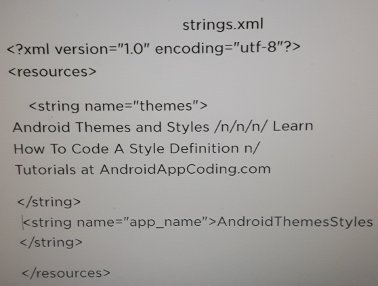
The \n means we want a new line added. Once the text is added SAVE the file. Our new text has been added; Next we code our styles to our textview.
What is Android Style
from developer. android website.......
"A style is a collection of attributes that specify the look and format for a View or window.
A style can specify attributes such as height, padding, font color, font size, background color, and much more. A style is defined in an XML resource that
is separate from the XML that specifies the layout."(1)
In the previous tutorial - Coding Themes - we learned how to add a Theme Style to our entire app.
In this tutorial we will learn to code individual 'Styles' to our TextView, and
a Customized style using the style.xml file.
Whereas a theme is a Style that is applied to an entire app or activity, styles can be used for specific views.
Making a 'customized style' saves you coding
time. Once you code a 'style definition', you can reuse it in any apps you make, - tweek it if you like - add and remove additional style attributes.
You can code numerous style attributes in one textview, however you need to
code them line by line; so if your adding several styles: like height, size, text color, background color; and you have several TextViews to code, it takes
some time to code them all.
Customized Styles
However, if you use a 'customized style definition'; you only have to code one line of code in your TextView; which references all your customized styles in the style.xml file. You can name your customized styles anything you like.
Lets Look At Our Example we are coding for our TextView.
fyi-
The 'TextView' is a view within your activity. You can have as many TextViews as you like in one activity.
An activity is one page of your app.(like a webpage is
one page of a website) You can have as many activities as you like in your app.
This example code shows style code added for:
textSize, textColorLink, textColor, typeface, autoLink
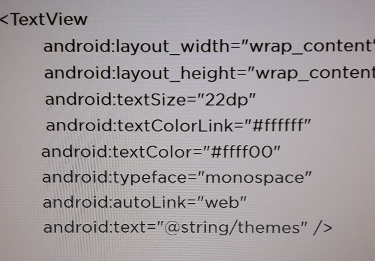
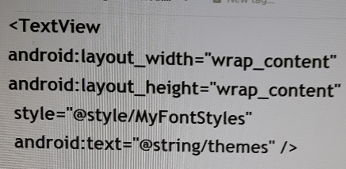
Instead of coding each style separately we can do this:
Put the style codes into a style definition called MyFontStyles,
which is then applied using the style="@style/MyFontStyles as shown in this example code.
Instead of typing several lines of code, we need only type one to code the Style Name we created.
How to Add The Style Definition To Your XML File

The Style Definition code is saved in the xml file named: style.xml
We created this page in our previous tutorial, and since we are using the same app for this tutorial, we do not need to create it again, we just
need to add our code to it for our style definition.
(if you do need to create this style.xml page again, just do the following)
Click on the little orange folder at top of files hierachy; (the one just above the text- add new xml file here), this take you to previous folders till you get to AppProjects,
Once at AppProjects, all app you created are shown, just click on AndroidThemesStyles.

GoTo AndroidThemesStyles/res/values
(Look at top menu as shown in this image, make sure you see AndroidThemesStyles/res/values there)
Next, click on 'add new xml file here'(as shown in this image), type the name 'style' and create file.
The file is created for you.
Looking at this image; you see the style.xml file and the strings.xml file.
And, make sure
your at AndroidThemesStyles/res/values folder.
Add the following code to your style.xml file.
(You can get the actual code to copy/paste into your app from the EXAMPLE CODE on this page.)
You will see also in this style.xml page, the style code from our previous tutorial, which is the code for the theme.holo.light we added.
We still need that code for this tutorial, as we are using the same theme, so you will have the style for the theme, and the style for the style definition
in the style.xml file:
As shown in this image

Once you have added the style code from this tutorial to the style.xml page, SAVE the page.
Now, just SAVE, the file. Next RUN your app to see the changes you made to your text appearance.
From top right menu, click, choose SAVE, then choose, RUN; this runs your app, compiles the code, and updates the app with the newly added code. Then INSTALL, OPEN app.

Now, you can click on APP ICON, (little green android, with the name, AndroidThemesStyles) to view your android app. It is with all the other apps installed on your tablet.
From Android Developer Website
"For each style you want to create, complete the following series of steps:
Add a style element to the file, with a name that uniquely identifies the style.
For each attribute of that style, add an item element, with a name that declares the style attribute.
The order of these elements doesn't matter.
Add an appropriate value to each item element."(2)
Coding Tips
You can make your own styles, use android platform pre-made styles, or use both, yours and and the pre-made ones.
Let's look again at our code from our example style definition:
MyFontStyles is the name we gave our customized style:
And then we add each style attribute to the style.xml file using the ITEM tag for each one:
Our attributes are:
This means our text size is 22 density pixels
item name="android:textSize = 22dp item
this means any links on the page will show in color white, #ffffff is white.
item name="android:textColorLink = #ffffff item
this means our text color will be yellow.
item name="android:textColor= #fffF00 item
this means our text will have the MONOSPACE look.
item name="android:typeface=" monospace item
This means any url we add will be clickable
item name="android:autoLink web item
If we want to, we can add additional items to our 'customized style', for each one added just use the ITEM tag
When you add or remove styles from your style.xml page, just SAVE page after each edit.
There are many styles from many code classes you can use in your apps. For this tutorial we gave an example of 'TextView XML styles'.
You can view all the available style attributes for TextView at the Developer Android website
View all TextView style properties and attributes/values
Also read our Android Article - How to Inherit a Style
COPY/PASTE CODE
You can copy paste the code from this tutorial from our EXAMPLE CODE section on this page.
You can add the code easily to your app code. Create your app at 'Android Themes Styles', tutorial.
JUST copy the code for this tutorial App Name is 'Android Themes Styles' - located at AppProjects/Android Themes Styles in AIDE, open the AIDE app, then open App Projects, THEN select the 'AndroidThemesStyles', app from your files hierachy(left menu); then click on any file from the app, like strings.xml Make sure at top of page, the app name 'AndroidThemesStyles' is there next to AppProjects like so: AppProjects/AndroidThemesStyles, then you know you have the proper App.
Once a file is in the editor, you can edit, save it, then RUN your APP, install,
Open your app.
Make sure you SAVED EACH PAGE, before you RUN your code. SAVE, RUN, INSTALL, OPEN, your AndroidThemesStyles App. Once it has been
installed on your tablet, you can open it Simply by Clicking on the Android little green App Icon,with the wording 'AndroidThemesStyles' on your tablet. It will
be with your other installed apps.
If you make further changes to this App, you need to SAVE, RUN, UPDATE, INSTALL, OPEN the app.
This free script provided by
JavaScript
Kit
AIDE for creating Android Apps on your tablet or cell phone(android).
Free and Paid.
GoTo Aide
ANDROID STUDIO - for creating Android Apps on your desktop computer.
Free to Install and Use
Learn more - Android Studio
The Java XML files we code(example codes) and the Android Apps we create in our Free Tutorials are compatible with Android Studio and AIDE. Just choose Java XML as your Programming Language.
You May Like:
Make Sushi Rolls Taste World Wines Flavours and Aromas
(1) Quoted from....AndroidDeveloper website - https://developer.android.com/guide/topics/ui/themes.html
(2) Quoted from....AndroidDeveloper website - https://developer.android.com/guide/topics/ui/themes.html