Python Tkinter Game Tutorials
Do Read this Tutorial also
Tkinter: Functions, Methods - For This Tutorial
We are going to action a Pixelart warrior(png sprite), and have it move across the game screen. Also, we are coding for portrait and landscape modes, so that the warrior action goes to the edge of the screen in each mode. Additionally, we are going to size our sprite image(warrior_128.png), so that it displays proper on a Windows laptop, and an Android phone, screen size 6.3. Lastly, we set the geometry of the laptop game window size so its' size is similar to landscape mode on an Android phone.
To RUN our game code, we save our codeset to file with the name: 'te2_little_warrior_views.py'
Then run the code; Run code in Python 3.13 REPL, on your Windows laptop or desktop computer.
All code for this tutorial is at the Example Code section on this page. At Game Shot, you can see a image of the game.
FYI: In addition to running your code in Python 3.13 REPL, on your Windows computer, the code from this game dev tutorial can be RUN with Pydroid3, a mobile IDE and Python interpreter, and also ACode's built in Linux terminal(Alpine).
Pydroid3 and ACode have built in code editors you can use to write, edit, copy/paste, and save Python Tkinter code, or any code. These are both available to download and install on your Android phone from Google Play store.
Tkinter: How to Create/Save the Game File
To write our game code file, we are going to use Notepad which is available to use on a Windows laptop or computer. If it isn't already available as an app on your computer, you can download it from the Microsoft store. From your Start menu on your computer just click the icon for Microsoft store. From there, you can browse or do a search for the app you want. Notepad is a basic code editor, and we can paste or write our Python Tkinter code into the editor, and save the file as, example: a mygame.py, py file type. If you prefer to use another coding editor that is fine also.Tkinter Game Shot from Laptop: Sprite Action
Code For This Tutorial
We can discuss each code block in the codeset for this tutorial. The blocks and lines of code are also #commented, making it easier to understand what each section does. As we complete each tutorial, the code becomes easier to understand, because many functions are common to all codesets.Call The Code
Typically, codesets are called when being loaded in the REPL, the Python REPL interpreter on your Windows computer. Although you can also paste the code into the REPL, it can be more problematic, especially, if the code has many lines. For small codesets pasting is fine. And, it is a good way to test small sections of a larger codeset, as you build your game code.
For this tutorial, we load the code into the REPL, on your windows computer, by calling the file's name.
To do that we use the following code:
Once, you paste the code call into the REPL, just RUN the code; tap the enter button on your keyboard twice, and the code will RUN. The game window will display on screen, and the warrior will move across the game screen.
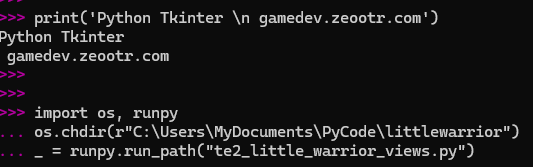
To load the code, use a code call:
#include os.chdir
#use chdir cuz of image
#otherwise, can use simple call
#Replace The Folder Names With Your Own Folder Names
import os, runpy
os.chdir(r"C:\Users\MyDocuments\PyCode\littlewarrior")
_ = runpy.run_path("te2_little_warrior_views.py")
SIMPLE call-ideal for codeset call without images added
If your game has no additional images, for example, you only used Tkinter's built in shapes, then your only running the .py file, and not including any external images/sprites. So the simple code call is fine. It only loads the file.
import runpy
_ = runpy.run_path(r"C:\Users\MyDocuments\PyCode\littlewarrior\te2_little_warrior_views.py")
Adding the _ = is good to do, because by adding it to the code call, you can eliminate a 'linux code dump', which appears on the your screen, after you click the x, in the game to exit the game. Run the code, without the, _ = , and see for yourself.
FYI: Make sure your .py file has 'read, write' access. Click the file, click properties, and apply 'read, write' if not already selected.
Image of Code Call: Game Window Appears
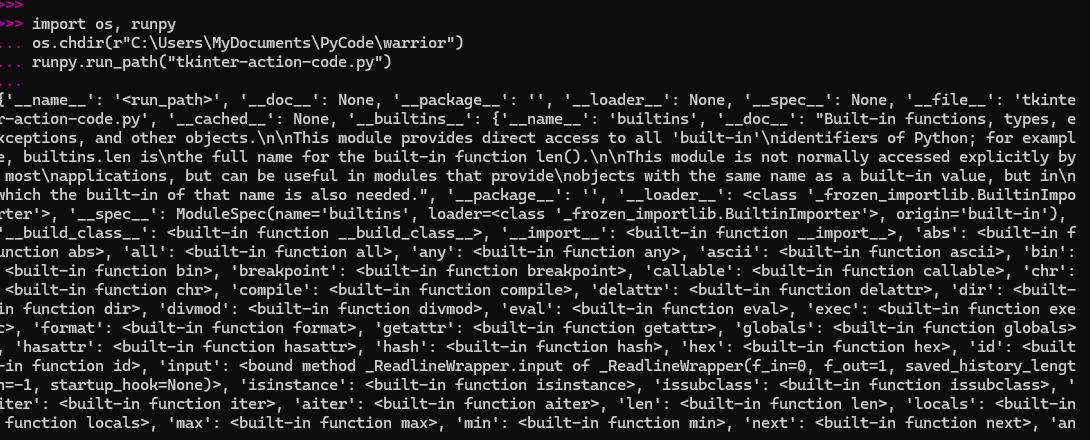
Image of Linux Code Dump: Lots of Data,
Harmless, Just Linux
Our First Code Block
Create our function for 'mygame' with def _init_(self, mygame). Def means to define a function in Python Tkinter.MyGame is the name we give as the function name. You can use any name you like. Use a name that makes sense to you and keep it consistent across all your games, that way, your code will be organized and easier to follow. The function, mygame will be included in most all the blocks of code as we build the game.
Next, set the title for the game with,
self.mygame.title("Warrior App"), then, add it to the canvas. with
self.canvas = tk.Canvas(mygame)
The canvas is where everything gets drawn, game name, sprites, color, action, sounds.
class WarriorApp:
def __init__(self, mygame):
self.mygame = mygame
self.mygame.title("Warrior App")
self.canvas = tk.Canvas(mygame)
self.canvas.pack(fill="both", expand=True)
This next code:
Sets the game's canvas, and add code so it can 'expand' to the size of whatever window it is displayed in. So, in particular, portrait, or landscape, mode on a phone, and also, the game window on a laptop. On all of these the 'sprite' goes to the edge of the game's window/screen, and that is what we want. Every Tkinter game has a canvas.
self.canvas = tk.Canvas(mygame)
self.canvas.pack(fill="both", expand=True)
Toggling For Image Selection:
This next code, we add our sprite warrior, and, add comments so that we can toggle the sprite
- for Windows REPL, and for cell phone
So, if coding on your Windows REPL, uncomment at 'if laptop, and, if coding for your phone, then uncomment 'if on cell phone', so that image's code is used.
The reason for this is because the sprite, warrior_128.png, is 128x128 size, and that is good size for a cell phone screen, however, on a laptop if appears much larger, because cell phone, and a Windows screen have different resolutions.
We can use a built-in, simple Tkinter code, to size the image, so it looks more appropriate on our Windows screen. The code is subsample(4,4). This will resize our image, but only to a smaller size. We can use, 1,1, 2,2, and so on, but no half sizes like 1.5,1.5. With (4,4) we keep the image similar in the game window to how it looks on a 6.3" cell phone. Advantage of this, is that you only have to create the one image - don't have to resize the image, just make the original for cell phone, typically 128x128, then use 'subsample' to resize it for the laptop.
However, if you prefer, you can make two images. Just resize the image itself, and add it using the same code as the original image, just change the image name, and add comment to use it on the computer.
There are several free online image resizers you can use for this. I use the one at imageresizer.com, it works on a cell phone and windows. Just upload your image, select your resize options, and download the image.
# Toggle - unComment, sprite png 128x128
#if on cell phone, android, this code
#self.warrior_img = tk.PhotoImage(file="warrior_128.png")
#if laptop, destop windows, use this code
self.warrior_img = tk.PhotoImage(file="warrior_128.png").subsample(4,4)
Image of Code: Sizing Image for Laptop vs Cell Phone
This next block of code is about the warrior sprite image.
With this code we can position our sprite, move it across the game screen; and set a slight delay when the game first starts to give the game window time to load, so the warrior image loads properly onto the game screen. And, finally, we update our game code, so the timing stays consistent with the action loop. #Comments have been added to explain each section of code.
Code to Note: 'Anchor' determines the where the image positioned at its' location. In this code its' 'nw', northwest. In Tkinter, timing is in milliseconds, so '50ms' or '50' with 'after', means 50 milliseconds.'After' is a timing function in Tkinter, so 'after(50', means after 50 milliseconds start the game loop.
# Vertical position stays fixed
self.warrior_y = 300 - 64
# Create image now, update pos later
self.warrior = self.canvas.create_image(
0, self.warrior_y,
anchor="nw",
image=self.warrior_img
)
#slight delay so canvas opens before the image
self.mygame.after(50, self.start_position)
#positioned for the width,height of the window
def start_position(self):
canvas_width = self.canvas.winfo_width()
canvas_height = self.canvas.winfo_height()
#png loads properly onto canvas
if canvas_width < 50 or canvas_height < 50:
self.mygame.after(50, self.start_position)
return
#warrior speed
self.warrior_x = int(canvas_width * 0.04)
self.warrior_y = int(canvas_height * 0.5) - 64
# Update warrior position
self.canvas.coords(self.warrior, self.warrior_x,
self.warrior_y)
Last Block of Code:
In this code, we attach our game function, mygame, to the Tkinter class. And, we set the screen size to 660x380,(basically landscape mode on 6.3" cell phone) for the windows laptop game. We don't have to set it for the cell phone, because it is already that size, 6.3".Many games are played in landscape mode, especially those with onboard (left,right) controls, like using your keyboard(windows), or onscreen controls(cell phone), to move the characters around. So, using a similar landscape size for the windows' game, and cell phone, is a good idea. With simple tweaks, we can write code that can be played on both platforms.
Next in our code, we add our function 'mygame' to the WarriorApp class. And, lastly, we attach the function 'mygame' to the game's loop. This ensures the game will RUN, once we call the code.
#attach function to tkinter
#set screen size
#attach class to function
#start game loop
mygame = tk.Tk()
mygame.geometry("660x380")
app = WarriorApp(mygame)
mygame.mainloop()
Image of Code: Set Geometry
Summary
In this tutorial, we learned how to implement a simple game sprite warrior and action it across the game screen. We added code so the warrior goes to the edge in both portrait, and landscape mode on a cell phone, and also to the edge in a Windows game. We learned how to code for geometry to set our game window size. And, lastly how to size an image with Tkinter built-in subsample sizing function.With Tkinter we can write our code and build our game on a Windows laptop or computer, and use that same code in Pydroid3 on our cell phone, often with few or no tweaks to the code.
Tkinter has many functions and methods we can use to create our game canvas and to implement action scenarios in our Tkinter games. And, you can create your own functions to customize your game.
Make Your Own Game Sprites
Small size images, like pixelart sprites, are well suited to Tkinter games, because they are usually small in size - 32x32, 64x64, 128x128. Because of their small size, they don't overload the performance of the game.To create your own sprite images, for your Tkinter games, use an online pixelart creator - Pixilart, or a mobile app like - Pixel Studio. For reading on this goto our tutorial, Intro To Making Sprites: What Is Pixelart
To view some free to download sprites I made in Pixel Studio, gohere
Next Tutorial: Chase and Try to Catch the Enemy
Now at Tutorials:Tkinter Tutorials
EXAMPLE CODE - Code For This Tutorial.
JUST copy and paste this code.
JUST copy and paste this code.