
Prev Page
View All Tutorials
eharmony Meet Singles! Canada, USA, Europe - Join Free
If you are just arriving at this page; you can gohere to first - Create your simple Android app
Once you create your App you can follow along with each tutorial.
If you just want to get some code; goto our Android Code Examples by Task section,
where you can quickly browse all code topics.
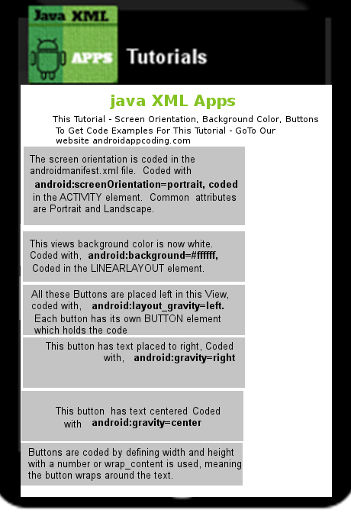
If you are completing each tutorial- This is what Your TUTORIALS App should now look like:
Once we edit our App adding this image and some text
howtoaddimageview_image.png

IMAGEVIEW
the App will look like this;
This is the first Activity(page) of our App;(also known as a View) and all Code elements are placed in the View; There are many View elements you can add to your Android app.
Common view elements are: a TextView, a Button, which we added in our previous tutorial.
In this tutorial: we are adding a ImageView element.
Adding an image to our activity view is done using the Imageview element.
As with previous tutorials, we reference Android Developer website for code classes we are using, and also, you can view all the code class properties/attributes for a specified element.
Create Your App Now
For this tutorial:
...Imageview properties and attributes
....ScaleType for Imageview element
To add an image to your app's view you use the ImageView element.
We will edit the layout file of our App named - Tutorials located at
AppProjects/tutorials/res/layout/main.xml
To add the image we will add the ImageView element with code to the main.xml file, and add the image to our res/drawable-hdpi folder:
Add text to the view; add a string to strings.xml
How To Code
IMAGEVIEWTo add the image to our app's activity view,
we use Imageview , element, and this is placed in our layout file
View code in this image.

To add the actual image to our app, we must add it to our resources folder for images, which is at:
res/drawable-hdpi. We need to place our image into this folder, then simply reference it from our Imageview element that we code into our layout file as shown:
android:src="@drawable/howtoaddimageview_image"
To download the image to your tablet, goto the Example Code section on this page, and Save As, to save it to your tablet. Then place it at AppProjects/tutorials/res/drawable-hdpi folder.
TEXTVIEWS
For the text on the screen, Browse Codes, and androidappcoding.com/code-examples, we use TextView element to add the text, as shown in this image.

Then, reference the strings in the strings.xml file where you place the actual text you want shown on the view for each named string.
Add a string to the strings.xml file for each string you create.

Coding Tips
Adding an Image to Activity View
Android:textColorHighlight ="#eeeeee" - attribute can be used to add a background color to the text link when hovered - as shown in image and example code on this page.Android:autoLink="web" - attribute can be used to make a domain name clickable, as shown in the code for this tutorial. AndroidAppCoding.com/code-examples text is a domain name, therefore, the text is a clickable link because we added the android:autolink="web" attribute to our code.
Each element you add to your Linear Layout,(like images, buttons, textview), are placed in the order they were coded. To code them otherwise,(their placement on the screen) you can use specific attributes from the available attributes of the element you are coding.
In this tutorial's code, we added our Imageview first, then the TextViews. Because we gave the ImageView a Top Margin,(layout_marginTop), it was placed more centered on the view. Had we not added the Layout Margin Top the ImageView's image would be placed at top of the screen view.
For the TextViews we added a layout_marginTop. This is the space allotted not from the top of the screen, but from the previous element. So in our first TextView, we coded a layout_marginTop of 15dp, which is 15dp from the Imageview, not from the top of screen.
There are many attributes and values, you can choose to add to your ImageView element; mostly to do with how you want your
image to be shown within the view.
....read Imageview attributes and values here
This next image shows all changes made to the layout file for our App named - "Tutorials"
You can copy this code and place it in the app layout file to replace the code there now; GoTo our Example Code section on this page to get the code.

Having made our changes: We will now RUN our app to update the app files:
(To RUN your app, click the top right icon in AIDE, the choose RUN. Follow prompts to install, and update the app.)
Then, simply open the app to view it.
This is the code for all edits we have done to our app named Tutorials, for this - Imageview tutorial; so you can just copy and paste to replace the code you now have in your layout file:
main.xml
strings.xml
App Name is Tutorials - located at AppProjects/tutorials in AIDE, open the AIDE app, then open App Projects,
once this code is placed in each page,
save each page, then RUN your code, INSTALL the app, to see the changes made.
This free script provided by
JavaScript
Kit
AIDE for creating Android Apps on your tablet or cell phone(android).
Free and Paid.
GoTo Aide
ANDROID STUDIO - for creating Android Apps on your desktop computer.
Free to Install and Use
Learn more - Android Studio
The Java XML files we code(example codes) and the Android Apps we create in our Free Tutorials are compatible with Android Studio and AIDE. Just choose Java XML as your Programming Language.