
Next Tutorial
How To Add An Image to an Activity View
Prev Page
View All Tutorials
Asian Dating - Meet Asian Singles Online at eHarmony
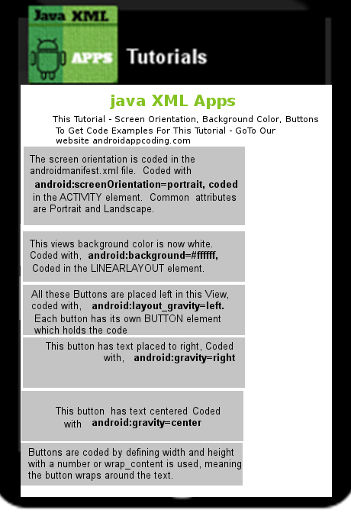
If you are following along and coding with our tutorials - This is what Your TUTORIALS App should now look like:
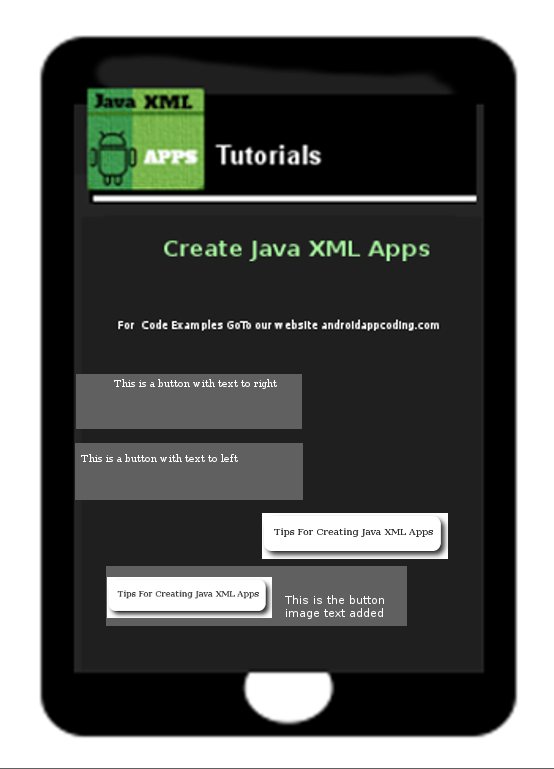
Once we edit our App with this TUTORIAL, the App will look like this;
This is the first Activity(page) of our App; and all items(elements) are placed in the View; The View class has many Properties(code classes) and Elements(attributes) you can add to your App.
To create your own App click the link on this page to create Android App
Once you create your App you can follow along with each tutorial.
In this Tutorial: we are editing the App we created using AIDE; named Tutorials: we are going to:
Change the Appearance with Background Color,
Changing how the screen looks with Screen Orientation,
Positioning text in buttons using Gravity.
As with previous tutorials, we reference Android Developer website with code classes we are using, and also, you can view all the class properties, elements available for any given code class at the website:
For this tutorial:
....how to change View background Color - LinearLayout element, Android View class
....how to change Screen Orientation- ACTIVITY element, also known as an App component(because it is required)
....how to code Buttons - BUTTON element, View class

we use android:background="#ffffff", (white - you can name any color here )
to change the Screen Orientation, placed at Activity element,(androidmanifest.xml file)
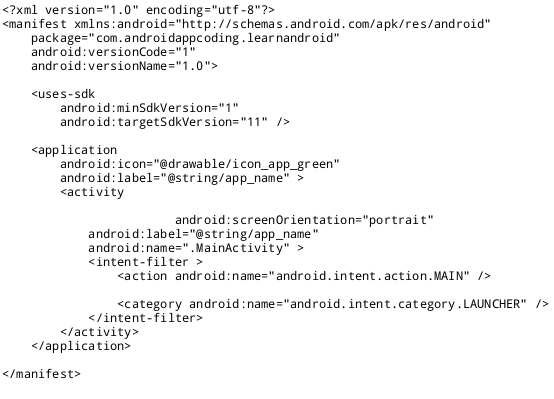
we use android:screenOrientation= "portrait", (portait, more tall than wide, or landscape, more wide than tall )
When the app is opened by a user, the app will present itself, more tall. There are several variations you can also use with portrait, as explained in our Coding Tips section.
As you read in our previous tutorial, BUTTONS can be any size, can be placed anywhere within the View, and can have text or even an image added to them. The text can be placed in different areas on the button, as shown in our tablet screen view image. For this tutorial we added additional buttons and added text properties to place the text in different areas of the buttons.
Coding Tips
There is also another orientation that is commonly used, that being:
Android:orientation,
however, it applies to the screen layout for design purposes, and is coded in the Linear Layout element. The attributes are Vertical and Horizontal. This is coded in the LINEARLAYOUT element.
If your App is going to be used moreso on your phone than a tablet; or you plan to distribute your App at the market places, and phone users is the demographic you are seeking; then Portrait orientation be a better screen view type to use, as cell phone usage at this time is far greater than tablet users; although tablet usage is slowly gaining popularity. And, tablets are better for gaming apps.
Text can be styled using several style properties available in the View class.
Text can also be underlined, bolded, or italized, simply by adding the appropriate code tags in the string itself;
u for underline, b for bold, i for italics. You place the tag around the word(s) you want tagged, as shown in this image.
Strings are placed in the strings.xml file, it is a resource file, located at:
res/values/strings.xml
Attributes and Properties for Buttons at Developer Android website.
Buttons
Having made our changes: We will now RUN our app to update the app files:
(To RUN your app, click the top right icon in AIDE, the choose RUN. Follow prompts to install, and update the app.)
Then, simply open the app to view it.
Here is the image view of all code changes made in this Tutorial for our App named - "Tutorials"
Prev Page
View All Tutorials
Asian Dating - Meet Asian Singles Online at eHarmony
If you are following along and coding with our tutorials - This is what Your TUTORIALS App should now look like:
BACKGROUND COLOR, ORIENTATION, GRAVITY
Once we edit our App with this TUTORIAL, the App will look like this;
This is the first Activity(page) of our App; and all items(elements) are placed in the View; The View class has many Properties(code classes) and Elements(attributes) you can add to your App.
To create your own App click the link on this page to create Android App
Once you create your App you can follow along with each tutorial.
In this Tutorial: we are editing the App we created using AIDE; named Tutorials: we are going to:
Change the Appearance with Background Color,
Changing how the screen looks with Screen Orientation,
Positioning text in buttons using Gravity.
As with previous tutorials, we reference Android Developer website with code classes we are using, and also, you can view all the class properties, elements available for any given code class at the website:
For this tutorial:
....how to change View background Color - LinearLayout element, Android View class
....how to change Screen Orientation- ACTIVITY element, also known as an App component(because it is required)
....how to code Buttons - BUTTON element, View class
To make these changes we will be editing these files and elements:
the App LinearLayout element, which is in the layout file of your App - named main.xml
You can locate it at
AppProjects/tutorials/res/layout/main.xml
the
Activity
element, coded in the manifest.xml file, located at root of your AppProject,
AppProjects/tutorials/androidmanifest.xml
the
BUTTONS element,
also coded in layout file,(main.xml)
How To Code
to change background color: placed at LinearLayout element,we use android:background="#ffffff", (white - you can name any color here )
to change the Screen Orientation, placed at Activity element,(androidmanifest.xml file)
we use android:screenOrientation= "portrait", (portait, more tall than wide, or landscape, more wide than tall )
When the app is opened by a user, the app will present itself, more tall. There are several variations you can also use with portrait, as explained in our Coding Tips section.
As you read in our previous tutorial, BUTTONS can be any size, can be placed anywhere within the View, and can have text or even an image added to them. The text can be placed in different areas on the button, as shown in our tablet screen view image. For this tutorial we added additional buttons and added text properties to place the text in different areas of the buttons.
Coding Tips
Change Background Color For the View
In addition to changing a background to any color you can also add a background image for the background. You can read about this at the Developer Website from the links on this page.Change Screen Orientation
Changing Screen Orientation is done in the Activity element of the androidmanifest.xml file with the common screen orientation attributes being Portrait and Landscape, including variations of each.There is also another orientation that is commonly used, that being:
Android:orientation,
however, it applies to the screen layout for design purposes, and is coded in the Linear Layout element. The attributes are Vertical and Horizontal. This is coded in the LINEARLAYOUT element.
If your App is going to be used moreso on your phone than a tablet; or you plan to distribute your App at the market places, and phone users is the demographic you are seeking; then Portrait orientation be a better screen view type to use, as cell phone usage at this time is far greater than tablet users; although tablet usage is slowly gaining popularity. And, tablets are better for gaming apps.
Adding Buttons and editing them
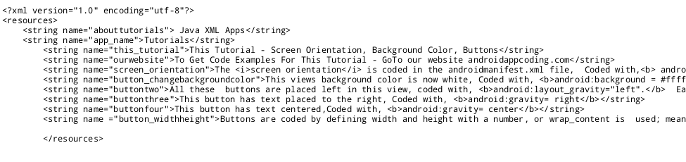
Text can be added to Buttons, and you can also add text to a button with an image. The actual text you want shown in the Button is added to the strings.xml file, as shown in this image of the strings.xml file, and each line of text can have its own string name.Text can be styled using several style properties available in the View class.
Text can also be underlined, bolded, or italized, simply by adding the appropriate code tags in the string itself;
u for underline, b for bold, i for italics. You place the tag around the word(s) you want tagged, as shown in this image.
Strings are placed in the strings.xml file, it is a resource file, located at:
res/values/strings.xml
Attributes and Properties for Buttons at Developer Android website.
Buttons
Having made our changes: We will now RUN our app to update the app files:
(To RUN your app, click the top right icon in AIDE, the choose RUN. Follow prompts to install, and update the app.)
Then, simply open the app to view it.
Here is the image view of all code changes made in this Tutorial for our App named - "Tutorials"
Code For This Tutorial
This is the code for all edits we have done to our app named Tutorials, for this tutorial - Background Color, Screen Orientation, Buttons tutorial using gravity; so you can just copy and paste to replace the code you now have in these files:
strings.xml
main.xml
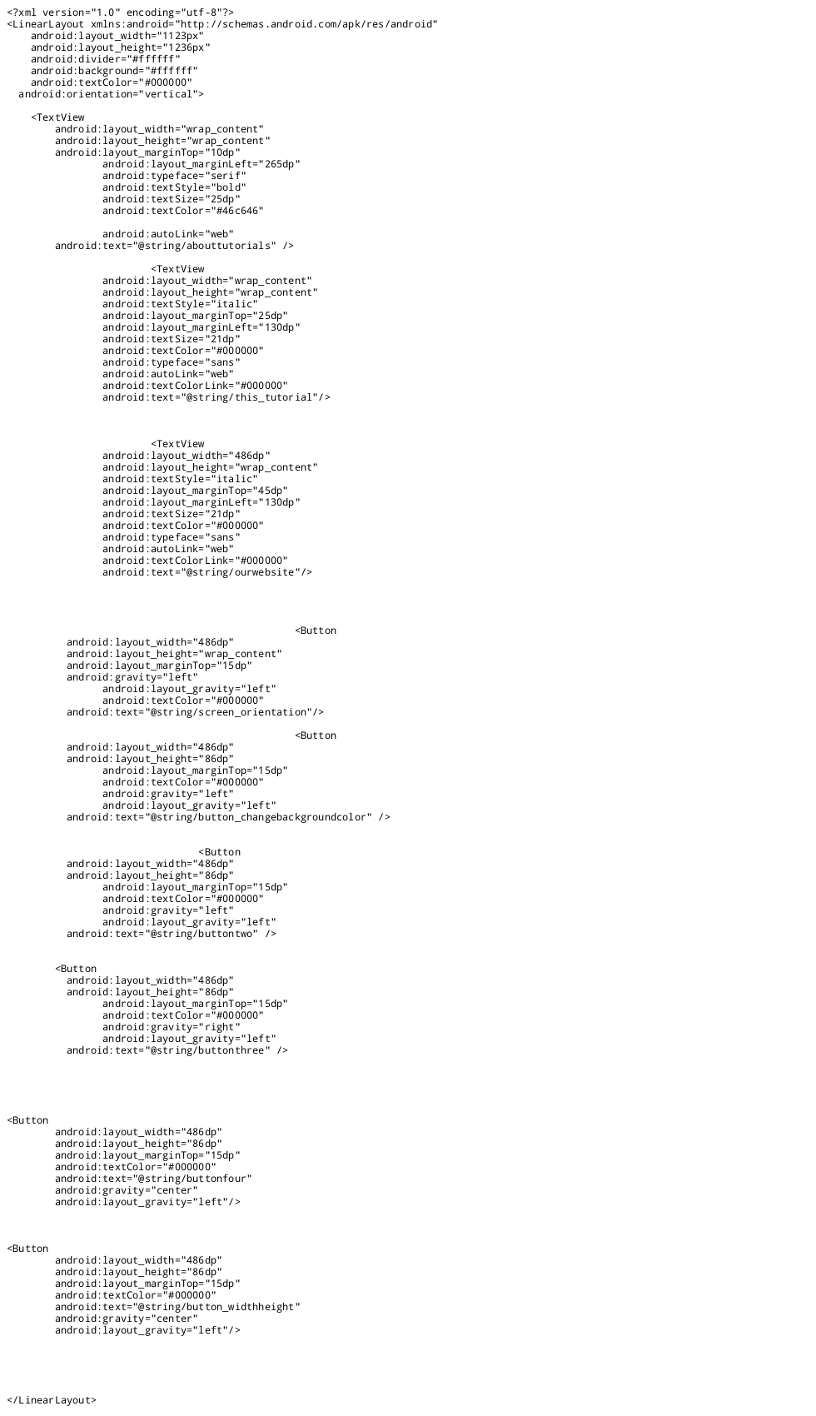
androidmanifest.xml
App Name is Tutorials - located at AppProjects/Tutorials folder in AIDE, open the AIDE app, then open App Projects, then Tutorials folder..keep browsing till you find src folder,,then the file names you need to open..main.xml, strings.xml The androidmanifest.xml you'll see as soon as you open Tutorials folder.
Replace the code with code from this tutorial on each page or where indicated to replace. Then, once the code is placed in each page,
save each page, then Build, RUN your code, INSTALL the app, to see the changes made.
This is the code for all edits we have done to our app named Tutorials, for this tutorial - Background Color, Screen Orientation, Buttons tutorial using gravity; so you can just copy and paste to replace the code you now have in these files:
strings.xml
main.xml
androidmanifest.xml
App Name is Tutorials - located at AppProjects/Tutorials folder in AIDE, open the AIDE app, then open App Projects, then Tutorials folder..keep browsing till you find src folder,,then the file names you need to open..main.xml, strings.xml The androidmanifest.xml you'll see as soon as you open Tutorials folder.
Replace the code with code from this tutorial on each page or where indicated to replace. Then, once the code is placed in each page,
save each page, then Build, RUN your code, INSTALL the app, to see the changes made.
This free script provided by
JavaScript
Kit
AIDE for creating Android Apps on your tablet or cell phone(android).
Free and Paid.
GoTo Aide
ANDROID STUDIO - for creating Android Apps on your desktop computer.
Free to Install and Use
Learn more - Android Studio
The Java XML files we code(example codes) and the Android Apps we create in our Free Tutorials are compatible with Android Studio and AIDE. Just choose Java XML as your Programming Language.
You May Like:
Make Sushi Rolls at Home Taste World Wines Flavours and Aromas